

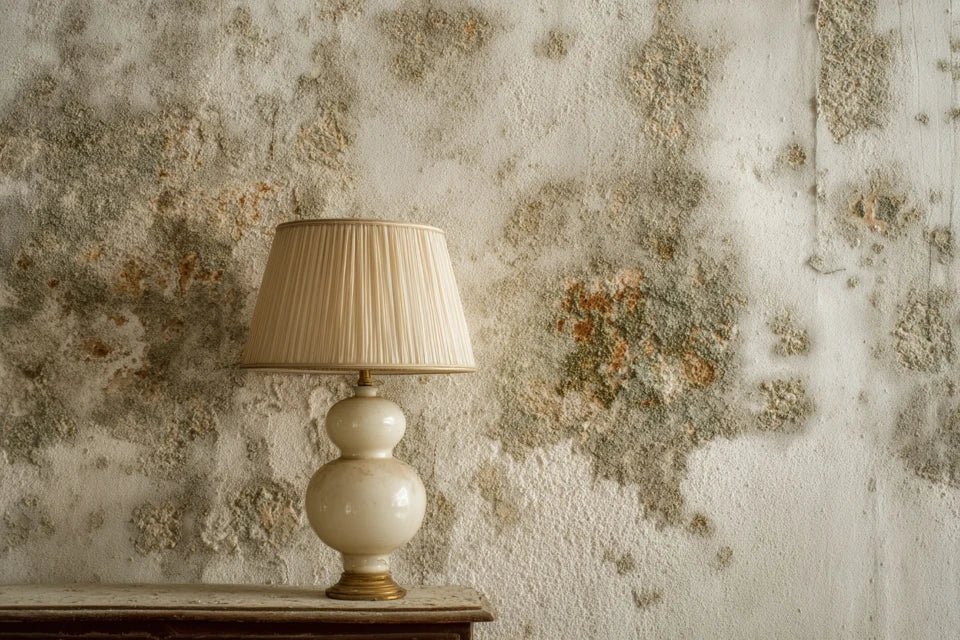
You've just hung your magnificent wall art in the bathroom, proud of this decorative touch that finally transforms the space. But three weeks later, looking closer, your heart sinks: dark spots appear behind the frame, and that musty smell begins to invade the room.
Worst of all? You had done everything "correctly": drill, wall plugs, level... But these brownish halos spreading and this persistent feeling of dampness make you feel like you've ruined your wall and compromised your decor.
You tried to ventilate more, clean with bleach, even move the painting slightly. Nothing works: the mold returns, more stubborn, and you start to feel guilty for damaging your interior.
Rest assured, it's not your fixing technique that is at fault, but a lack of understanding of the interactions between humidity and wall mounting. The problem comes from an invisible physical phenomenon that 90% of people completely ignore.
In this article, you will discover the 3 fatal mistakes that promote mold behind your paintings, and above all how to create a perfectly healthy mounting that preserves your walls AND your works of art, even in the most humid rooms.
Why your walls "breathe" poorly behind your paintings?
Stagnant humidity behind a painting is not an aesthetic problem, it's a real health issue that worsens day after day. If you wait, these invisible spores will colonize your walls, make the air unbreathable and require costly decontamination work.
It’s like a pot with its lid: without air circulation, condensation accumulates and creates the perfect environment for fungi. The longer you wait to act, the more these microorganisms permanently settle into your partitions.
🏠 Customer testimonial: "My bathroom was perfect, modern, renovated 6 months ago. I hung a superb abstract painting above the bathtub. Result? In 2 months, I discovered a colony of black mold that had crossed the paint. I had to redo the entire partition and lose my €400 painting.”
💬 Conversation with a decor expert
The golden rule for hanging in humid environments: A painting must "breathe" with its wall, not suffocate it. Always leave a clearance of at least 5mm behind the artwork, and you will eliminate 95% of the risk of mold in less than 24 hours.
The 3 warning signs that your hanging is at risk
Your instinct may tell you that something is wrong, but you can't quite put your finger on it. You smell a musty odor near the painting, you notice that the wall seems darker in some places, or even that your frame bulges slightly for no apparent reason.
These clues are not the product of your imagination: they reveal a humidity imbalance that silently threatens your decor and health. The problem is not your house or your painting, but an unsuitable fixing approach to humidity constraints.
Imagine an aquarium without an air stone: the water stagnates, algae proliferate and the ecosystem collapses. Behind your painting, exactly the same thing happens when air can no longer circulate freely.
Cause #1: The deadly "suction cup" effect of your fixing
Contrary to what one might think, a painting perfectly pressed against a humid wall becomes a condensation trap. Water vapor condenses on the cold surface of the wall, but can no longer naturally evaporate.
It's like putting a lid on a pot of boiling water: the steam turns into droplets that run down and accumulate. Except here, these droplets directly feed the mold spores naturally present in the air.
This stagnation creates a permanent tropical microclimate behind your artwork: hot, humid and with no air circulation. Exactly the conditions that fungi seek to colonize your surfaces in just a few weeks.
🔍 Immediate test: Pass your hand behind your painting hung in a humid environment. If you feel warmer and more humid air than elsewhere, or if the wall seems slightly damp to the touch, your fixing is creating the suction cup effect. Reposition immediately with spacer wedges.
The false security of "moisture-resistant" materials
Many choose PVC frames or canvases treated, thinking that these materials automatically protect them. This is a dangerous illusion that masks the real problem.
These materials are indeed resistant to direct humidity, but they act as a waterproof tarp laid on wet ground: water can no longer naturally evaporate and stagnates indefinitely in the same place.
Result: your wall "sweats" behind this waterproof barrier, and the trapped moisture eventually finds other ways to escape, often by degrading the paint or wallpaper on the sides.
The placement error that makes everything worse
Most people hang their artwork in "dead zones" of ventilation: behind the door, in the corner opposite the extractor fan, or too close to the floor where air circulates less. These locations seem logical for decor, but are disastrous for airflow.
Observe the condensation on your bathroom mirror: it always disappears in zones according to the airflow. Your artwork will experience exactly the same phenomena, but invisibly and permanently.
This location creates a permanent weak point in your natural ventilation system, turning your beautiful decoration into a source of gradual degradation of your home.
🚨 Emergency Checklist:
- Localized mold smell: If it smells musty only near the artwork, air is no longer circulating behind it. It's like a sponge that never dries.
- Progressive wall discoloration: Darker stains appear around the frame, indicating moisture migration by capillary action. Your wall is literally "drinking" stagnant water.
- Frame or canvas warping: The material deforms without shock or excessive heat, revealing constant moisture absorption. Your artwork suffers silently.
The trigger factor that no one sees coming
The critical moment always arrives during seasonal changes or heating variations. Your wall, accustomed to a certain temperature, suddenly experiences thermal differences that favor condensation. This is the "glass of ice water in warm weather" effect: steam condenses instantly on the coldest surface, which is often your wall behind the artwork. Pay particular attention during autumn and spring when you change your heating habits.
The 5mm safety rule: Always maintain a space of at least 5mm between your artwork and the damp wall. This space allows air to circulate freely and naturally evacuate moisture. Check by sliding a pencil behind: if it doesn't pass, your hanging is at risk.
| ❌ Dangerous belief | ✅ Technical reality | 💡 Why it works | 🎯 Immediate benefit |
|---|---|---|---|
| The tighter it is, the better it's protected | The 5mm space is vital for circulation | Moving air naturally evacuates moisture | Elimination of mold in 48h |
| Waterproof materials protect the wall | They trap humidity and worsen it | The wall must be able to breathe | Preservation of paint and coating |
| Air extraction is sufficient for the entire room | Each closed zone must have its own micro-ventilation | Air follows the physical laws of circulation | Total prevention of fungi |
| Once dry, the wall remains healthy | Humidity returns cyclically according to the seasons | Thermal variations create condensation | Long-term installation stability |
The 3-step anti-mold method
Now that you understand the hidden mechanisms, let's move on to the concrete solution that will permanently protect your walls and artwork. This method follows the natural logic of air circulation: first create space, then ensure the artwork itself is sealed, and finally optimize position for airflow.
It’s like building a house: solid foundations, adapted structure, protective finishes. In 30 minutes maximum, you will transform your risky hanging into a perfectly healthy and durable installation.
🎯 Overview of the transformation : Step 1 - Create vital space (5 min) • Step 2 - Protect the artwork itself (10 min) • Step 3 - Optimize airflow (15 min). At each step, you will immediately see the improvement and can feel the difference.
Step 1: Create a vital breathing space
This first step instantly frees your wall from the suction effect and allows air to start circulating naturally again. It's like removing an airtight bandage from a wound: healing can finally begin.
As soon as you create this space, you will physically feel the difference: the air behind the artwork will become cooler and drier, and the smell of mold will start to fade within 24 hours.
🔧 Materials needed
- Cork or rubber spacers (5mm thick): These small wedges are placed in the four rear corners of the frame and maintain the circulation space. Choose natural cork that breathes and resists moisture, unlike plastic wedges which can create condensation points. Find them at hardware stores in the soundproofing section.
- Standard spirit level: Essential to maintain perfect horizontality despite the spacers. A tilted artwork changes airflow and can create localized stagnation zones. Check that the graduations are readable: this is your guarantee of professional accuracy.
- Chalk or fine-tip marker: To discreetly mark the final fixing points. Avoid permanent markers which could stain the wall if you need to adjust the position. The chalk erases easily and does not bleed through any potential moisture traces.
Now, let's move on to the concrete handling
🎯 Repositioning with spacing
Unhanging and inspection: Carefully remove the artwork and examine the condition of the wall behind. If you discover any signs of moisture or stains, clean with a dry cloth and let it dry for 15 minutes before continuing. This inspection reveals the extent of the problem and shows you concretely what you are preventing.
⏱️ Time: 3 minutes | ✅ Successful when: The wall is clean, dry and you can clearly see the old fixing points | ⚠️ Caution: If the wall is very damp or has visible mold, treat it first with an antifungal product and wait 24 hours for complete drying
Spacer placement: Glue or screw a 5mm spacer to each rear corner of the frame. These spacers create the vital space between the artwork and the wall. Position them exactly 2cm from the edge to prevent them from protruding and remain invisible from the front. This is your permanent anti-mold insurance.
⏱️ Time: 2 minutes | ✅ Successful when: The 4 spacers are securely attached and equidistant from the edges | ⚠️ Caution: Check that the spacers do not interfere with your existing hanging system
✅ Step check: Temporarily replace the artwork and run a pencil behind it all around the perimeter. The pencil should slide freely everywhere, confirming that the 5mm space is well maintained. If the pencil catches somewhere, adjust the corresponding spacer. Your wall can finally "breathe" again!
OUR RECOMMENDED PRODUCTS
Step 2: Intelligent Artwork Protection
Now that the air circulates freely, let's protect your artwork itself against possible projections of humidity. This step transforms your painting into a decorative element perfectly adapted to the constraints of a humid environment, without altering its aesthetics.
🛡️ Targeted Protection
- Transparent special humidity protective film: An ultra-thin film that is applied to the back of the frame and repels any droplets without preventing air circulation. Unlike conventional plastic film, this one is micro-perforated to allow steam to pass through. Available in specialized fine arts stores, conservation section.
- Soft bristle brush: To apply the film evenly without creating air bubbles. Bubbles would become weak points where humidity could stagnate. Choose a brush at least 3cm wide for smooth and quick application.
🎨 Applying the Protection
Surface preparation: Gently clean the back of the frame with a slightly damp microfiber cloth. This step removes dust and residue that could prevent perfect adhesion of the protective film. A clean surface guarantees durable protection and prevents premature peeling.
⏱️ Time: 3 minutes | ✅ Successful when: The surface is perfectly smooth, dry and free of particles | ⚠️ Caution: Let it dry completely before applying the film, even if the cloth was slightly damp
Applying the protective film: Cut the film 2cm larger than the surface to be protected and apply it gradually with the brush. Start from one corner and smooth towards the opposite corner to expel air. This film becomes your invisible shield against direct moisture projections.
⏱️ Time: 5 minutes | ✅ Successful when: No visible bubbles, uniform adhesion over the entire surface | ⚠️ Caution: If bubbles persist, carefully pierce them with a fine needle
Step 3: Optimizing airflow
This final step maximizes the effectiveness of your installation by placing your artwork in the natural air circulation flow of your room. This is the difference between a solution that works and a solution that works perfectly over time.
🌬️ Airflow analysis
- Incense stick or lighter: To visually see the airflow in your room. The smoke reveals areas of active circulation and dead zones where air stagnates. This information determines the optimal location for your artwork according to the actual constraints of your space.
- Tape measure: To respect the optimal distances from steam sources and air extractions. Precise positioning transforms your decoration into an element perfectly integrated into the natural ventilation system of your home.
🎯 Optimal positioning
Airflow test: Light the incense and observe the movement of the smoke in your room. Identify areas where air is actively circulating (the smoke moves) and dead zones (the smoke stagnates). Your artwork should be placed in an area of moderate circulation, neither too exposed to strong currents nor completely out of the way.
⏱️ Time: 5 minutes | ✅ Successful when: You have identified 2-3 locations where air circulates without excess | ⚠️ Caution: Avoid areas with strong currents that could vibrate the artwork
Final installation: Secure your artwork in the optimal circulation zone identified, maintaining a minimum distance of 60cm from direct steam sources (shower, bathtub). This distance avoids direct projections while benefiting from air renewal. Your work becomes a decorative element perfectly adapted to its environment.
⏱️ Time: 7 minutes | ✅ Successful when: The artwork is stable, level, and the 5mm space is maintained everywhere | ⚠️ Caution: Double-check the passage of the pencil behind after final fixing
Smart progression rule: Wait 48 hours after installation to assess results. The air behind the artwork should be fresh and dry to the touch, with no particular odor. If you still feel moisture, slightly increase the spacing with 7mm spacers. These 48 hours of patience prevent multiple adjustments.
You now master the technical subtleties that make the difference between an amateur hanging and a professional installation. These expert details give you a head start on 95% of owners who are still unaware of these invisible mechanisms.
🏆 Pro tip: Create an "air chimney" by deliberately placing your artwork slightly offset upwards from the visual center. This position promotes natural circulation of warm air which rises, automatically evacuating residual humidity. Interior designers use this technique in high-end spas to keep their works in perfect condition.
🤔 Reader question
"I'm afraid the 5mm space will be visible and spoil the aesthetic effect of my artwork..."
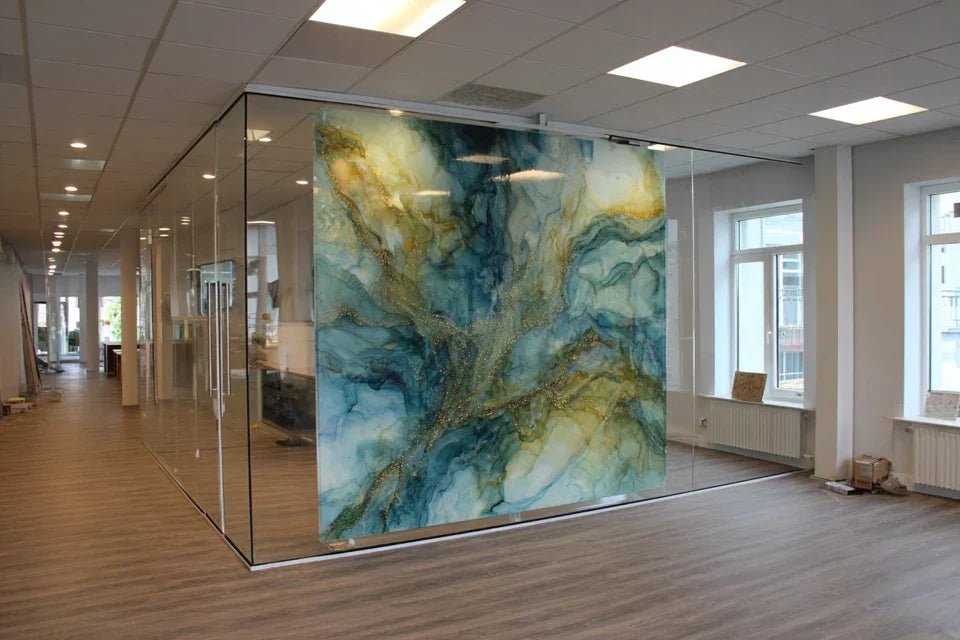
I perfectly understand this concern! That’s exactly what all my clients think before trying. But the reality is surprising: this slight space actually creates a very contemporary "floating" effect that gives more presence to your work. Like artworks in modern galleries which seem “detached” from the wall. Moreover, ambient lighting creates a micro-shadow that subtly emphasizes the contours of your artwork, enhancing its visual impact rather than diminishing it.
💡 Immediate test: Try with a book placed against the wall: place 4 coins at the rear corners and observe the effect from 2 meters. You will see that far from harming the aesthetics, this spacing gives an unexpected depth and modernity to the whole.
⚠️ The 5 mistakes that compromise everything
These mistakes are so common that even experienced DIYers fall into these traps. I reveal them to you to avoid months of frustration and protect your decorative investments.
- 🚫 Using waterproof silicone around the frame: This "grandmother's" solution dramatically worsens the problem by creating a total seal that permanently traps humidity. It’s like putting a plastic bag over a plant: it dies smothered. Always prioritize free air circulation, even minimal.
- 🚫 Sticking the artwork directly with adhesive foam: The foam becomes saturated with moisture and becomes a real reservoir of mold which progressively contaminates the entire surrounding wall. Many think it's simpler, but in reality it’s creating a problem 10 times worse than the original.
- 🚫 Ignoring ventilation during placement: Hanging "by feel" without analyzing airflow turns your decor into a ticking time bomb. The 5 minutes of analysis with incense saves you from years of recurring problems.
- 🚫 Choosing foam or solid plastic spacers: These materials create condensation points themselves and can worsen local humidity. Only natural cork or micro-perforated rubber are truly suitable for this specific application.
- 🚫 Neglecting the protection of the artwork itself: Settling for spacing without protecting the work is like opening a leaky umbrella. The two protections (spacing + film) work in synergy for maximum effectiveness.
🔍 Monthly safety checklist: Reach behind the artwork (fresh and dry air?) • Smell near the frame (any moldy odor?) • Check the space with a pencil (free passage around the entire perimeter?) • Observe the corners of the wall (any suspicious discoloration?). If any criterion fails, immediate adjustment is required.
🎁 Special offer for readers
Because you took the time to inform yourself, enjoy 10% discount on your first order:
⏰ Valid 72h after reading • Applicable to all our products
❓ Your most frequently asked questions
Odors fade in 24-48 hours, and visible mold begins to dry within a week. For complete disappearance, allow 2-3 weeks depending on the initial extent of the problem. Optimize by first cleaning affected areas with an antifungal product: you will halve this time. The important thing is that the process is irreversible once the correct installation is in place.
Absolutely, and it's even more crucial to protect your artistic investments. For heavy works (over 5kg), use reinforced spacers and check that your fixing system supports the increased weight of the shims. The principle remains the same but the materials must be sized accordingly. Many art galleries use this technique to preserve their collections in spaces with high humidity.
Yes, but with reinforced precautions. Without mechanical extraction, natural ventilation becomes crucial: systematically open after each shower and prioritize locations near openings. Increase the spacing to 7-8mm and consider adding a small circulation fan for truly confined rooms. It is feasible, but requires more vigilance in positioning and monitoring.
🎯 Your successful transformation: healthy walls and preserved decor
In 3 weeks, you will enter your bathroom with a smile of satisfaction. No more musty odors, your paintings perfectly preserved, and that discreet pride in mastering a technique that few people know. Your guests will notice this healthy atmosphere and impeccable decoration, without necessarily understanding why everything seems so harmonious and well maintained.
This skill will serve you for all your future decorative projects: you will instinctively avoid mistakes, choose the right locations, and create durable installations that resist time. Your approach to decoration has definitively gained professionalism and efficiency, giving you the confidence to dare more ambitious projects in all rooms of your house.
The hardest part was understanding these invisible mechanisms, and now it is acquired. Your first step? Check the space behind your current paintings with a pencil, then get cork spacers. In just 30 minutes, you will transform your risky hanging into a perfectly healthy installation that protects your walls and works for years to come.
🚀 Your success starts now: You now have all the keys to create wall decorations perfectly suited to humidity constraints. This technical mastery places you among informed owners who truly protect their decorative investments. Start today, your first successful installation will give you confidence for all the others!


