

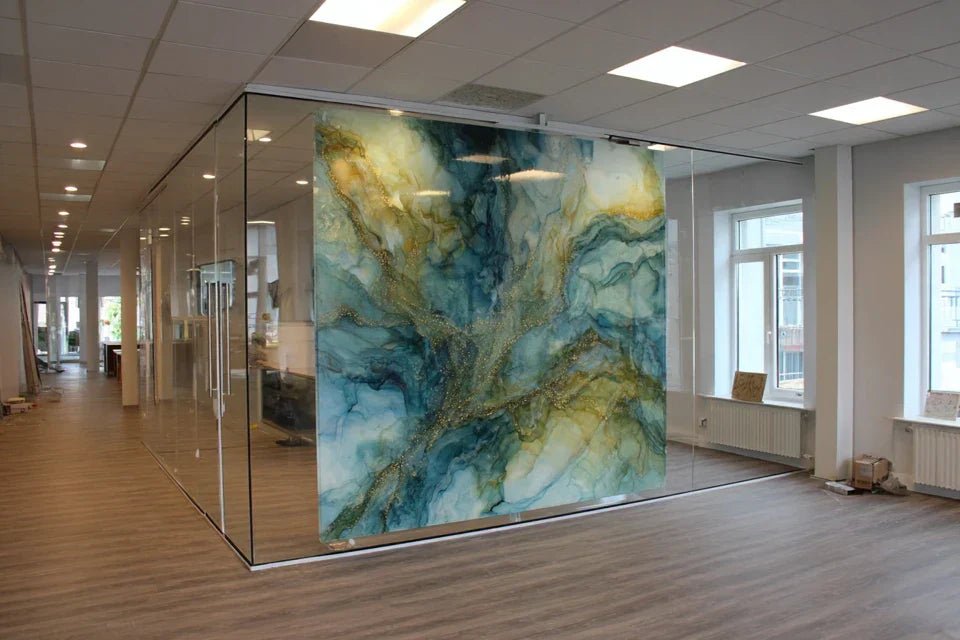
You've just fallen for this stunning acrylic glass artwork that would perfectly illuminate your living room, but here's the thing: you face your drywall partition and anxiety sets in. "What if I drill in the wrong spot? What if everything collapses?"
You can already imagine the gaping hole, rubble on the floor, and that dream artwork broken at your feet. This fear of weakening your wall paralyzes you, and your work of art remains leaning against the sofa for weeks.
You may have tried classic solutions: standard anchors, nails, or even those famous "universal systems" that promise mountains and wonders. Result? Holes that get bigger, fixings that move, or worse: spectacular falls.
Don't worry, it’s not your fault. Modern partitions require a specific approach that most sellers ignore. The secret? Understand that your partition is not your enemy, but an ally waiting for the right technique.
By the end of this article, you will master the 3 foolproof techniques to confidently hang your glass artwork on any partition, and you'll even discover how to transform this "weakness" into a sophisticated decor asset.
Why Your Glass Artwork Deserves More Than Just A Nail?
Installing an acrylic glass artwork on a fragile partition is like trying to hang a crystal chandelier from a paper lampshade. Without the right technique, you risk not only weakening your wall but also depriving your interior of that modern elegance that only glass can bring. The time is pressing: every day without this artwork on the wall is an atmosphere of refinement escaping you.
💡 Customer testimonial: "I waited 6 months before daring to hang my 80x60cm plexi artwork. Result: my BA13 partition held perfectly with the right technique, and now my guests keep asking me where I found this 'reinforced' partition! In reality, it’s just standard drywall."
💬 Conversation With A Decor Expert
The golden rule of partitions: A well-distributed fixing always holds better than a punctual fixing, even on concrete.
Result: your artwork will be more stable than with a simple nail, and you’ll sleep soundly. Allow 30 minutes of preparation for years of serenity. You probably feel this underlying frustration: your wall sounds hollow when you tap it, you can already imagine the disaster, and you constantly postpone the installation moment.
This constant hesitation prevents you from fully enjoying your new artwork.
In reality, your plasterboard partition is not fragile by nature. It’s just designed differently.
Like a sailboat that navigates differently than an ocean liner, it simply requires an adapted approach.
Imagine your partition as a sophisticated sandwich: two slices of solid plaster with an intelligent honeycomb core.
The secret is to make the whole thing work, not just the surface.
Contrary to what everyone believes, a modern partition can support more weight than a poorly secured stone wall.
The difference? The distribution of forces and the hanging technique.
It's like the difference between carrying a backpack with a thin strap (painful) or with wide shoulder straps (comfortable).
Same weight, totally different sensation.
This limiting belief deprives you of elegant solutions and pushes you towards frustrating compromises: artworks placed on the floor, unsightly fixings, or outright abandonment.
Change your approach, change your results.
🔍 Quick Test: Press firmly with the palm of your open hand against your partition for 10 seconds. It doesn't move? Congratulations, it can easily support 20kg with proper distribution!
Most people think you need "the right nail in the right place" to succeed.
In reality, multiple fixings create a safety net that is much more effective than a single point, even a perfect one.
Think of a spiderweb: each thread is thin, but the whole thing captures prey much heavier than itself.
Your artwork benefits from the same principle of intelligent distribution.
This "multi-point" approach frees you from the pressure of the "perfect shot" and gives you a comfortable margin of error.
Less stress, less measuring to the millimeter: safety through redundancy.
No one has explained to you that today's specialized anchors are little technological gems.
They no longer look like our grandparents’ Fisher wall plugs.
You can easily check this: observe how your anchor behaves during drilling.
A modern anchor "blooms" behind the plasterboard, a classic anchor "pushes" against the surface.
This difference changes everything in your daily experience: no more worrying vibrations, no more constant adjustments.
Your artwork finds its definitive place from the first installation.
🎯 3 Signals of a "Ready" Partition:
What really makes a difference is understanding your partition rather than just enduring it.
Like a pilot who knows their aircraft, you anticipate its reactions and exploit its strengths instead of fighting against its specifics.
Result: each installation becomes a predictable success and your confidence grows with each new project.
Universal Rule: A partition that accepts a 6mm wall plug without crumbling can support 15kg distributed over 2 points. Always test on a discreet corner before final installation.
Now that you understand the real issues, let's move on to practice with a totally secure approach.
This progressive method leads you from your first hesitant drill hole to complete mastery, like learning to drive: first the empty parking lot, then the road, finally the highway.
At each stage reached, you gain confidence and technical precision, until you can install any artwork in 15 minutes flat.
🏗️ Overview of Progression: Step 1 = Preparation & Resistance Test (safety), Step 2 = Standard Installation (efficiency), Step 3 = Expert Finishing (elegance). Each level gives you immediate satisfaction and naturally prepares the next.
Starting with preparation is like building solid foundations: invisible but essential.
This step avoids 95% of future problems and gives you the serene confidence of professionals.
Once completed, you will be certain that your partition is ready and compatible.
Location and marking of area: Use your detector to identify metal studs, then mark a "free" zone of at least 60cm. This zone will give you the freedom to position according to pure aesthetics. The technical detail: the studs are spaced 60cm apart on average, so you always have an ideal central space. ⏱️ Time: 5 minutes | ✅ Successful when: You have a marked area without metal detected | ⚠️ Attention: Electrical outlets can sometimes distort detection - stay away from 20cm Discreet resistance test: Drill a test hole of 6mm in a little visible corner (behind a future piece of furniture). Insert an anchor and test with 5kg for 30 seconds. This manipulation reveals the true capacity of your partition and reassures you definitively. ⏱️ Time: 10 minutes | ✅ Successful when: No movement, no noise, no cracks | ⚠️ Attention: If the anchor spins in the void, go to the next size up (8mm) Tracing of definitive reference: With your laser level, draw a horizontal line at the desired height over 80cm wide. This line will serve as an absolute reference for all your future pictures. Pro technique: also mark the precise locations of the fixings according to the attachments of your picture. ⏱️ Time: 5 minutes | ✅ Successful when: Perfectly straight line visible over the entire width | ⚠️ Attention: Too thick pencil = difficult-to-erase traces, use an H or 2H pencil ✓ Step 1 Validation: Your zone is identified, tested and marked. You should see a clean straight line and feel a well-anchored wall plug during your test. If in doubt about the solidity, repeat the test with a larger wall plug. Well done, you now master the fundamentals!Understanding What’s Really Going On Behind Your Wall
First Hidden Cause: The Illusion of "Fragility"
Second Cause: The Myth of Single Fixing
Third Cause: Ignorance of Modern Materials
The Trigger Factor: Confidence in Your Support
❌ Common Belief
✅ Technical Reality
💡 Simple Explanation
🎯 Practical Benefit
Partitions are fragile and dangerous
They can easily support 20kg when properly fixed
Sandwich structure designed for distributed load
Peaceful installation without fear of breakage
You absolutely must hit the metal frame
The gypsum board is sufficient with the right wall plugs
Modern wall plugs create an anchor in the thickness
Total freedom of aesthetic positioning
The heavier it is, the more risky it is
Weight matters less than distribution
Physical principle: contact surface × adhesion
XXL artworks possible with appropriate technique
One fixing = one hanging point
Multi-point system = exponential security
Redundancy and stress distribution
Maximum stability and comfortable margin of error
The Progressive Method: From Beginner to Expert in 3 Steps
Step 1: Intelligent Preparation & Resistance Test
🔧 Essential materials for success
🎯 Methodical execution of step 1
OUR RECOMMENDED PRODUCTS
Step 2: Technical Installation and Securing
You are now moving to the next level: the actual installation of your artwork. This step transforms your preparation into a visible result and gives you that immediate "mission accomplished" satisfaction. The snowball effect begins here: each successful gesture reinforces your confidence for the next ones.
🔩 Level 2 Specialized Materials
- Adapted countersunk screws: Choose stainless steel screws of at least 40mm with a countersunk head to sit perfectly flush. Criterion: diameter slightly smaller than the wall plug for optimal progressive tightening. Avoid pan-head screws which create a stress point.
- Distribution washers: Small metal pieces that distribute pressure over a larger surface. Principle: divide the constraint to multiply the resistance. Impact: 10x longer fixing life and elimination of sinking risk.
- Specialized picture hanging system: Prefer hooks with a locking system to simple rings. Quality index: breaking load announced higher than the weight of your artwork. Benefit: perfect stability without oscillation.
🎯 Step 2 Methodical Installation
Precise definitive drilling: Follow your markings and drill at a moderate speed (level 2 out of 3) to avoid overheating. Vacuum up dust as you go for a clear vision. The secret: drill in a regular movement without jerks to preserve the integrity of the plasterboard.
⏱️ Time: 15 minutes | ✅ Successful when: Clean holes without burrs, uniform depth | ⚠️ Attention: Drill bit that heats up = risk of hole enlargement, take breaks
Wall plug and screw installation: Insert the wall plugs by hand until flush, then gradually tighten the screws feeling the resistance increase. Halfway through, the wall plug expands behind the partition - this is the key moment. Finish with a firm but not excessive tightening.
⏱️ Time: 10 minutes | ✅ Successful when: Screw stable, washer well seated, no play | ⚠️ Attention: Excessive tightening = risk of weakening, stop as soon as it is firm
Load and final hanging test: First, suspend a weight equivalent for 2 minutes to check stability. Then hang your artwork checking the final horizontality. Adjust if necessary with the fixing adjustment systems.
⏱️ Time: 5 minutes | ✅ Successful when: Artwork perfectly straight and stable | ⚠️ Caution: First delicate handling - handle the artwork with two people if >5kg
✓ Validation step 2: Your artwork is hung, straight and stable. Test by applying slight lateral pressure: it should not move. The result should make you want to start over on other walls. On to step 3 for expert finishes!
Step 3: Expert Finishes and Aesthetic Optimization
You are now reaching the level of mastery that makes the difference between a DIYer and a connoisseur. This step transforms a functional installation into an exceptional achievement you will be proud of for years to come. Your guests will notice this professional finish without being able to explain why "it looks more expensive".
🎨 Expert Finish Materials
- Fine filler: Special paste to mask micro-defects around the fixings. What does it do: erase any trace of drilling for an invisible finish. Where to buy it: paint departments, a 200ml tube is enough for 20 artworks. Quality criteria: drying without shrinkage or cracking.
- Precise touch-up brush: 5mm brush for localized micro-paint retouching. Principle: surgical intervention rather than repainting the entire wall. Quality index: synthetic bristles that do not shed. Impact result: invisible finish even at 30cm.
- LED accent lighting: Adjustable spotlight to reveal your artwork in the evening. Advantage: enhances artwork investment and creates a sophisticated atmosphere. Criteria: color temperature of 3000K to respect artistic colors.
🎯 Exceptional Finishes Step 3
Perfectionist retouching: Fill the micro-spaces around the fixings with the fine filler applied by finger. Smooth immediately with a damp cloth for a perfect blend. Once dry (2h), touch up the paint with the precise brush. Pro technique: take paint from a hidden area for a color-matched blend.
⏱️ Time: 20 minutes + drying time | ✅ Successful when: Fixings invisible at 50cm distance | ⚠️ Caution: Filler applied too thick = shrinkage during drying and rework necessary
Lighting optimization: Position an accent light at a 30° angle from the artwork to avoid reflections. Ideal distance: 1.5 times the width of the artwork. This light reveals the nuances of your glass work and creates a sophisticated focal point in the room.
⏱️ Time: 15 minutes | ✅ Successful when: Even lighting without parasitic reflections | ⚠️ Attention: Avoid direct frontal lighting that creates annoying reflections on the glass
Final check and adjustments: Step back 2 meters and examine the whole. Check horizontality from different viewing angles. Adjust if necessary with micro-adjustment systems. This step guarantees a perfect result from all points in the room.
⏱️ Time: 10 minutes | ✅ Successful when: Impeccable result from all angles | ⚠️ Attention: Room lighting influences perception - test during the day AND in the evening
Expert progression rule: You can consider yourself an expert when installing a new artwork takes less than 30 minutes and the result is technically invisible. Patience for mastery, ambition for results.
You now master all fundamental techniques, but some expert subtleties can transform a good installation into a masterpiece of precision. These tips give you the decisive advantage of professionals and explain why some installations "work" more than others.
🏆 Little-known pro tip: Tilt your artwork slightly towards the wall (2-3°) to compensate for perspective optical effect. This museography technique eliminates the impression of a "picture falling forward" and optimizes vision from seating areas. Result: natural elegance that intrigues without anyone knowing why.
🤔 Frequent question from our readers
"What if my partition makes a strange noise when I tap it? Can I still install my artwork?"
Excellent question that shows you are attentive to detail! This "strange noise" can indeed be worrying, but often simply reveals the normal alveolar structure of modern plasterboard. The real question is not the sound, but the rigidity: press firmly with your palm. If the surface remains stable, your partition is perfectly able to receive your artwork. The hollow sound is normal, it's the flexing that would be problematic. Trust your hands more than your ears for this diagnosis.
💪 Confirmation test: Press with both palms simultaneously over 50cm width for 15 seconds. No flexing = guaranteed green light for your installation, even with a 15kg artwork.
⚠️ Pitfalls to absolutely avoid (we protect you!)
After guiding hundreds of installations, we have identified the 5 recurring mistakes that turn a serene installation into a nightmare. These errors are human and predictable, but totally avoidable when you know them.
- 🚫 Underestimating wall thickness: Attempting to choose anchors at random, but an anchor that is too short will not properly embed in the drywall. Consequence: unstable fixing that degrades quickly. Solution: always measure the thickness (13mm standard) and choose 40mm minimum anchors. This is mistake #1 for beginners.
- 🚫 Forcing the initial screwing: The desire to "tighten well" leads to forcing from the beginning, but anchors need to expand gradually. Result: deformed anchor and compromised hold. Alternative: slow screwing with increasing resistance. Monitor your sensations more than your strength.
- 🚫 Neglecting final horizontality: Obsessed with technique, one forgets to check that the painting is straight. Impact: crooked painting that irritates the eye daily. Correction: systematic verification with a spirit level after hanging. 2 minutes to avoid months of frustration.
- 🚫 Ignoring tool wear: A dull drill bit heats up, widens the hole and weakens the fixing. Symptom: fine chips instead of clean chips. Solution: replace the drill bit at the first signs of excessive effort. A drill bit costs €3, a broken painting costs much more.
- 🚫 Rushing the final handling: The excitement of seeing the result leads to manipulating the painting alone, even when it is heavy. Risk: fall during hanging, damaged painting and fixings. Wise method: two people for any painting >5kg, even with the best fixing.
🛡️ Anti-failure verification system: Before each step, ask yourself these 4 questions: "Are my tools in good condition?", "Does my technique respect the pause times?", "Is my intermediate result consistent with the criteria?", "Do I have the necessary help for the next step?". Warning signs: abnormal resistance, unusual noise, suspicious visual result, physical fatigue.
🎁 Special reader offer
Because you took the time to inform yourself, enjoy 10% discount on your first order:
⏰ Valid 72h after reading • Applicable to all our products
❓ Your most frequently asked questions about glass paintings
Allow 45 minutes to 1 hour for a complete first installation, including finishes. Once the technique is mastered, 20-30 minutes are enough. To optimize: prepare all tools before starting and work in good weather (humidity slows down drying times). Concrete example: our Marseille client installed 3 paintings in 1h30 after his first experience.
Initial investment €15-20 in specialized materials versus €5 for standard wall plugs, but x10 durability and a professional result. Real savings: fewer corrections, less retouching, less stress. Think investment rather than expense: these tools will serve for all your future artworks.
🌟 Your transformation: from hesitation to expertise
In a few weeks, when you look at your magnificent glass artwork perfectly integrated into your decor, you'll have trouble remembering that initial apprehension. Your guests will compliment this "beautiful professional installation" without imagining that you did it yourself. This discreet pride and newfound confidence in your technical abilities positively color your relationship with your interior.
Beyond the artwork itself, you have acquired a transferable skill: this understanding of modern partition walls will serve you for all your future decor projects. Shelves, mirrors, luminaires... you now approach each installation with the serenity of someone who masters their environment. Your apartment becomes a playground for creativity rather than a technical obstacle.
Understanding was indeed the most difficult part. Now that you know why it works, execution becomes natural. Your first concrete step? Gather your tools and plan 2 hours of peace and quiet this weekend. Your future self will thank you for taking the plunge today rather than postponing it.
🚀 Your moment has arrived: You have all the keys in hand to transform this hesitation into concrete success. Your artwork deserves more than to be leaning against the sofa, and you deserve the satisfaction of a perfectly successful project!


