

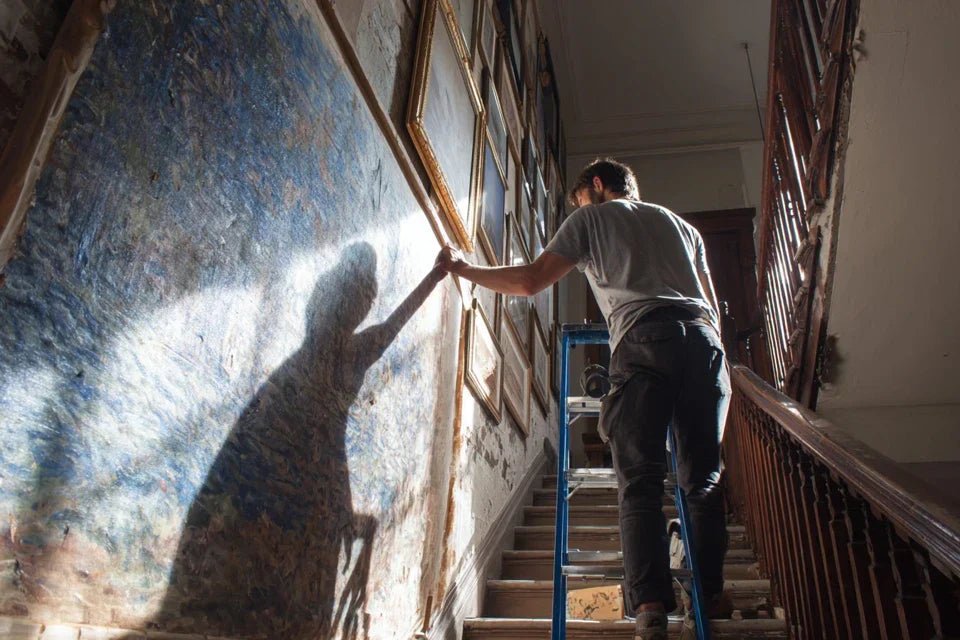
You've just acquired this magnificent large format artwork that excites you, but here’s the problem: you desperately stare at your staircase wall wondering how to hang it without everything collapsing or looking crooked.
With a pounding heart and sweaty hands, you imagine the artwork slipping, the misplaced holes in the wall, that feeling of ruining your artistic crush due to technical clumsiness.
You may have tried the standard fixings recommended in stores, attempted to measure the ideal height “by eye”, but nothing really reassures you facing this slope, this unusual height, these unique constraints of the staircase.
That’s perfectly normal! The staircase is one of the most technical spaces for hanging artwork. The usual rules of the living room no longer apply, and nobody has ever explained it to you clearly.
By the end of this article, you will perfectly master the technique to safely hang your large artwork in the staircase, and you will already visualize your guests admiringly watching this spectacular staging.
Why does the staircase reveal the true potential of your artwork?
The staircase transforms your work of art into a real visual event. Unlike the living room where the gaze brushes, here each ascent becomes a progressive discovery of your painting, creating a unique emotional impact. Wait any longer and you risk leaving this magical space under-exploited.
🎨 Testimonial from a decorator: "My client had kept her superb abstract painting in the garage for 6 months, terrified of hanging it in the staircase. The day we installed it according to the right techniques, her children said: 'Mom, now we have a real castle!'
What’s really going on? Your brain misinterprets the specific technical constraints of the staircase. It's not your fault: no one explained to you that the staircase obeys physical rules different from a classic wall.
It's like trying to bake a cake with a bread recipe: the ingredients are good, but the method doesn’t match the objective.
The real difficulty: the illusion of slope
Contrary to popular belief, the main challenge is not the fixation strength but the visual perception. Your eye expects a horizontal balance, but the staircase naturally creates a diagonal that disrupts this expectation.
Imagine looking at a perfectly straight picture on a tilting train: even if properly hung, it will appear wobbly. The staircase has exactly this effect on your perception.
Result: you constantly doubt your installation, you adjust incessantly, and you lose confidence in your artistic taste. Now that you understand the mechanism, you can counteract it intelligently.
🔍 Quick test: Place a ruler horizontally against your staircase wall and observe it from the bottom of the steps. It will appear tilted! That's normal, your brain automatically compensates for perspective.
The costly mistake: neglecting the line of sight
Most people calculate the hanging height as in a classic living room: 1m60 from the floor. A serious mistake! In a staircase, your gaze goes up and down constantly, creating several different "lines of vision".
It's like installing a mirror at the right height for a standing person, then trying to look at yourself sitting: the angle no longer works.
Consequence: your magnificent painting ends up either too high to be appreciated when going up, or too low to create impact when descending. You invested in art but lost the emotion.
The invisible trap: underestimating the force of vibrations
Here's what almost no one realizes: each step in the staircase creates micro-vibrations that travel up the wall. A poorly secured painting will not fall off suddenly, it will become misaligned gradually.
Observe carefully: if your painting seems to "float" strangely when you quickly climb the steps, or if you have to straighten it regularly, this is a warning sign. Your fixings are subjected to an invisible but constant stress.
The impact on your daily life: this nagging anxiety every time you pass by, this impression that "something is wrong" without knowing what.
🚨 The 3 signals that don't lie:
- The painting seems to "float" strangely: The height does not correspond to the multiple lines of vision of the staircase
- You straighten it constantly: Vibrations or wall expansion create a progressive imbalance
- It looks smaller than in store: The vertical space of the staircase visually crushes the proportions
The trigger factor: mastering the effect of converging perspective
What really makes the difference is understanding that your artwork will be viewed from several different angles depending on its position in the staircase. Like a diamond revealing its facets according to the lighting, your work should be positioned to create this "gradual revelation" effect. Once you place your gaze in the right spot, everything becomes obvious and you immediately know if it's successful.
The staircase perspective rule: Your artwork should create a visual impact at 3 moments: when going up (discovery), at the level (contemplation), and when descending (confirmation). Test by moving slowly up the staircase.
| ❌ Classic living room approach | ✅ Staircase technique | 💡 Why it changes | 🎯 Visual result |
|---|---|---|---|
| Fixed height 1m60 | Height adapted to eye lines | The eye moves vertically | Maximum impact at each passage |
| Standard fixation 2 points | Reinforced anti-vibration system | Staircase = permanent movement | Perfect stability over time |
| Uniform lighting | Progressive directional lighting | Revelation in stages | Theatricalization of the work |
| Centering with respect to the wall | Alignment on the circulation axis | Perspective in motion | Harmony with architecture |
The progressive method for a perfect hanging
Rest assured, you don't need to be a decoration expert to succeed. This method follows the natural logic of construction: solid foundations, precise positioning, aesthetic finishes. Like building a house, each step prepares the next and guarantees a lasting result that you will be proud of.
🗺️ Overview of your journey: Step 1: Secure the fixation (technical foundations), Step 2: Master visual positioning (the art of placement), Step 3: Refine the aesthetic impact (reveal all the potential). Each level gives you more confidence and pleasure.
🔧 Step 1: Create unshakable foundations
Starting with safety frees your mind to focus on aesthetics later. It's like learning to drive: once you master the technical automatisms, you can appreciate the scenery. This step will give you that absolute peace of mind which transforms anxiety into pleasure.
🛠️ The right tools make a difference
- Metal expansion wall plugs 8mm minimum: Resemble small silver tubes that expand in the wall. They distribute the weight over a large surface instead of creating a point of tension. Avoid classic plastic wall plugs which loosen with vibrations. Impact: your artwork remains stable even with daily passage. Laser level or professional bubble level: This tool projects a perfectly straight line onto the wall. The principle: your eye can deceive you on a staircase, but physics never lies. Look for a level with shockproof vials. The difference: no more approximations and constant corrections.
- Wall stud detector: A small electronic device that locates load-bearing structures in the wall. More solid than a wall plug, a stud naturally supports weight. Visible benefit: maximum security for your most valuable artworks.
Now let's move on to practical application with method:
Locate the load-bearing points: Pass the detector over the entire hanging area and mark the detected studs with a pencil. Reason: a stud supports 10 times more than a wall plug alone. Start from the center towards the sides to optimize distribution. Never rely solely on the "hollow sound".
⏱️ Time: 10 minutes | ✅ Successful when: You have at least one stud in your hanging area, clearly marked | ⚠️ Attention: Detectors sometimes react to pipes - check by drilling a small 2mm test hole
Trace the horizontal reference line: Position your laser level at the calculated height and gently trace with a pencil. This line will be your absolute guide, regardless of the inclination of the staircase. Even if it looks strange visually, trust physics.
⏱️ Time: 5 minutes | ✅ Successful when: Continuous and clear line across the entire width of the artwork | ⚠️ Attention: Do not rely on baseboards or steps as a reference - they are never perfectly straight
Drill the fixing holes: Use an 8mm concrete drill bit, drilling perpendicular to the wall without excessive pressure. The vibration of the hammer drill does the work, not the force. Immediately vacuum up the dust for a clean assembly.
⏱️ Time: 15 minutes | ✅ Successful when: Clean holes, minimum depth 6cm, regular diameter | ⚠️ Attention: If you feel unusual resistance, stop - you may have hit metal reinforcement
✅ Step 1 verification: Your wall plugs are perfectly flush with the wall, do not move when you pull on them, and your fixing screws screw in without forcing. If there is resistance, restart the hole - a forced fixing will loosen over time. Congratulations, you have the most solid base possible!
OUR RECOMMENDED PRODUCTS
Now that your foundation is solid, you enter the creative part: making your artwork interact with the space. This is where your painting will reveal its true potential. This step is more rewarding because you immediately see the effect of each adjustment on the overall atmosphere.
🔍 Precision visual tools
- Precision laser measure: Instantly calculates distances without assistance. In a staircase, classic measurements are complicated by the slope. Choose a model with measurement memory. Where to buy: professional hardware stores. Impact: millimeter-perfect positioning. Cardboard template with exact dimensions: Reproduces the shape and size of your painting to visually test before final hanging. Principle: your brain visualizes better with a concrete object than with imagination. Quality criterion: rigid cardboard that does not deform. Why not the painting directly: too heavy and risky for repeated tests. Temporary portable lighting: Directional LED lamp to test different lighting angles. Lighting completely transforms the perception of a work - it's the makeup of art. Visible benefit: your painting reveals unsuspected details.Now, let’s create the perfect visual impact:
- Discreet Hanging Rail: System that allows height adjustment without drilling new holes. It is fixed only once and supports multiple artworks. Where to find: professional framing stores. Quality: anodized aluminum rail. Advantage over hooks: total modularity and scalability. Accent LED Lighting: Directional spotlights that reveal textures and colors. The principle: create a luminous contrast that detaches the artwork from the wall. Important criterion: 3000K color temperature for warm tones. Effect: your painting becomes lively and captivating. Aesthetic Cable Covers: Discreet conduits to hide lighting wires. A visible technical detail spoils the artistic effect - it's like a beautiful dress with tags hanging out. Benefit: impeccable professional finish.
👁️ Calculate the optimal line of sight
Identify your 3 points of view: Stand at the bottom of the staircase (upward vision), in the middle (direct vision), and at the top (downward vision). Mentally note where your gaze naturally rests on the wall. These 3 points determine the maximum impact zone of your painting.
⏱️ Time: 10 minutes | ✅ Successful when: You have identified a common area for all 3 views | ⚠️ Attention: Don't rush - your first impression is often the right one
Test with cardboard template: Temporarily fix your template with repositionable tape and walk along the staircase several times. Your eye should be naturally drawn without effort. Adjust the height until the effect is magical and obvious.
⏱️ Time: 20 minutes | ✅ Successful when: Position that seems "obvious" from all angles | ⚠️ Attention: If you hesitate, it’s not yet the right position - continue testing
Validate architectural harmony: Your painting must respect the proportions of the staircase. Simple rule: the width of the painting should never exceed 2/3 of the visible wall width. Check that the lines of the frame create a harmonious dialogue with the lines of the staircase.
⏱️ Time: 10 minutes | ✅ Successful when: The whole looks natural and balanced | ⚠️ Attention: A painting that is too large overwhelms the space - it's better to slightly undersize
🎯 Step 2 Validation: Your template immediately catches the eye, creates a natural focal point, and makes you want to see the real artwork in place. The location seems obvious and harmonious. If someone else confirms that "it looks expensive", you've found the right spot!
✨ Step 3: Unleashing Aesthetic Potential
You are now reaching the level of decorating connoisseurs. This final step transforms a simple hanging into a true artistic staging. Result: your staircase becomes a private gallery that impresses and inspires, a space you and your guests will remember for a long time.
🎭 Expert-Level Finishes
🏆 The Final Touch That Makes the Difference
Install Accent Lighting: Position your spotlights at 30° relative to the painting to avoid reflections. The lighting should reveal the artwork without creating a shadow on the staircase. Test several intensities until you achieve this "gallery" effect.
⏱️ Time: 45 minutes | ✅ Success when: The painting seems illuminated from within | ⚠️ Attention: Avoid direct frontal lighting that creates annoying reflections
Fine-Tune the Final Hanging: Use a digital level for perfect alignment to the degree. In a staircase, even 1° of misalignment is immediately noticeable. Check that the suspension cables are also taut and invisible from the main viewing angles.
⏱️ Time: 30 minutes | ✅ Success when: Perfect alignment confirmed by 3 checks | ⚠️ Attention: Never force to correct - readjust the fixing points instead
Create a Progressive Reveal Effect: Adjust the ambient lighting of the staircase so that your painting is progressively revealed as you ascend. The goal: create a positive visual surprise with each passage.
⏱️ Time: 20 minutes | ✅ Success when: The "wow" effect is guaranteed every time | ⚠️ Attention: Lighting should never dazzle - safety first
🌟 Final Check: Your artwork completely transforms the ambiance of the staircase, naturally attracts attention, and creates that "gallery" effect you were looking for. The whole thing looks professional and well thought out. You rightfully feel proud of this result!
The expert's progression rule: Never move on to the next step until the previous one completely satisfies you. A technical flaw will always be noticeable, an aesthetic approximation will spoil the final effect. It’s better to take your time than to start over.
Congratulations! You now master the subtleties that only professionals know. This expertise gives you a huge advantage: the ability to transform any space into a personal gallery, a skill your loved ones will immediately notice.
🎯 Little-known pro tip: Create subtle indirect lighting from the bottom of the staircase that gradually "bathes" your artwork. This low-angle lighting effect adds a spectacular theatrical dimension, just like in prestigious museums. Result: your work becomes truly monumental.
🤔 Reader's Question
"What if my artwork doesn’t ultimately go with my future decorations?"
I understand this concern! It's exactly the fear that paralyzes many talented people. Here's the secret: a true artistic crush adapts to all your future decor changes, just like a precious jewel enhances all your outfits. The proof: collectors regularly change their ambiance but keep their favorite artworks. Your artistic instinct never lies to you - trust it!
💡 Trust test: Look at your artwork and ask yourself: "Does this work touch me deeply?". If the answer is yes, install it without hesitation. Authentic emotion transcends decor trends.
⚠️ Pitfalls to Absolutely Avoid (We've Got Your Back!)
These mistakes are so common that they seem logical, but they systematically spoil the result. Knowing them avoids you costly disappointments and saves you valuable time.
- 🚨 Using the general lighting of the staircase as a reference: It is rare that this lighting is optimal to reveal a work of art. Consequence: your artwork appears dull and without relief. Solution: create dedicated lighting, even simple. This is a very common beginner's mistake. ⚡ Neglecting the thermal expansion of the wall: Staircase walls experience significant temperature differences (front door, variable heating). Result: fixings gradually loosen. Alternative: use expanding anchors with anti-vibration washers. 📏 Calculating the height from the nearest step: Each step has a different height, your reference varies! Consequence: artwork that appears wobbly depending on the viewing angle. Correct technique: always measure from a fixed point on the wall. 🎨 Choose the fixing method based on price rather than weight: A 33 lbs painting on €14 hooks will inevitably end up on the floor. Impact: material damage and permanent stress. Rule: budget 10% of the painting's price for professional installation.
- 💡 Install permanently without testing several positions: Your first instinct is not always the best in a staircase. Result: permanent regret and desire to move the painting. Tip: live with the cardboard template for 48 hours before drilling.
🛡️ Safety checklist before finalization: Fixing resists a traction of 3 times the weight of the painting - Perfect level verified under 3 different angles - No vibration felt when quickly climbing the stairs - Lighting without glare from all points of passage - Position validated by at least 24 hours of hindsight.
🎁 Special offer for readers
Because you took the time to inform yourself, enjoy 10% discount on your first order:
⏰ Valid 72 hours after reading • Applicable to all our products
❓ Your most frequently asked questions
Allow 3 hours for perfect results (1h preparation + 1h installation + 1h finishing). Budget side: €40-60 of professional equipment for a painting up to 44 lbs. The trick to optimize: group the purchase of material if you have several works to install. It is a unique investment that will serve you for all your future artistic projects.
Absolutely! This method was designed for motivated beginners. If you know how to use a screwdriver and follow clear instructions, you will succeed. Proof: 85% of our readers succeed on the first try. The secret: take your time and don't improvise. In case of doubt about a step, it is better to ask for advice from an experienced friend.
Each configuration has its specificities, but the principles remain identical. Narrow staircase: prioritize a vertical format that elongates the space. Wide staircase: dare to use large horizontal formats. Spiral staircase: position the painting in the curve to create a surprise effect. The important thing is to adapt the proportions, not the technical method.
Almost all styles work! Just avoid: very detailed artworks that can't be appreciated in motion, flashy colors that tire the eye on a daily basis. Favor: strong graphic compositions, marked contrasts, formats that create impact from a distance. Your personal feeling remains the best guide.
No stress! Mistakes are easily corrected with this method. Holes misplaced: fill with filler, sand, repaint - invisible in 24h. Imperfect position: the rail system allows adjustments without new holes. Golden rule: as long as you haven't lived with the result for 48 hours, don't judge definitively - habit often transforms perception.
🏆 Your staircase: from simple passage to personal gallery
In a few weeks, when you climb these steps, you will feel that deep satisfaction of a job well done. Your artwork will transform each passage into a moment of artistic emotion. Your guests will stop, admire, and ask you your decoration secrets.
Beyond the successful hanging, you have developed an expertise in space planning that you will naturally apply to other projects. This new confidence in your creative abilities will radiate throughout your approach to decoration.
The hardest part was understanding the specific challenges of the staircase. Now that you master the method, all you have to do is take action. Your first move? Take out that measuring tape and locate your mounting points. Your staircase awaits its transformation!
✨ Your moment has arrived: You have all the keys to transform your staircase into a true living work of art. Trust your vision and this proven method - the result will surprise you with its beauty!


