

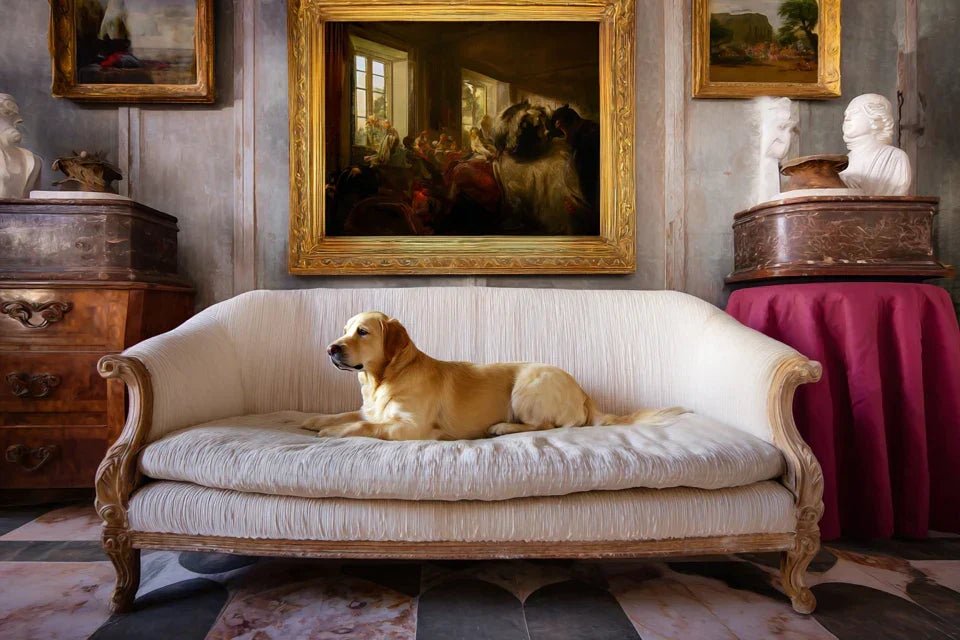
You’ve just hung your new wall art with so much love, and then your cat jumps on it or your dog brushes against it while running. Your heart sinks: what if your wall artwork fell and broke?
This scene repeats in thousands of homes every day. The patter of paws, unpredictable jumps, frantic runs in the living room... Your pets transform your interior into a playground, with no consideration for your precious wall art.
You may have already tried moving your frames higher, prohibiting access to certain rooms, or even scolding your four-legged companions. But nothing works: anxiety remains, and you no longer fully enjoy your decor.
Rest assured, it’s neither your fault nor that of your animals. The problem simply comes from a lack of knowledge about secure hanging techniques and protection strategies adapted to homes with pets.
By the end of this article, you will master all the tips to effectively protect your wall art, create a harmonious environment where art and animals coexist peacefully, and regain that sought-after decorative serenity.
Why securing your wall art can’t wait?
Every day spent without adequate protection of your artwork is an increased risk of accident. Imagine the frustration of seeing a valuable painting break, not due to natural wear and tear, but because of a simple animal movement. It’s like driving without a seatbelt: you tell yourself it happens to others, until the day... This negligence also deprives you of the authentic pleasure of your decor. You can no longer admire your wall art with peace of mind.
🏠 Real testimonial: Sarah, owner of an energetic Bengal, saw her beautiful 200€ abstract painting fall during a nighttime chase between her two cats. "I had postponed securing it due to lack of time. Result: broken frame, torn canvas, and a 200€ lesson. Since then, all my paintings are perfectly secured."
💬 Conversation with a decor expert
The 24-hour rule: Securing a painting properly today can save you years of worry. It's like installing a smoke detector: 30 minutes of effort for years of peace of mind. Immediate observable result: you rediscover the pleasure of contemplating your works without stress.
Understanding why your previous attempts have failed
You probably recognize yourself in these situations: you constantly reposition your paintings after each "incident", you tried to teach your animals to avoid certain areas, or you simply hoped that "it wouldn't happen". Sound familiar?
What’s really happening is that you are fighting the symptoms instead of treating the cause. The problem isn't your animal or your decor, but the lack of an integrated protection system from installation.
It's like trying to hold water with your hands rather than using a suitable container. Your energy is dispersed instead of focusing on the real solution.
🔍 Hidden first cause: The illusion of a "standard" hanging
Contrary to what many think, a classic hanging is absolutely not designed to withstand unpredictable animal movements. Most standard systems are designed for static environments, without vibrations or accidental contacts.
It's like using city shoes for hiking: it works in appearance, but at the first difficult terrain, the limits appear.
This misunderstanding leads you to underestimate the risks and adopt a false sense of security. Result: you think you are protected when your installation remains vulnerable to the slightest solicitations.
✋ Quick test: Gently touch the corner of your painting with the back of your hand. If it moves or wobbles, your hanging is not suitable for an environment with animals. You have just simulated a light animal contact.
🎯 Second hidden cause: Lack of knowledge about animal behavior indoors
Many believe that animals naturally avoid decorative objects or that they can be "trained" not to approach walls. The reality is quite different: your companions use the vertical space as natural territory and passageway.
It's like forbidding a fish to swim: you go against deeply ingrained instincts.
This lack of knowledge leads you to adopt repressive strategies rather than preventive ones, creating constant tension between decorative pleasure and animal well-being.
⚡ Third hidden cause: The neglected domino effect
What almost no one notices is that the fall of a painting can trigger a chain reaction. An animal frightened by the noise may knock over other objects, injure itself, or develop a lasting fear of this space.
Observe your animal after a loud noise in the house: it usually avoids the area for several days, a sign that the psychological impact exceeds simple material damage.
This oversight transforms a single incident into a lasting behavioral problem, affecting the overall harmony of your home.
🔍 3 warning signs to watch out for:
- Oscillations after passing: If your artwork moves when an animal passes nearby, it's because the vibrations from the floor are transmitted to the wall. Sign of insufficient anchoring.
- Paw prints on the wall: These marks reveal repeated contacts. Your pet uses this area as a support or passage; you need to adjust the protection.
- Sudden avoidance of an area: If your animal suddenly avoids an area they used to frequent, they may have experienced stress related to an unstable object. Major warning sign.
💡 The trigger factor: The critical height
What really makes the difference is understanding your animals' natural collision zone. Each species and size of animal has its preferred height of movement. It’s a domino effect: once you identify this zone in your home, everything else organizes itself naturally. Observe for 2-3 days at what height your animal naturally touches the walls when moving around. This data becomes your security reference.
The one-meter safety rule: Any artwork located within a one-meter radius of animal walkways should benefit from reinforced protection. Check immediately by standing in front of your artwork and extending your arms: if you touch a walkway, security is mandatory.
| ❌ Common misconception | ✅ Reality on the ground | 💡 Simple explanation | 🎯 Concrete benefit |
|---|---|---|---|
| A simple nail is enough for a small artwork | Every artwork requires an anchoring proportional to the environment | Vibrations and contacts multiply constraints by 10 | Zero accidental falls, even with active animals |
| You need to educate the animal to avoid the area | You need to adapt the installation to natural behavior | Modifying the environment is more effective than modifying behavior | Immediate harmony without stress or frustration |
| Anti-fall systems are unsightly | The best protections are invisible | Modern security prioritizes aesthetic discretion | Maximum protection without decorative compromise |
| It's complicated and expensive to set up | A few simple steps are enough for total safety | 80% of the protection comes from 20% of the right techniques | Lasting peace of mind with minimal investment |
The progressive method for total protection of your artworks
Now that you understand the real causes of accidents, let's take action with a progressive and reassuring approach. Imagine building an invisible fortress around your artworks: each step reinforces the previous one, creating a global protection system. The final result? perfectly secured wall art, animals that evolve naturally without constraint, and you who rediscover the pure pleasure of your decoration.
🏗️ Method overview: We will proceed as if building a house: first the solid foundations (reinforced anchoring), then the structure (anti-fall systems), and finally the finishing touches (aesthetic optimizations). At each step, you gain security and confidence.
🔧 Step 1: Create unshakable foundations
Starting with wall anchors is essential because it determines the overall resistance of your installation. It's like building on rock rather than sand: everything else depends on this base. Once this step is complete, you will already feel a huge sense of satisfaction: your paintings will no longer move even a millimeter, even during the most frantic runs of your animals.
🛠️ What you need:
- High-strength expansion anchors: Opt for metal anchors that deploy behind the partition, creating a multidirectional anchor. Available in hardware stores, choose a load capacity 3 times greater than the weight of your painting. Avoid classic plastic anchors which do not resist repeated stresses.
- Stainless steel screws: Traditional screws rust and become fragile. Stainless steel guarantees durability and resistance to vibrations. Check the diameter: it must perfectly match your anchor. This precision avoids play and micro-movements.
- Digital bubble level: Precise placement avoids asymmetrical stresses that weaken the whole structure. The human eye cannot perceive deviations of less than 2°, but they create tensions that gradually weaken the attachment.
Let's move on to practice, step by step:
✅ Concrete implementation
Anchor point location: Accurately measure the distance between the attachments of your painting and transfer it to the wall, adding 5cm in height above your initial intention. This elevation places the artwork out of reach of accidental contacts while maintaining aesthetics.
⏱️ Time: 10 minutes | ✅ Success when: Your points are perfectly aligned and the level confirms horizontality | ⚠️ Attention: Avoid measuring directly on the wall, deformation of the frame falsifies the distances
Precision drilling: Drill with a bit suited to the diameter of your wall plugs, maintaining perfect perpendicularity to the wall. This precision guarantees optimal plug deployment and therefore maximum hold. Vacuum up dust immediately to prevent it from hindering insertion.
⏱️ Time: 5 minutes per point | ✅ Successful when: The wall plug inserts smoothly without force and sits perfectly flush | ⚠️ Attention: An overly large hole negates the expansion effect, too small a hole can crack the wall
Installation and load test: Screw in gradually, testing resistance with each turn. The wall plug should deploy evenly behind the partition. Perform a gentle pull test: the anchor should have no play or movement.
⏱️ Time: 5 minutes per screw | ✅ Successful when: No movement even when pulling firmly | ⚠️ Attention: Excessive tightening can break the wall plug inside the wall
🎯 Final check of step 1: Your installation should be perfectly stable, with no oscillation even when pressing lightly. Test by gently shaking the frame: it should remain secure to the wall. If you feel a slight resistance, that's perfect! If you experience any difficulty, double-check the deployment of your wall plugs before moving on to the next step.
OUR RECOMMENDED PRODUCTS
🛡️ Step 2: Install the anti-fall protections
Now that your foundations are solid, we move on to the next level: creating an invisible safety net. This step is more rewarding because you can see your protection system taking shape concretely. The snowball effect begins here: each installed protection strengthens your psychological confidence and encourages you to optimize other aspects of your decor.
🔒 Protection hardware:
- Transparent safety cables: Steel wires sheathed in transparent plastic, almost invisible once installed. They create a backup restraint in case of primary attachment failure. Choose a minimum resistance of 15kg, more than enough for all domestic paintings.
- Discreet wall fixings: Small pins screwed at a 45° angle that guide the cable without creating stress points. Installation at an angle distributes force and prevents tearing. Stainless steel is essential for durability.
- Adjustable tensioners: Allow you to adjust the tension of the cable according to the weight of the painting. A well-tensioned cable visually disappears, a loose cable creates a unsightly line. Optimal adjustment is between full tension and visible slack.
🔗 Installing the restraint system
Strategic fastener placement: Install the anchors 20cm on either side of the artwork, slightly diagonally downwards. This configuration creates an inverted "V" that naturally accompanies any potential fall while remaining discreet. The angled position prevents the cable from interfering with the aesthetics.
⏱️ Time: 15 minutes | ✅ Success when: The fasteners are firm and the angle corresponds to a natural "V" | ⚠️ Attention: Fasteners that are too close create excessive stress on the cable
Cable installation and adjustment: Pass the cable behind the artwork, through the frame attachments, then connect to the wall fasteners. Adjust the tension so that the cable is taut but not visible from the front. This tension should allow the artwork to maintain its natural position while preventing a fall beyond 5cm.
⏱️ Time: 10 minutes | ✅ Success when: The cable is invisible from the front and effectively limits movement | ⚠️ Attention: Excessive tension deforms the frame and creates permanent stress
🎯 Safety test step 2: Simulate a fall by gently lifting the bottom of the artwork and releasing it. The cable should stop the movement smoothly, without jerks. Your protection is operational! If you observe residual oscillations, adjust the tension slightly.
You are now reaching the expert level: transforming your protection into a decorative asset. The difference between an amateur and a connoisseur lies in these details that make your installation seem "naturally perfect". The final result you can visualize: artwork that seems to float on the wall with absolute stability, without any visible safety elements, and perfect harmony with your pets.
🎨 Finishing materials:
- Decorative screw covers: Small elements that fit over your fasteners to integrate them into the decor. Choose a color that matches your wall or contrasts for an intentional effect. They transform a technical element into a decorative detail. Touch-up paint: To mask any drill marks and create a perfect finish. A color slightly lighter than the wall creates a subtle sense of depth around the artwork. Accent lighting: Adjustable LED spotlight that enhances the artwork while diverting attention from safety elements. Directed light creates a "natural suspension" effect for the artwork.
🖼️ Visual refinement
Harmonious integration: Install the screw covers and touch up the drill holes with paint. Check the ambient lighting: your artwork should seem naturally highlighted. This finishing completely erases the "DIY" aspect of your installation.
⏱️ Time: 20 minutes | ✅ Successful when: No technical elements are visible and the whole thing looks "original" | ⚠️ Attention: Avoid decorative overload that would attract attention to the protections
Final test with your animals: Observe the behavior of your companions facing the new installation. They must circulate naturally without being hindered or attracted by the new elements. This observation validates the successful integration of your protection.
⏱️ Time: 24h of observation | ✅ Successful when: No change in animal behavior is observed | ⚠️ Attention: If your animal suddenly avoids the area, check that no element hinders its passage
The rule of natural progression: You can move on to the next step when the previous one requires no more thought and works automatically. Objective criteria: no vibration, no visible movement, and natural animal circulation. Patience with technique, ambition with result!
Congratulations! You now master the expert subtleties to effectively protect your paintings. This expertise gives you a considerable advantage: you can now choose and install any work of art without apprehension.
💎 Pro tip: Create a 2mm "air gap" between the painting and the wall by adding thin shims behind the frame. This technique absorbs vibrations and prevents moisture from accumulating, preserving your work while improving its stability. Professionals use this method in all museums.
💭 Frequent question from our readers
"Will these protections hold up with my 8kg Maine Coon cat who loves to climb everywhere?"
I perfectly understand your concern! Large cats are indeed more impressive, but rest assured: our method has been tested with animals of all sizes. A Maine Coon is certainly imposing, but its movements remain within the resistance capabilities of your reinforced installation. The specific trick for large felines: add a protection cushion on the floor under the painting during the first days. This will give you confidence and allow your cat to get used to the new configuration. Guaranteed result: even your furry giant will naturally respect the protected space.
🎯 Immediate action: Observe for 2 days the areas that your Maine Coon uses to climb. This map of "feline highways" will precisely indicate where to reinforce your protections. You will obtain a personalized security plan.
⚠️ Mistakes that can ruin all your efforts
Before you can enjoy your perfectly secured artworks, I must warn you about some common pitfalls. These errors are normal and understandable, but they can undo hours of work. It's better to know them so you can avoid them!
- 🚫 Underestimating the actual weight: It’s tempting to “make do” with slightly undersized fixings to save time or money. The result: a gradual failure that manifests several weeks after installation. Absolute rule: always multiply by 2 the required load capacity. This is a mistake that 80% of DIYers make at least once.
- 🚫 Neglecting seasonal environment: Humidity and temperature variations alter the properties of the wall and frame. A perfect installation in summer can degrade in winter. Plan a bi-annual check of your anchors, it's 5 minutes that avoids inconvenience.
- 🚫 Forgetting animal evolution: A kitten will become an adult cat, a puppy will become a large dog. Your protection must anticipate this growth. Always size for the adult size, even if it seems excessive at first.
- 🚫 Trusting a single fixing point: Even the best anchor can have a manufacturing or installation defect. Redundancy is your friend: two fixing points are better than one, even for a small picture. It's the principle of both a seatbelt AND shoulder harness.
- 🚫 Ignoring signs of fatigue: A slight play in the hanging, an oscillation that didn’t exist before, a trace of wear on the safety cable... These signals announce a future failure. React immediately to avoid accidents and costly repairs.
🛡️ Your safety checklist: Monthly check these 4 points: absence of play in the fixings, perfect stability of the artwork, integrity of the safety cables, and normal behavior of your animals around the installation. Warning signs: any new movement, unusual noise during handling, or sudden avoidance of the area by your animals.
🎁 Special readers offer
Because you took the time to inform yourself, enjoy 10% discount on your first order:
⏰ Valid 72h after reading • Applicable to all our products


