

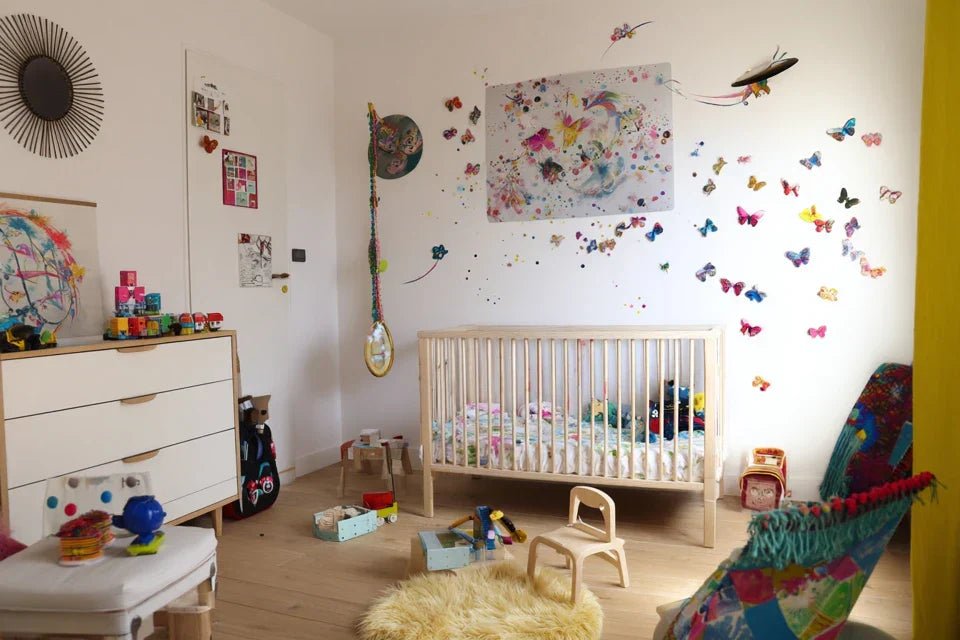
You’ve just splurged on this magnificent artisanal artwork during your last gallery visit, but a question haunts you: "Is it really reasonable to hang it in my child's room?"
You can already imagine your little 4-year-old launching his toys, paint splatters during his creative activities, or worse, that dreaded moment when he decides to “redecorate” your precious acquisition with his markers.
You've probably already tried the classic solutions: plasticized posters, repositionable stickers, framed drawings... But nothing really satisfies you, because deep down, you dream of refined and durable decoration that will accompany your child’s evolution.
Rest assured, this hesitation is perfectly legitimate! The real reason for your doubts isn't the supposed fragility of artworks, but the lack of information on secure hanging techniques and materials suitable for family living spaces.
By the end of this article, you will know exactly how to integrate a high-end artwork into your child's room safely, and you’ll discover why it’s one of the best decor investments you can make for his artistic and emotional development.
Why rethink your child's bedroom decoration NOW?
Your child's artistic sensitivity develops mainly between 2 and 8 years old. If you wait until he’s “old enough,” you miss this magical window of time to absorb shapes, colors, and emotions conveyed by art. It’s like planting a tree: the best time was 20 years ago, the second-best time is today!
🎨 Testimony from Marion, mother of Léo (5 years old): "I was afraid to hang our abstract painting in his room. Three months after installing it, Léo spontaneously asks me to explain 'why the colors dance together'. Today, he creates his own compositions and develops an artistic vocabulary that his friends don’t have!"
💬 Conversation with a decor expert
The golden rule of high-end children’s decor: A child who lives daily with beautiful objects instinctively develops a sense of aesthetics and respect for heritage. Result observable as early as 3-4 weeks: he begins to spontaneously comment on the colors and shapes around him.
Understanding what is really holding you back in this decision
You probably recognize yourself in these situations: you hesitate before each "adult" purchase for his room, you multiply temporary purchases “until he grows up”, or you wonder if you are not about to “waste” your decor budget.
What is really happening is that our society has created a false opposition between "functional child’s room" and “aesthetically accomplished space”. The problem isn't your hesitation, but this limiting belief that you have to choose between beauty and practicality.
It’s like believing that you can’t have a car that is both safe AND elegant: the two are perfectly compatible with the right information!
First brake: The fear of an "irreversible" accident
Contrary to popular belief, a quality artwork is remarkably resistant to everyday mishaps. The difference from a cheap reproduction? High-end materials are designed to last for decades.
It’s exactly like the difference between fast-fashion clothing that shrinks after the first wash and a quality piece that embellishes with time.
This discovery will transform your approach: instead of multiplying temporary purchases, you invest once in durable items that will accompany your child’s evolution.
🔍 Immediate test: Gently touch the surface of a stretched canvas artwork: you will feel it “bounce” slightly under pressure. This natural elasticity absorbs small shocks, unlike rigid surfaces which break cleanly.
Second brake: The illusion of "not yet the right time"
Many parents think that they have to wait until the child is “mature enough” to appreciate art. In reality, it’s early exposure to beauty that develops this maturity!
It's like learning a language: a child exposed early acquires naturally the accent and nuances, whereas an adult will have to make conscious efforts.
Result: you are depriving your child of this natural artistic impregnation that shapes taste and aesthetic sensitivity for life.
Third brake: The "too beautiful to be practical" syndrome
Here's the point that few parents notice: we systematically underestimate children’s ability to adapt to valuable objects in their environment.
Observe: does a child who regularly eats with “real” tableware break more plates than with plastic? No, he naturally develops more caution!
This effect extends to his entire relationship with space: he spontaneously learns to modulate his gestures and games according to the quality of what surrounds him.
3 signals that show your child is ready:
- He stops to observe images and colors: This natural behavior reveals his developing visual sensitivity, like a gardener instinctively noticing shades of green
- He spontaneously comments on what he sees: This verbalization indicates that his brain is actively processing aesthetic information, a sign of fertile ground for artistic education
- He has marked visual preferences: When he says "I don't like this color" or "that's pretty," he's already expressing a personal taste that a refined environment can cultivate
The trigger factor: The mirroring effect of the environment
What really makes the difference is understanding that children become what they are exposed to. A well-cared-for environment acts as a permanent educational lever: it naturally raises the level of requirement and care in all daily gestures. You'll easily notice it: a child accustomed to "beauty" spontaneously develops greater delicacy in his movements and more curiosity for details.
Universal rule of aesthetic education: What a child sees daily becomes his reference of "normal." To verify this: observe how he reacts differently in a well-cared-for space versus a neglected one.
| ❌ Temporary bedroom | ✅ Bedroom investment | 💡 Mechanism | 🎯 Long-term benefit |
|---|---|---|---|
| Frequent replacements as he grows | Evolving and timeless rooms | Quality lasts through growth phases | Savings + lasting aesthetic |
| "Child-specific" decor that infantilizes | Real, adapted decoration | The child grows with his tastes | Development of critical thinking |
| Constant fear of accidents | Natural learning of care | Progressive responsibility | Instinctive respect for beauty |
| Low emotional investment | Shared parent-child pride | Attachment protects better than prohibition | Transmission of family values |
The progressive method to succeed with your project
Now that you know why it's the right time, let's move on to practical implementation with serenity. This approach is like building a house: first, we lay solid foundations (safety), then we raise the structure (aesthetic choices), and finally we take care of the finishing touches (harmonious integration). At each step, you'll gain confidence and your child will progressively discover his new "artistic territory".
🎯 3-Step Overview: Securing the space (immediate satisfaction of knowing everything is controlled), selecting the artwork (enjoyment of creating a unique space), then integrating it into daily life (pride in seeing your child's positive evolution).
Step 1: Secure Installation Like a Professional
Starting with safety frees your mind to fully enjoy the creative process. It’s like installing good lighting in a workshop first: the rest becomes easier and more enjoyable. Once this foundation is laid, you will feel that deep satisfaction of knowing that your investment is protected long term.
Essential Equipment for Secure Hanging
- Reinforced Wall Fixings: Choose Molly or Fischer wall plugs suitable for your wall type. They resemble small anchors that expand behind the partition. Their role is to distribute the weight over a larger surface area than standard wall plugs. Where to find them: hardware stores or order online. Quality criteria: minimum announced resistance of 20kg per plug. Avoid basic plastic wall plugs that give way with everyday vibrations
- Transparent Safety Cable: Plastic-coated steel wire, almost invisible once installed. Its principle: even if the main fixing fails, the painting remains suspended without falling. Quality recognition: minimum diameter of 1.5mm, soft sheath to the touch. Impact on result: total peace of mind for parents and children
- Adapted Hanging Height: 120-130cm from the floor to the center of the painting. This measurement corresponds to the height of an adult standing, while remaining visible to the child. Visible benefit: the artwork visually structures the space without dominating or being ignored
Now, let's move on to practice with method:
Installation Step by Step (rest assured, it’s simpler than it seems)
Marking and Marking Fixing Points: Measure the distance between the fixings on the back of the painting, transfer this measurement to the wall using a spirit level. This precision avoids the tilted painting that irritates the eye. Pro technique: use a measuring tape and mark with pencil (erasable). The goal: perfectly aligned points from the first attempt
⏱️ Time: 10 minutes | ✅ Success when: The level indicates perfectly horizontal, the measurements are identical on each side | ⚠️ Attention: Common mistake = measuring from the corners of the painting instead of the actual fixings, which creates a frustrating shift
Drilling and Plug Installation: Drill at the marked points with a drill bit suitable for the diameter of your wall plugs. The key is to go gradually so as not to crack the plasterboard. Insert the wall plugs and tighten the screws moderately (not all the way, we will adjust with the weight of the painting). Principle: the plug should be flush, not sink in
⏱️ Time: 15 minutes | ✅ Successful when: Dowels don't move when pulled, screws protrude 3-4mm | ⚠️ Caution: Do not overtighten immediately, the weight of the artwork will finish tightening it
Safety cable installation: Attach one end of the cable behind the artwork, thread the other through a small, discreet hook screwed higher up on the wall. This invisible safety acts like a seatbelt: you don't see it but it protects. Adjustment: leave 2-3cm of slack so that the cable only tightens in case of a fall
⏱️ Time: 8 minutes | ✅ Successful when: The cable is taut without forcing on the main hanging point, invisible from the normal viewing position | ⚠️ Caution: Too tight, the cable deforms the artwork; too loose, it's useless in case of a problem
✅ Final safety check: Your installation is successful when the artwork doesn't move a millimeter if you pull down slightly, the level confirms perfect horizontality, and you don't see any fixing elements from the normal viewing position. If a dowel seems less solid, don't hesitate to start again: 15 more minutes now avoids years of worry!
OUR RECOMMENDED PRODUCTS
Step 2: Choosing the artwork that will grow with your child
Now that safety is mastered, let's move on to the pleasure of selection! This step is more rewarding because you are no longer subject to technical stress. You can focus on the essential: creating an environment that will nourish your child's curiosity and development. The snowball effect begins here: a well-chosen artwork sparks interest, which generates conversations, which develops artistic vocabulary.
Selection criteria for a lasting investment
- Evolving color palette: Favor natural or contrasting shades that survive changes in taste. "Trendy" colors quickly become dated, but a deep blue, an earthy red, or neutral tones work with all styles. Where to check: the color should still look beautiful even in artificial evening light. Why avoid exclusive pastel tones: they confine you to a "baby's room" aesthetic
- Non-figurative or timeless composition: Abstracts, stylized landscapes, or geometric patterns cross ages without becoming "childish". Operating principle: your child projects their imagination onto it without being limited by a too specific subject. Quality indicator: you should discover new details with each observation. Impact: the artwork grows with whoever looks at it
- Format adapted to evolving spaces: A 40x60cm or 50x70cm artwork offers sufficient presence without dominating. This size is easily repositioned if you rearrange. Visible benefit: the work structures the space without restricting it to a definitive style
Collaborative selection process with your child
Shared exploration phase: Show your child 3-4 options maximum and ask them what they "feel" rather than what they "prefer". This nuance develops their emotional vocabulary related to art. Technique: "What does this color make you feel?" instead of "Do you like it?" The goal: create an authentic dialogue about sensations
⏱️ Time: 20 minutes | ✅ Successful when: Your child spontaneously uses words like "soft", "strong", "calm" to describe the works | ⚠️ Attention: Avoid influencing by showing your preferences too early, let them first express their natural impressions
Step 3: Harmonious integration into daily life
This final phase transforms a simple purchase into a true family project. You reach here the level of mastery that makes the difference: creating a space where art naturally becomes part of life, without preciosity or constraint. The final result you will be proud of: a bedroom where your child spontaneously develops their sense of aesthetics and positive relationship with beauty.
Progressive ritualization of artistic presence
Create moments of shared observation: Establish a small evening ritual where you observe the work together for 2-3 minutes, taking turns discovering a new detail. This practice naturally develops visual attention and creates a privileged moment. Technique: start by pointing out something you have never noticed before, your child will want to do the same
⏱️ Time: 3 minutes/day | ✅ Successful when: Your child spontaneously takes the initiative of these observations, or comments on the work in front of visitors | ⚠️ Attention: Do not turn this into a "lesson", keep the lightness and spontaneity of play
Adapt lighting according to moments: Vary the light ambiance to reveal different facets of the work: natural daylight, subdued evening lighting, or focus with a small adjustable lamp. Principle: show that art "lives" and changes depending on the context. Optimal setting: the artwork should remain visible without creating annoying reflections
⏱️ Time: Occasional adjustment | ✅ Successful when: Your child notices that “the painting changes” according to the hours | ⚠️ Attention: Avoid direct lighting which can discolor pigments over time
🎯 Integration validation successful: Your project is fully realized when your child spontaneously shows off "their" artwork to guests, develops a personal descriptive vocabulary, and the work naturally becomes part of their daily visual references. The ultimate indicator: they instinctively notice artistic quality in other environments
Natural progression rule: Allow 2-3 weeks between installation and impact assessment. Artistic appropriation follows the child's pace, neither forced nor directed. Signs of positive evolution: increasing curiosity, spontaneous comments, pride in showing off the space
You now have all the keys to transform this decision into a family success! Here are some expert subtleties that will give you that edge in comparison to parents who improvise their decor.
🔥 Professional decorator's secret: Photograph the artwork under different lighting conditions as soon as it is installed. These photos will serve as a "visual journal" for you to observe the evolution of your gaze and that of your child over several months. Proven effectiveness: you will objectively realize the subtle transformations of your space and the impact on the overall atmosphere.
💭 "What if my child quickly loses interest in the artwork?"
"I'm afraid that after a few weeks, they won't even pay attention to it..."
This concern is very normal and reveals your desire to make a good investment! In reality, the opposite happens with a quality artwork: it gradually becomes an "unconscious visual reference" that nourishes the eye every day. Think of a beautiful family piece of furniture: we don't actively "look" at it every day, but it structures our spatial well-being. Art works the same way: its influence is subliminal and profoundly beneficial, even when conscious attention is elsewhere.
🎨 Validation test: Temporarily remove the artwork after 6 weeks of installation. You will immediately see that your child notices "something is missing" and spontaneously asks for its return. This proves that appropriation has taken place deeply!
Pitfalls to absolutely avoid (even with the best intentions)
Attention, some well-intentioned mistakes can totally ruin your project! These pitfalls are very tempting because they seem "logical" at first glance, but experience shows that they create more problems than they solve.
- ⚠️ Multiplying visible "protective measures": Plasticizing, framing under thick glass, or surrounding with discreet barriers seems prudent, but this transforms the artwork into a "forbidden object" rather than a "familiar element". Concrete consequence: your child develops a relationship of distrust instead of natural appropriation. Solution: focus on an ultra-secure hanging and let the artwork "breathe" visually. This is a common approach among perfectionist parents
- ⚠️ Choosing a theme that is "too childish" for safety: Going for cute animals or exclusively soft colors seems appropriate, but locks you into an aesthetic that will quickly become outdated. Actual impact: you'll have to repurchase in 2-3 years, and your child won't develop the ability to appreciate more sophisticated aesthetics. Alternative: prioritize emotion and artistic quality over the apparent subject matter. Very common mistake among first-time parents
- ⚠️ Installing too low "so he can see better": Lowering it below 110cm from the floor seems logical for a child, but creates a visual imbalance in the room and exposes the artwork to accidental splashes. Observable result: the space appears "crushed" and the painting suffers more damage. Good practice: keep the standard height and explain that "looking up" develops contemplation. Natural reflex to fight
- ⚠️ Wanting your child to "understand" art immediately: Explaining in detail the technique, style, or intention of the artist upon installation may seem educational, but short-circuits the natural development of personal gaze. Frustrating consequence: the child recites without feeling, instead of developing their own aesthetic emotions. Winning approach: let questions come spontaneously and answer them simply. Classic trap of cultured parents
- ⚠️ Changing location too often "to renew": Moving the artwork every month to avoid boredom seems stimulating, but prevents deep appropriation and the creation of stable spatial references. Perverse effect: the child never develops that intimate relationship with "their" artistic environment. Golden rule: leave it in the same place for at least 6 months to allow impregnation. Understandable temptation but counterproductive
🛡️ Monthly checkup points: Check that the fixings remain firm (small downward traction test), that your child comments positively or spontaneously questions the artwork, that the whole maintains its visual harmony even with seasonal storage changes. Warning signs: fixings that move, total disinterest after 2 months, or repeated negative criticism from your child
🎁 Special reader offer
Because you took the time to inform yourself, enjoy 10% discount on your first order:
⏰ Valid 72h after reading • Applicable to all our products
❓ Your most frequent practical questions
Expect to spend between €150 and €400 for a quality gallery-worthy original artwork that will last decades. To optimize: always prioritize material quality over size; a superb 40x50cm piece is better than an average 80x100cm one. Real-life example: our customer Sophie invested €280 in an abstract painting in 2019 for her then 3-year-old daughter’s bedroom. Now, at age 9, Margot still talks about it with pride and the artwork harmonizes perfectly with her emerging teen décor.
From 18 months! At that age, your child already distinguishes contrasting colors and develops their visual preferences. Parenthood tip: observe their reactions to different visuals; they will clearly show you what attracts them. Rassure yourself with this example: Lucas, 2 and a half years old, spontaneously points to his painting with orange tones every morning saying "beautiful sun" since it was installed.
Most hardware stores offer an in-home installation service for €40-€60, including supplies and warranty. Economical alternative: ask a handy friend for advice; the installation actually takes 30 minutes with the right anchors. Technical point: if your wall is made of concrete or brick, standard anchors are sufficient to hold a painting up to 5kg.
Failproof rule: if the artwork still moves you after 15 days of daily observation, it has that timeless quality that transcends trends. Practical test: show it to people from different generations; true works of art always elicit a positive reaction beyond personal tastes. Simply avoid anything that refers to a specific "trend" (Pantone color of the year, current cartoon characters).
Absolutely! A well-chosen 30x40cm painting visually structures a space better than a large generic poster. In 9m², prioritize tones that “expand” the space: deep blues, natural greens, or airy compositions. Architect's tip: a painting placed facing a source of natural light dramatically multiplies the feeling of space in creating subtle reflections on adjacent walls.
🌟 Your child in 6 months: a transformation you can't yet imagine
Imagine: your child welcoming their friends by spontaneously showing them “their” painting, developing an artistic vocabulary that their classmates don’t have, and exhibiting the quiet confidence of children accustomed to beauty. The pride in their gaze when they explain their favorite colors and why they speak louder depending on the seasons... Your surroundings will notice this early aesthetic maturity and a natural ability to appreciate refined things.
But the impact goes far beyond art: this visual education naturally develops detail-oriented observation, patience, and a kind curiosity that translates into all areas of learning. Teachers often note that children familiar with art more easily develop their personal expression and constructive critical thinking.
Understanding was indeed the most complex part of this project. Now that you know how to proceed, the first concrete step is simple: schedule an appointment with your child to "explore images that make you feel good". This shared adventure begins today and will enrich your bond for years to come!
✨ Your project in a sentence: You are giving your child much more than just decoration: you are teaching them how to live with beauty every day, a legacy that will accompany them throughout their life and for which they will thank you in 20 years!


