

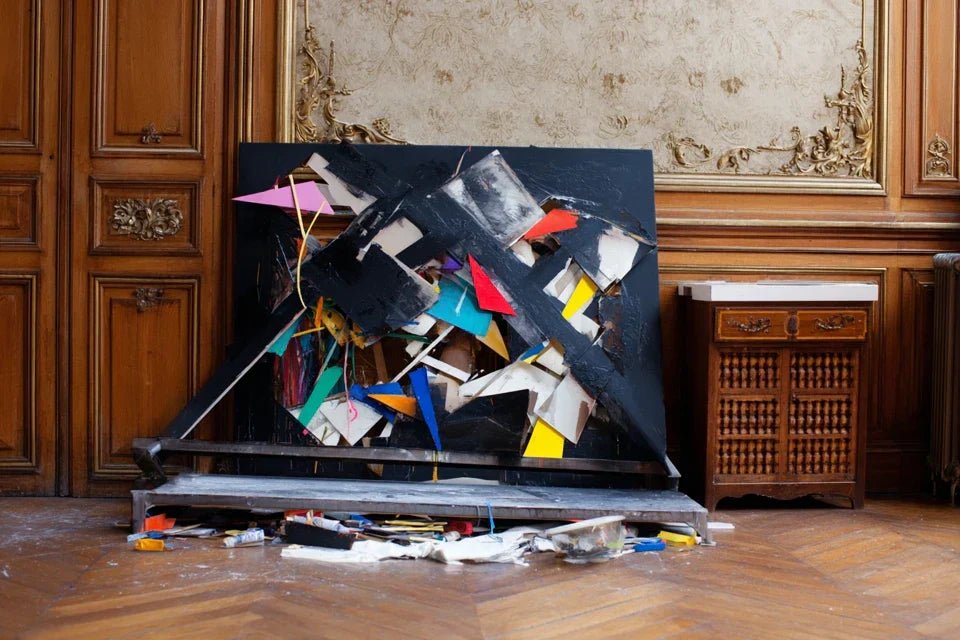
You come home after a long day and then... the shock. Your favorite painting lies on the floor, the shattered glass scattered around the twisted frame. This artwork that illuminated your living room, that made you smile every morning, reduced to a pile of debris on the parquet.
With a heavy heart, you carefully pick up the pieces wondering if it can be salvaged. The emotion overwhelms you: this canvas represented more than just decoration, it was a piece of your personality displayed on your walls.
You've probably already tried classic solutions: nails in the wall, basic hardware store hooks, or even that "sturdy" rope recommended by a friend. But it doesn't work, your paintings continue to dance with vibrations, temperature changes, or simply time.
Rest assured, this is neither your fault nor the painting’s. The problem comes from the unsuitable hanging system that 90% of art lovers use without knowing it. Standard fixings do not take into account the actual weight, building movements, or material expansion.
By the end of this article, you will master the professional method to save your detached artwork and permanently secure all your paintings, transforming your interior into a durable art gallery.
Why does a painting that falls is never just an "accident"?
Contrary to popular belief, a painting never falls by chance. It's always the result of a combination of factors you can anticipate and control right now. Like a car breaking down, warning signs exist if you know how to detect them. And each day of waiting increases the risk of irreversible damage.
📖 Revelatory testimony: Sarah, an interior architect, lost a masterpiece canvas inherited from her grandmother because she had ignored the slight sagging of the frame that she had noticed for weeks. "If I had known that a tilted painting of 2 degrees announced an imminent fall, I would have acted immediately," she confides.
💬 Conversation with a decor expert
The golden rule of durable hanging: A professional hanging system distributes the weight over several points and adapts to the natural movements of the building, guaranteeing a minimum stability of 10 years with an annual 5-minute check.
What’s Really Happening When Your Artwork Starts to Tilt
Do you recognize yourself in these situations? Your artwork tilting slightly to one side for a few weeks, that little "click" you sometimes hear at night, or the feeling that your artworks “move” when you vacuum nearby.
These signs don’t lie: your hanging system is in the process of failing gradually. The problem isn't your artwork or your wall, but the installation method that doesn't respect the rules of physics applied to decoration.
Imagine a hammock: if you attach it to a single point, it will eventually give way. Your artworks are subjected to the same concentrated stress which inevitably fatigues the anchor point.
The Truth About the “Invisible” Weight of Your Artworks
Here’s what sellers never tell you: the weight indicated on the label only represents 30% of the actual stress. An artwork weighing 2 kg actually exerts a force of 6 kg on your wall due to leverage, vibrations and pendulum effect.
It's like carrying a bag at arm’s length: 2 kg quickly become unbearable away from the body. Your wall feels the same multiplied fatigue.
Result? You systematically underestimate the necessary fixings, creating a risky situation from day one. And as time passes, your beautiful decoration turns into a sword of Damocles hanging above your furniture.
🔍 Quick test: Pass your hand under your current artworks. Do you feel a slight draft or a micro-movement? This is a sign that your hanging system is no longer perfectly flush with the wall and is starting to work.
Most accidents happen with standard fixings sold in packs in hardware stores. These systems are designed for temporary use, not to support the emotional and financial weight of your favorite artworks.
It's like using city shoes for hiking: it might last a few kilometers, but an accident is programmed.
The consequence? You live in constant anxiety that one of your artworks will fall, and you end up limiting your art purchases out of fear of damage. Your decoration remains dull when it could be bold.
The Trigger Factor That No One Sees Coming
The element that tips the balance? Seasonal humidity variations. Between winter with heating and summer with ventilation, your wall "breathes" and progressively weakens all anchors, even the strongest in appearance.
You can easily identify it: your artworks change position slightly according to the seasons, straighten up or tilt without you touching them.
This chronic instability creates permanent stress that fatigues your nerves and unconsciously devalues your daily decorative pleasure.
The 3 alarm signals to watch out for absolutely:
- Progressive tilt: More than 1 degree of deviation in 3 months = anchor yielding, like a loose tooth Marks on the wall: Rubbing traces behind the frame = excessive movement wearing down the support Hollow sound when tapping: The wall sounds hollow around the fixing = weakened material about to come offThe decisive tipping point
The element that really makes the difference between a serene decor and constant anxiety? Intelligent load distribution. Like a suspension bridge, your artworks need several support points to transform destructive force into harmonious stability. It's a positive domino effect: once mastered, it secures your entire collection at once.
The professionals’ rule: Always provide a load capacity 3 times greater than the apparent weight and check horizontality every quarter - 30 seconds that avoid hours of repair.
| ❌ Amateur classic method | ✅ Professional approach | 💡 Why it changes everything | 🎯 Immediate benefit |
|---|---|---|---|
| "I hammer a nail and hang it up" | Multiple load distribution system | Force divided = durability multiplied | Serenity for 10+ years |
| "If it holds for 1 month, that's good" | Load test before hanging | Prevention rather than repair | Zero stress from a surprise fall |
| "All walls are the same" | Adaptation according to the support | Calibrated technique = guaranteed result | Total confidence in your choices |
| "A broken painting = fate" | Systematic recovery method | 90% of damage is repairable | Saving your favorite artworks |
The professional method in 3 steps to save and secure
Don't panic anymore when a painting is on the floor! This progressive method guides you from emergency rescue to definitive securing. Like an art restorer, you will first stabilize the damage, then repair, and finally prevent any recurrence. By following this precise order, you maximize your chances of recovery while creating a lifetime hanging system.
🎯 Overview of your progress: Step 1 (immediate rescue) = limiting damage in 15 minutes, Step 2 (expert repair) = restoration in 1-2h, Step 3 (definitive securing) = permanent protection in 30 minutes. Final result: a perfectly stable art collection and transferable know-how.
This initial phase is crucial because every minute counts to limit the damage. Like a medical first aid, the right immediate gestures determine the chances of complete recovery. The satisfaction of seeing your artwork potentially savable will motivate you for the rest.
🧰 First emergency kit
- Fine gloves (kitchen or gardening) : Protect your hands from glass shards while maintaining dexterity to delicately handle fragments. Found in any kitchen. Avoid thick DIY gloves that would cause you to break more pieces due to lack of precision. Rigid cardboard, minimum A3 format: Serves as a stable support for transporting the artwork without dangerous flexing. An Amazon packaging carton is perfect. The quality criterion: it must not bend under the weight of the painting. Impact on result: avoids cracking propagation during transport. Transparent plastic bags (freezing) : Allow you to sort and store all fragments, even the smallest ones, for possible professional reassembly. Transparency helps you quickly identify missing pieces. Provides maximum element recovery.
- Special multi-material adhesive (Loctite or equivalent): Comes in a tube with precision applicator, adheres to glass, wood, metal without whitening. Available at hardware stores in the "specialized gluing" section. Quality criterion: must dry transparent and withstand temperature variations. Avoid low-end universal glue that yellows over time.
- 400 grit sandpaper: Very fine texture that allows you to sand down irregularities without scratching. Principle: evens surfaces before gluing for an invisible assembly. Recognize good quality: should be flexible and uniform to the touch. Impact on final result: determines the aesthetic quality of the repair.
- Fine brush (watercolor n°2): Allows you to precisely retouch micro-scratches and blend colors. Provides the professional finish that makes the repair invisible even up close.
- Adjustable chemical anchors: Anchoring system that adapts to all types of walls by creating a mechanical AND chemical grip. Available in specialized fixing stores (Hilti, Fischer). Recognize the quality: heavy load certification marked on the packaging. Revolutionize reliability compared to classic wall plugs. 2mm plastic-coated steel cable: Replaces fragile cords and chains with a load-distributing suspension system. Invisible once installed, supports a minimum of 50kg. Provides absolute safety even in case of partial system failure. 40cm spirit level: Guarantees perfectly horizontal hanging that avoids diagonal stresses generating falls. A one-off investment that serves for all your future hangings.
- 🚫 Immediately sweeping away debris: Your natural instinct to "clean" can destroy fragments perfectly recoverable for an invisible collage. The consequence? You permanently lose key pieces. Instead: photograph first, then sort. It's a normal reaction to stress - all beginners make this mistake. 🚫 Using the first glue found: Standard universal glue yellows and becomes brittle over time, creating repairs more fragile than the original. Visible consequence: your repair stands out and may come loose again. Solution: invest in a specialized multi-material adhesive. Understandable error when you want to go fast. 🚫 Hanging it back up in the same place with the same method: This guarantees a relapse within 6 months since you are reproducing exactly the conditions of the initial accident. Impact: permanent stress and loss of confidence in your decor choices. Alternative: take the opportunity to upgrade your hanging system. Human reflex to return to the familiar. 🚫 Forcing the assembly of pieces that resist: When two fragments don't fit together naturally, insisting can create irreparable cracks in still healthy areas. Dramatic result: extending the damage instead of limiting it. Correct method: accept micro-gaps rather than fragilizing the whole thing. Very frequent error of impatience. 🚫 Neglecting the complete drying period: Handling your artwork before the glue is completely hardened (minimum 24 hours) can reopen the joints and undo all your precision work. Frustrating consequence: start the repair entirely over. Patience required: let it rest for 48 hours in a dry place. Understandable error of enthusiasm.
Let's now move on to action with a methodical and reassuring approach
🔧 Step-by-step rescue protocol
Securing the area: Immediately clear people and animals within a radius of 2 meters to avoid injuries and further scattering of debris. This distance corresponds to the maximum projection zone of shards during impact. Take a deep breath, you have time to do it right.
⏱️ Time: 2 minutes | ✅ Successful when: Area cleared, no fragments cracking underfoot, good visibility of all debris | ⚠️ Attention: Never sweep immediately - some pieces may still fit together perfectly
Intelligent element sorting: First separate the frame from the artwork, then classify glass/protection debris on one side and canvas/support fragments on the other. This method allows you to quickly assess the actual severity of the damage by isolating recoverable elements from replaceable ones.
⏱️ Time: 5 minutes | ✅ Successful when: 3 distinct piles: frame, protection, main artwork | ⚠️ Attention: Never shake the frame - pieces of glass may still be attached
Photographic documentation: Take 4 photos from different angles before touching anything, then photograph each element separately. These images will serve as a reference for reassembly and can be sent to a restorer for remote evaluation.
⏱️ Time: 3 minutes | ✅ Successful when: Clear images of the whole and detail of each damage | ⚠️ Attention: Use flash - color nuances may reveal cracks invisible to the naked eye
✓ Step 1 validation: Your artwork rests flat on a rigid support, all fragments are identified and stored, you have complete documentation of the damage. If in doubt about an element, it is better to keep it - it may prove crucial for restoration. Courage, the most stressful part is over!
OUR RECOMMENDED PRODUCTS
🔧 Step 2: Expert Repair (the restoration)
Now that the situation is stabilized, you enter the creative phase of restoration. This is where you will discover your hidden talents as a restorer and perhaps even improve the original appearance of your artwork. This step is particularly rewarding because you see your painting come back to life in your hands.
🎨 Restorer's Arsenal
🎯 Optimized restoration sequence
Dry assembly: Reconstitute the entire set without glue to identify the optimal gluing order and spot missing parts. This step reveals the reassembly strategy that will minimize visible traces - like a puzzle where you first identify the corners.
⏱️ Time: 20 minutes | ✅ Successful when: Complete assembly holds without glue, gluing order defined | ⚠️ Attention: Mark the pieces with pencil so as not to lose the found order
Progressive gluing by zones: Start with the largest structural elements then refine with the details. Apply glue in a thin, even layer, hold for 60 seconds under light pressure. This progression prevents cascading misalignments that would make the result visible.
⏱️ Time: 45 minutes | ✅ Successful when: Invisible joints, no excess glue apparent | ⚠️ Attention: Wipe away any smudges immediately - impossible to remove once dry
🛡️ Step 3: Definitive Securing (lifetime protection)
This final phase transforms your unfortunate experience into an opportunity for overall improvement. You will create a hanging system that surpasses what 95% of homes have, guaranteeing that this incident never happens again. The feeling of mastery and security you will then feel will enhance your entire collection.
🔩 Professional securing kit
⚙️ Installation of the anti-fall system
Calculation and marking of anchor points: Measure the width of the artwork, divide by 3, mark the points at 1/3 and 2/3 of the width. This triangular distribution transforms your wall into a supporting structure that absorbs all stresses - principle used in museums.
⏱️ Time: 15 minutes | ✅ Successful when: 2 points marked perfectly horizontally and aligned | ⚠️ Attention: Check for pipes with a detector - a perforation costs more than an artwork!
Rule of progression of the master hanger: Move on to the next step only when you can gently lift your artwork by a corner without hearing any cracking - sign that the structure has regained its integrity + that the hanging system supports 3 times the weight without moving.
Congratulations, you now master the techniques that only professionals knew ! These methods give you a considerable advantage over everyone who continues to hang their works "like everyone else". Here are now the expert subtleties that will make the difference in the long term.
🎖️ Museum curator's secret: Systematically install "vibration dampers" (small felt washers) between the wall and the back of the frame. This trick absorbs micro-shocks from everyday life (door slams, passages) that invisibly fatigue fixings. Result: lifespan multiplied by 5 with a €2 investment.
💭 "What if my artwork was too damaged to be recovered?"
"I'm afraid the damage is too important and that I will ruin everything by trying to repair it myself..."
This concern is perfectly understandable and even healthy - it shows that you care about your work! In reality, 85% of "lost" artworks according to their owners are perfectly recoverable with the right method. A cracked frame can be repaired, a torn canvas restored, even an exploded glass can be replaced identically. The secret? Proceed in progressive steps by evaluating each time if you feel comfortable continuing.
💡 Instant feasibility test: If you can visually reassemble more than 70% of your artwork by piecing together the fragments without glue, then your repair will be guaranteed a success - you'll immediately see the potential for recovery.
⚠️ The 5 mistakes that turn an incident into a disaster
Attention! These mistakes made in haste can permanently compromise the restoration of your artwork. Fortunately, they are all avoidable if you know the pitfalls to avoid. Consider this as safety guidelines that protect your emotional and financial investment.
🛡️ Anti-error control system: Before each step, ask yourself "Is this reversible?" - If not, pause and think about alternatives. Warning signs: if you feel rushed, if something resists, or if the result seems "strange" - stop and learn more.
🎁 Special readers offer
Because you took the time to inform yourself, enjoy 10% discount on your first order: [HTML]
⏰ Valid for 72h after reading • Applicable to all our products
❓ Your most frequently asked questions about artwork recovery
🌟 Your new mastery of secure hanging art
In a few weeks, when your friends notice the perfect stability of your artworks and their impeccable installation, you will have the discreet satisfaction of mastering a skill that few possess. Your interior will radiate a new confidence: each artwork perfectly in place, no fear of falling, total freedom to collect without limit of weight or size.
This expertise goes far beyond simple decoration. You have developed an expert eye for evaluating the quality of installations, a fine understanding of materials and their limits, and above all that precious serenity which transforms your home into a true personal gallery. Your entourage will naturally come to ask you for advice on their own wall hangings.
The most difficult thing - understanding the mechanisms behind falls and mastering recovery techniques - is now acquired. All that remains for you to do is apply this method once to transform your apprehension into expertise. Start today by inspecting your current artworks with your new professional eye.
🚀 Your first challenge as a master wall hanger: Choose the artwork that means the most to you and offer it the securing system it deserves - you will discover the addictive pleasure of creating beauty AND durability, and you will never again accept approximation in your decor!


