Composez votre galerie d'art

Des tableaux qui racontent votre histoire
Code d'initiation
ART10
10% offerts sur votre première acquisition
Découvrir la collection

Recycling old frames around your modern paintings: a chic contrast

Recycler des cadres anciens autour de vos tableaux modernes : contraste chic
⏱️ Reading time: 8 minutes

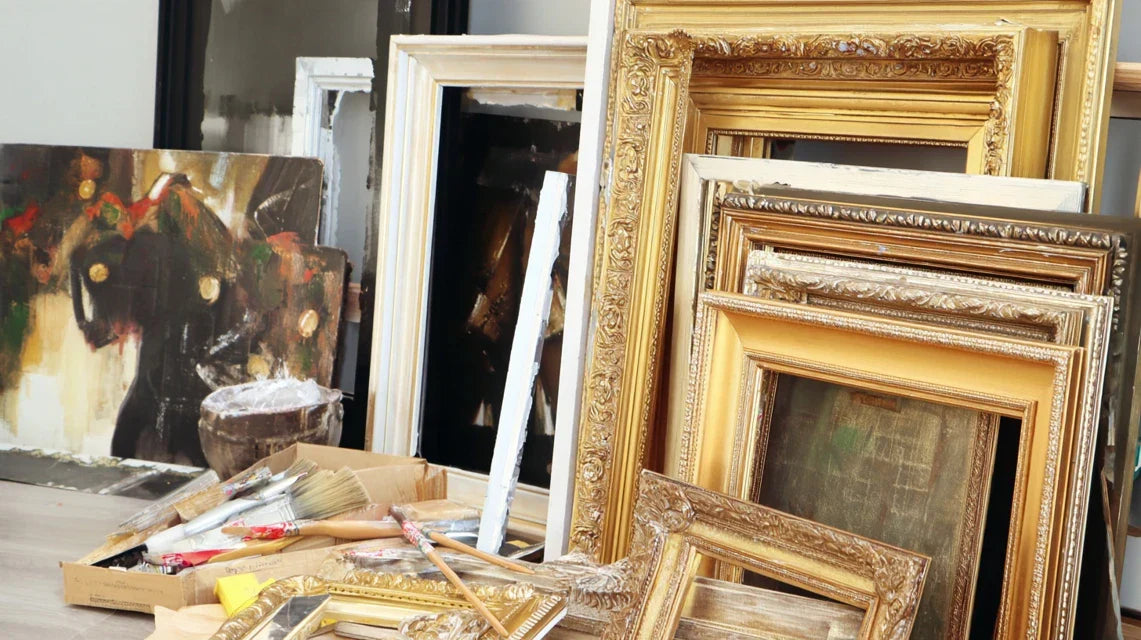
You’ve just acquired this magnificent contemporary artwork that excites you, but it's impossible to find a frame that does it justice without blowing your decorating budget.

You wander through stores, discouraged by the exorbitant prices of modern frames, or worse, those industrial frames with no soul that trivialize your artwork.

You may have tried a basic black or white frame, thinking to play it safe, but the result leaves you wanting: your painting loses its personality and blends into the crowd.

That's normal! The problem isn’t your artistic taste, but this misconception that you absolutely must match the era of the frame to that of the artwork to create harmony.

By the end of this article, you’ll know how to transform your vintage frames sourced from flea markets into perfect settings for your contemporary paintings, creating that sophisticated contrast that makes all the difference in a high-end decor.

Why mixing eras is revolutionizing your decor now?

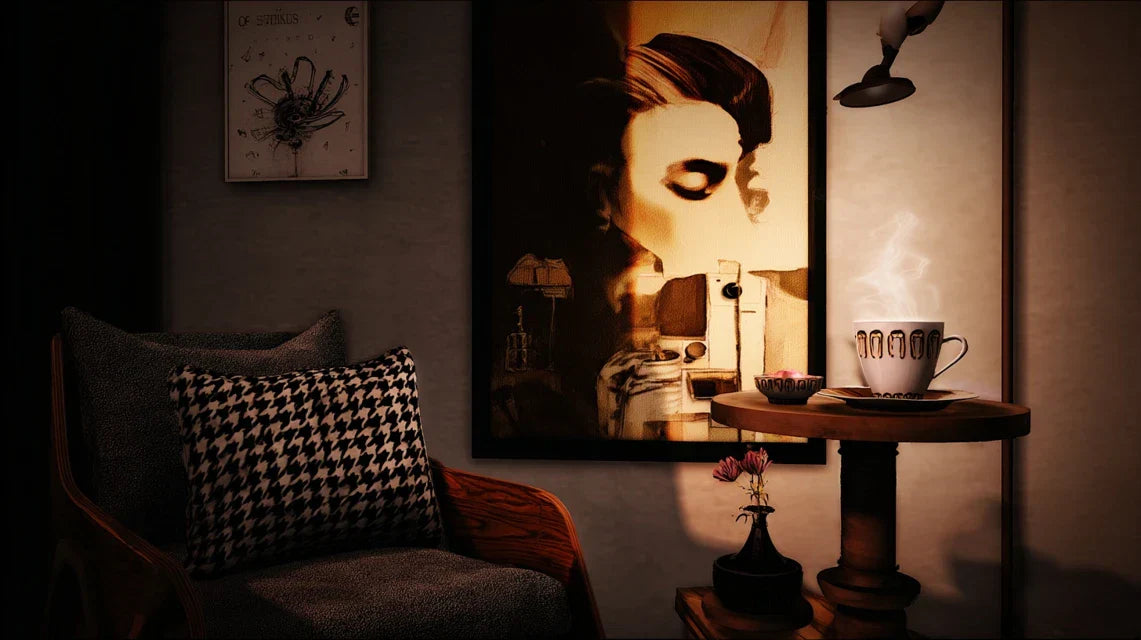
Interior design is currently undergoing a major aesthetic revolution. The time when each room had to respect a unique and fixed style is over. Today, the most sought-after decorators create memorable interiors by juxtaposing eras with boldness. It's like in gastronomic cuisine: the greatest chefs mix culinary traditions to create new flavors. Your interior becomes a personal signature when you dare these unexpected combinations. If you continue to search for perfect uniformity, you are missing out on this major trend that already enhances the most sought-after real estate properties.

🏡 Expert testimony: Sarah, a Parisian interior architect, says: "My client owned a collection of contemporary art but refused my proposals for antique frames. After installing a street art piece in a gilded Louis XVI frame, he immediately understood. The contrast created a fascinating visual tension that made both elements more precious."

💬 Conversation with a decor expert

"I'm afraid it will look like an amateur DIY project... Will mixing an old frame with my modern painting shock people?"
On the contrary! This fear comes from a time when decor followed strict rules. Think of the most beautiful New York lofts: they mix industrial beams and contemporary artworks with an obvious refinement. The secret? The intentionality of your choice.
"I've always been told that you have to respect the era of the artwork so as not to make a mistake in taste..."
This rule was valid in the interiors of the 20th century. Today, the most discerning collectors are looking for this controlled aesthetic break. Look at the largest galleries: they exhibit contemporary art in heritage settings to create this dialogue of eras.

The golden rule of mastered contrast: The greater the time difference between your frame and your painting, the more striking the visual effect. Like a dissonant musical chord that resolves into perfect harmony, this tension creates an immediate sophistication that your guests will instantly notice. Allow 3 to 6 months to fully master this art of mixing.

Understand what is really blocking your decorative creativity

Do you find yourself in these situations? You've been staring at your blank wall for weeks, paralyzed by the fear of doing it wrong. You buy and return frames to the store, never satisfied with the result. You admire interiors in magazines without understanding their secret.

What is really happening? Your brain applies outdated aesthetic filters inherited from an era when decoration was codified. These automatisms prevent you from seeing the creative possibilities available to you.

It's as if you were driving with tinted glasses that distort your perception of colors. Once you take them off, you discover a world of unsuspected nuances.

h3>The first illusion: "A style = an era Contrary to what is believed, the most beautiful interiors never respect this rule. They create their own visual language by mixing temporal references.

Imagine your living room as a music playlist: the best compilations alternate styles and eras to create a rich and surprising emotional experience.

This discovery will transform your approach to decoration: you are no longer looking for consistency, but the balance of contrasts. Your gaze becomes more free, more daring.

✨ Immediate test: Place your modern painting against a wall, then bring an antique object (book, vase, vintage photo frame) closer to it. Observe how the two elements enhance each other instead of competing.

The perfection trap You think a "good" assembly should appear obvious and natural at first glance. In reality, the most memorable compositions create an initial surprise that transforms into evidence.

It's like in gastronomy: the most successful associations initially surprise before revealing their deep gustatory logic. The eye needs this time of discovery.

As a result, you reject bold combinations that could have become your most remarkable decor signatures. You deprive yourself of the dimension of surprise that makes personalized interiors charming.

h3>The "all or nothing" error Many believe they need to completely transform their decor all at once. This pressure paralyzes and leads to safe choices lacking personality.

In reality, a single statement piece - like your contemporary artwork in its vintage frame - can revolutionize the atmosphere of an entire room.

You discover that your decor can evolve gradually, experimentation after experimentation, without risking the irreversible mistake you fear.

3 signs you're ready to take the plunge:

  • You’re tired of your current decor: Your eye craves more visual stimulation, like a palate that gets used to bland flavors
  • You're drawn to "unconventional" interiors: Unconsciously, you are searching for this controlled originality that distinguishes true connoisseurs
  • You collect without daring to display: You own objects from different eras but are afraid of judgment when combining them

The trigger factor: the positive surprise effect

What really makes the difference is your ability to create this subtle "wow" effect in your visitors. Like a pastry chef who adds an unexpected salty note to a sweet dessert, you create this mastered aesthetic disruption that sticks in people's memories. Your contrast is more assumed and thoughtful, the more striking the effect. Spot that magical moment when the eye catches, surprised then seduced by the boldness of your choice.

The rule of balanced contrasts: A successful contrast always respects a common element (color, proportion, or material) between the mixed eras. Check immediately by looking for this visual connecting thread that unifies your composition.

❌ Traditional approach ✅ Contemporary approach 💡 Why it works 🎯 Visual benefit
Seeking perfect harmony Creating controlled visual tensions The eye prefers stimulation to uniformity Memorable and personalized decor
Respecting the rules of the era Inventing your own decor language Originality creates perceived value Unique decorative signature
Avoiding "risky" mixes Embracing bold contrasts Sophistication is born from the mastery of risk Guaranteed wow effect
Following current trends Creating your own timeless aesthetic Authenticity transcends trends Decor that doesn't go out of style

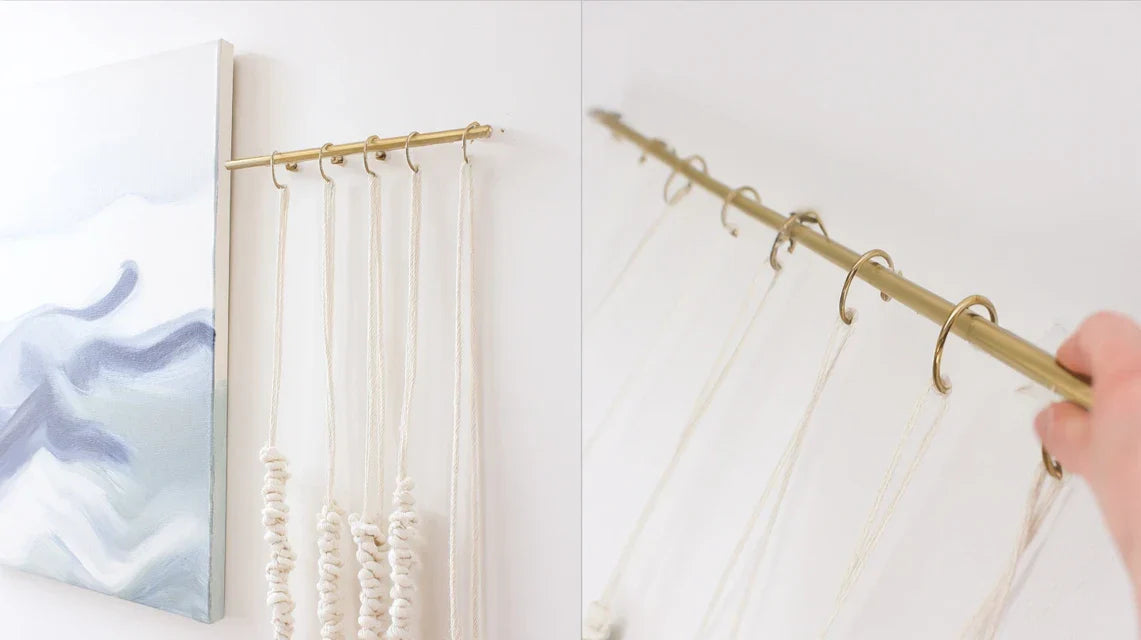
The 3-step method to transform your vintage frames

Rest assured, this transformation requires neither advanced technical skills nor costly investment. We will proceed as an art restorer : first analyze, then prepare, finally reveal. Each step will bring you immediate satisfaction and visible results that will motivate you for the next one. In a maximum of 3 weeks, you will master this technique which impresses even the most demanding visitors.

🎯 Overview of the transformation : Step 1 - Selection and diagnosis of your frames (weekend 1) • Step 2 - Preparation and beautification (weekend 2) • Step 3 - Installation and final adjustments (weekend 3). Each step reveals the hidden potential of your finds and transforms your view on the art of mixing.

Step 1: Select the perfect frame for your painting

This first step is crucial as it determines 80% of the final success. Like an architect who studies the terrain before drawing his house, you will learn to "read" an old frame to reveal its potential. Once this step is mastered, you will develop that expert eye which instantly spots gems in flea markets and garage sales.

What you need for this step

  • A quality measuring tape : Essential to accurately measure the internal dimensions of the frame. Choose a rigid metal model rather than a flexible meter that falsifies measurements in corners. Find it in a hardware store. Accuracy to the millimeter is crucial because an error of 2-3 cm can compromise the final visual balance.
  • A powerful LED flashlight : To examine the actual condition of the wood under layers of varnish or paint. The principle: reveal hidden defects before purchase. Natural lighting in flea markets often masks cracks. Look for a model with adjustable intensity to adapt the examination according to the materials.
  • Your smartphone with the camera : To document your finds and visualize the rendering at home before purchasing. The pro tip: photograph the frame with your hand to give scale, then compare with photos of your painting to anticipate the harmony of proportions.

Let's move on to selection practice now

How to identify a frame with potential

Check the proportions in relation to your painting : Measure the internal opening of the frame and compare it to the dimensions of your artwork. The golden rule: allow 2-3 cm margin on each side to allow for the installation of a mat if necessary. This margin avoids the "tight" effect that harms the visual breathing of the work.

⏱️ Time : 5 minutes per frame | ✅ Successful when : You can easily slide 2 fingers between the painting and the inner edge | ⚠️ Attention : Many underestimate the thickness of the fixing system, which makes mounting impossible

Assess the structure's quality: Test its solidity by applying slight pressure on the corners. A viable frame should not move or creak. Examine the joints: they must be clean, with no visible gaps. This check avoids unpleasant surprises when installing your artwork.

⏱️ Time: 3 minutes | ✅ Success when: The frame remains perfectly rigid under pressure | ⚠️ Attention: A fragile assembly will quickly deteriorate under the weight of the artwork

Analyze the aesthetic potential: Observe the style of the frame and imagine the contrast with your modern artwork. Look for sculpting details, gilding, patinas that will create this sought-after visual dialogue. A frame that is too simple will lose its impact, a frame that is too busy will stifle your work.

⏱️ Time: 10 minutes of reflection | ✅ Success when: You clearly visualize the final effect | ⚠️ Attention: The enthusiasm of the moment can mask proportion defects

✨ Final validation: You have found the right frame when you feel that emotional evidence: "That's exactly it!" Trust this intuition after verifying the technical aspects. If you are still unsure, take a photo and take 24 hours to reflect. A good choice will impose itself naturally.

OUR RECOMMENDED PRODUCTS

Step 2: Restore and prepare your vintage frame

We are now entering the revelation phase. Your frame will regain its original splendor while adapting to modern hanging and presentation requirements. This step is particularly rewarding because you see the transformation unfold before your eyes. This is where the magic of contrast between the restored old and the contemporary is born.

Restoration materials needed

  • Specialized gentle wood cleaner: Absolutely avoid classic household products that attack antique finishes. Look for a pH neutral cleaner in a hardware store or art supplier. It preserves the patina while removing accumulated dirt. Mandatory test on a hidden area before general application.
  • Fine natural hair brush: To reach reliefs and sculptures without forcing. The softness of the natural bristles follows complex shapes and avoids scratches. Avoid synthetic brushes that are too rigid, which can damage fragile gilding. Ideal size: 2-3 cm wide. Colorless beeswax: To nourish the wood and revive its natural luster. This traditional finish respects the authenticity of the frame while protecting it durably. Apply in thin layers, always in the direction of the wood grain. The result far surpasses modern varnishes for this type of project.

Step-by-step restoration process

Deep cleaning: Begin by carefully dusting with a dry brush, then apply the cleaner with a soft cloth. Work in small sections to control the result. This phase often reveals sculptural details masked by decades of accumulation.

⏱️ Time: 45 minutes to 1h | ✅ Successful when: No dirt traces come off with the cloth | ⚠️ Caution: Never leave the product on for too long on gilding

Treatment of minor imperfections: Fill small cracks with tinted wood filler matching the dominant color. Sand gently after complete drying. This step requires patience but guarantees a professional result that values your time investment.

⏱️ Time: 30 minutes + 2h of drying | ✅ Successful when: Repairs are invisible to the touch | ⚠️ Caution: Strictly adhere to drying times

Step 3: Final installation and visual optimization

The ultimate step where your vision comes to life! You will discover professional hanging techniques and these subtle adjustments that make all the difference between an amateur result and a composition worthy of a gallery. This technical mastery gives you total confidence for all your future decorative projects.

Professional installation techniques

Calculation of optimal height: Place the center of your framed artwork at 5.25 ft from the floor (standard museum height). This rule works in 90% of cases and automatically creates a harmonious visual balance. Discreetly mark with pencil before drilling.

⏱️ Time: 15 minutes of measurement | ✅ Successful when: The artwork naturally sits within your field of vision | ⚠️ Caution: Adapt according to ceiling height if less than 8.2 ft

Secure fixing system: Use metal X hooks suitable for the weight of the frame + artwork assembly. The safety rule: choose fixings supporting 3 times the actual weight. This margin avoids any risk of falling and protects your walls from damage.

⏱️ Time: 20 minutes | ✅ Successful when: The entire assembly remains perfectly stable | ⚠️ Caution: Check the nature of the wall (drywall, stone, concrete) to adapt the anchors

The golden rule of progression: Master each step perfectly before moving on to the next. A rushed cleaning compromises the finish, an approximate fixing spoils the final effect. Initial patience guarantees a result you will be proud of for years.

You’ve just acquired a rare decorative skill that distinguishes true connoisseurs from enthusiasts. This mastery of the contrast between old and modern opens up an infinite creative universe where each found object becomes a potential masterpiece.

🎨 Expert secret: Professional decorators use the "rule of three": they always arrange their contrasts in groups of 3 elements (an antique frame, a modern painting, a transitional object). This composition automatically creates a sophisticated visual balance that the eye perceives as "natural".

🤔 Frequent question from our readers

"I found a magnificent gilded baroque frame, but I'm afraid it will be too busy for my minimalist contemporary painting..."

This hesitation is perfectly legitimate and reveals a right aesthetic instinct. In reality, it’s exactly this type of maximum contrast that creates the most striking compositions! Think of the most beautiful contemporary art galleries: they often exhibit the most refined works in sumptuous heritage settings.

The secret? Leave some "breathing room" around this focal piece. Avoid overloading the same wall and make this contrast your main focus point. The effect will be spectacular and perfectly controlled.

💡 Test before purchase: Photograph the frame at a flea market, then use a photo editing app to overlay your painting with transparency. This instant visualization will give you the confidence to dare this bold pairing.

The 5 mistakes that can ruin your project (and how to avoid them)

After supporting hundreds of decorative recycling projects, I have identified these recurring pitfalls that turn a good idea into disappointment. The good news? They are all easily avoidable when you know them.

  • ⚠️ Neglecting the thickness of the painting: You fall in love with a frame without checking whether your canvas will fit easily inside. Result: impossible to close the rear fixing system. Always measure the total thickness of your artwork (canvas + stretcher bars) before any purchase. This frustrating mistake is yet the easiest to avoid.
  • 🎨 Forcing a color agreement: You try to harmonize the shades of the frame with those of the painting, losing all the interest of the contrast. The effectiveness comes precisely from this assumed chromatic break. Let the colors oppose naturally to create that sought-after visual tension. 🔧 Underestimating the final weight: A massive antique wooden frame + a large painting = an ensemble sometimes very heavy that your standard fixings will not support. Weigh the whole thing before installation and adapt your hanging system. A fall would irreparably damage your artwork. 🕐 Rushing the cleaning phase: The eagerness to see the final result leads to rushing this crucial step. An approximate cleaning leaves traces that will permanently tarnish the desired effect. Allow yourself enough time: that's the difference between an amateur and a professional.
  • 📐 Ignoring the scale of the room: Your frame + artwork composition works perfectly... on your table, but seems lost once hung on your large wall. Always visualize in situ before final fixing. A successful contrast must dialogue with the architecture of the room.

🛡️ Safety checklist before installation: Check that the artwork slides easily into the frame • Test the solidity of the corners under pressure • Confirm that your fixings support 3 times the actual weight • Mark the position with a pencil before drilling. Warning signs: the frame creaks, the joints move, the rear fixing forces or if you need to "adapt" the dimensions.

🎁 Special offer for readers

Because you took the time to inform yourself, enjoy 10% discount on your first order:

ART10

⏰ Valid for 72h after reading • Applicable to all our products

Frequently asked questions about recycling old frames

💰 How much does this transformation really cost and is it profitable compared to buying a new frame?

Allow between €15 and €45 for a vintage frame + €10-15 of restoration material, or a total of €25-60. A similar new frame costs €80-200 in a specialist shop. Your savings: minimum 50-75%, with the bonus of a unique piece impossible to find elsewhere. The time investment (4-6h) is profitable from the first successful project.

🔧 Do you need any particular DIY skills to succeed in this transformation?

Absolutely not! The techniques presented use only simple gestures: cleaning, light sanding, waxing. No electric tools required. If you know how to take care of a wooden piece of furniture, you already have the necessary level. Patience is more important than technicality. Total beginner? Start with a small, simple frame to gain confidence.

⏱️ How long does it really take to see a satisfactory result?

First visible result: 3-4 hours of work spread over a relaxed weekend. Optimal result with all details refined: maximum 6-8h. The learning curve is gentle: your 2nd project will be twice as fast as the 1st. After 3-4 restored frames, you develop this natural ease that makes all the difference.

🎨 How do I know if my modern artwork will really go with an old frame?

Trust the "contrast test": if the two elements seem diametrically opposed at first glance, that's often a good sign! Avoid half-measures that create confusion. The golden rule: a very marked style (baroque, Louis XVI) with a very contemporary painting (abstract, minimalist). This frank opposition automatically generates the sought-after aesthetic tension.

🏠 Does this technique work in all interior styles?
Paradoxically, this approach adapts better to clean and contemporary interiors than to already cluttered decor. In a modern loft, a Scandinavian living room or an architectural house, this contrast naturally becomes the centerpiece. In a classic, overloaded interior, the effect is lost. Simple rule: the more neutral your base decor is, the more spectacular the impact will be.

Your decorative transformation begins now

In a few weeks, when your guests stop dead in front of your antique frame + modern painting composition, you'll realize how far you've come. This technique that you now master transforms any ordinary room into a character space that marks memories.

Beyond the simple decorative effect, you have developed this expert eye that instantly recognizes the hidden potential of salvaged objects. This skill applies to all your future projects: furniture, lighting, works of art. You would never buy "ready-made" decoration in a store again.

Your next weekend at a flea market will never be the same. Armed with your new knowledge, you have all the keys to find those gems that others don't see. The hardest part was understanding the mechanisms, now it's time for practice!

🚀 Your challenge for this weekend: Go hunting for the perfect frame with your checklist in hand. This first find will mark the beginning of your new unique decorative signature. Expertise is acquired by practicing, so dive in now!

🎨 Read more DIY decor articles

Read more

DIY : utiliser des baguettes, tiges ou cordes pour suspendre plusieurs œuvres
Créer un coin lecture ou café avec un tableau comme pièce maîtresse