⏱️ Reading time : 8 minutes
You stand frozen in front of this blank wall that has mocked you for months, unable to choose between that family photo, that inspirational quote found on Pinterest, and that painting you love but seems too small to fill the space.
You can already imagine your guests' reactions: "It’s a bit empty, isn’t it?" or worse, the awkward silence when they look at your sadly bare wall. You tried sticking a few frames randomly, but the result looks more like a confused patchwork than thoughtful decor.
You tried the "one large painting in the center" approach, then the chaotic accumulation of everything you liked. Result: either it’s sadly minimalist, or it's a visual bazaar that stresses you out more than inspires you.
It's not your fault if these attempts failed. The real difficulty lies in the art of composing a harmonious ensemble while keeping a personal soul. Creating an expressive wall requires a precise method that has never been explained to you.
By the end of this article, you will master the art of creating a captivating expressive wall that tells your story while impressing your guests – a space that truly resembles you and which you will be proud to look at.
Why Your Expressive Wall Can Completely Transform Your Interior?
A successful expressive wall instantly becomes the focal point of your room. It's like having an open book on your personality that your guests discover with fascination. If you wait any longer, you are depriving your interior of this unique soul that makes all the difference between a commonplace house and a home that resembles you.
💡 True story: Sarah had collected travel photos, motivational quotes, and small canvases by local artists in drawers for 3 years. She thought she would never have "enough" to create something beautiful. The day she dared to display everything on her living room wall according to a real method, her friends immediately noticed that her apartment gained warmth and character.
💬 Conversation with a Decor Expert
"I don’t have enough interesting elements to create a beautiful expressive wall. My photos aren't artistic enough and I only have a few quotes found on the internet..."
The classic mistake! It's not the
rarity that makes beauty, it’s the arrangement. Think of a bouquet: even garden flowers become beautiful with the right composition. Your personal memories have a thousand times more charm than impersonal, even high-end decor.
"I've always been told that you need to respect strict rules of symmetry and spacing. If I mix photos, paintings, and objects, it will look cluttered..."
This rule dates back to an era when decor was frozen! Today,
mastered eclecticism creates far more emotion than a museum gallery. The trick? Create subtle visual links (colors, themes, shapes) that unify the whole without stiffening it.
What's really stopping you from creating the wall of your dreams
You hesitate between hanging this photo in the center or on the side. You measure and re-measure distances. You change your mind three times before hammering in the first nail. What you are experiencing has nothing to do with a lack of taste.
In reality, you're running into an issue of method, not creativity. No one has ever explained to you how to visually structure a space so that it tells a coherent story. It’s exactly like wanting to cook a complex dish without knowing the order of steps.
The good news? Once you understand the 3 basic principles, everything becomes clear and you enjoy composing your wall instead of suffering it.
First trap: the illusion of geometric perfection
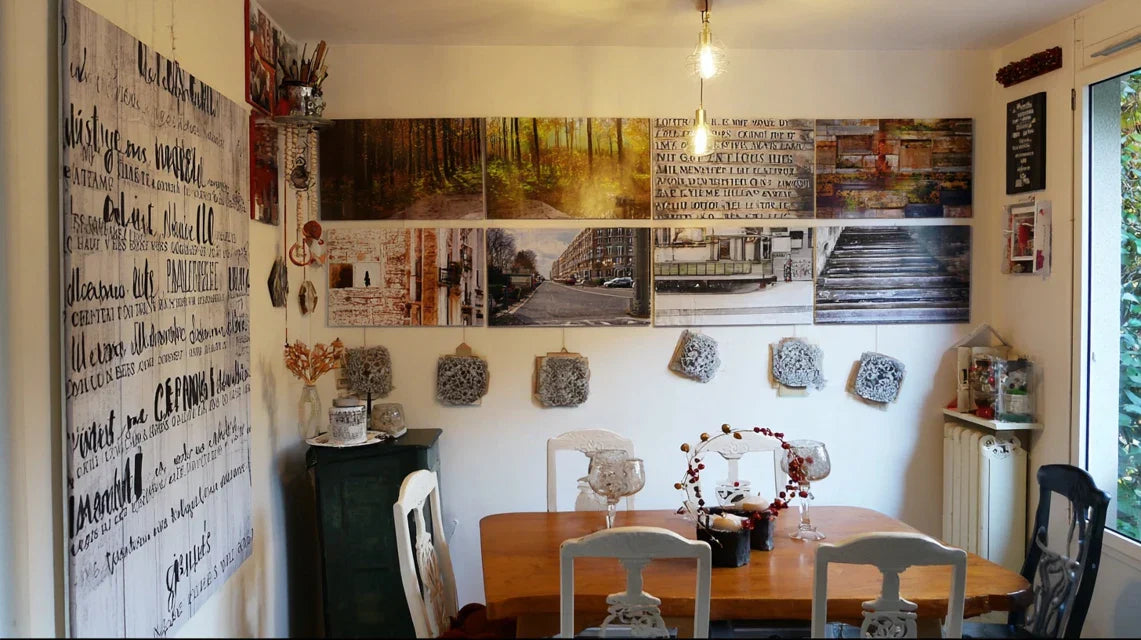
Contrary to what you've been led to believe, an expressive wall doesn’t have to look like an exhibition. Perfect alignments and millimeter-measured spacing create a cold and impersonal atmosphere. It is the mastered imperfection that gives soul.
Imagine the difference between a French garden (everything is aligned, symmetrical, predictable) and an English garden (organized chaos that seems natural but is actually cleverly thought out). Your expressive wall should be your English garden.
This obsession with geometry paralyzes you and prevents you from expressing your creativity. As a result: you spend more time calculating than feeling the harmony of your composition.
🔍 Immediate test: Look at the expressive walls you admire on Instagram or Pinterest. Count those that are perfectly symmetrical vs those that have a freer but balanced arrangement. You will be surprised by the result!
Second mistake: mixing without a guiding thread
You think it’s enough to accumulate what you like to create something beautiful. It's like wanting to improvise a concert by mixing your favorite tracks without an overall score.
The magic happens when your elements dialogue with each other: this travel photo recalls the tones of this abstract painting, this quote resonates with the emotion of another image. Without these subtle links, even the most beautiful objects remain isolated elements.
When you don’t create these connections, your eye moves from one element to another without rest, creating visual fatigue instead of the sought-after contemplative pleasure.
Third hurdle: the fear of emptiness and excess
You constantly oscillate between "My wall is empty" and "I've put too much on it." This hesitation reveals that you don't know how to measure the optimal visual density for your space and lifestyle.
You can spot this uncertainty in your gestures: you add an element, you step back, you remove another, you start again. It’s a sign that you haven't yet found your personal balance between expression and serenity.
This hesitant waltz exhausts and discourages you, when you should be enjoying creating your personalized visual cocoon.
3 signs that you haven't found the right balance:
- You avoid looking at this wall: Unconsciously, your brain is fleeing a composition that fatigues it rather than soothes it
- Your guests comment little on this space: A successful wall naturally sparks questions and compliments; it’s a conversation magnet
- You still think about it after 2 weeks: Once finished, a wall of expression should bring you satisfaction and serenity, not worry
The trigger factor: finding your emotional theme
What transforms an accumulation of objects into a true expression wall is the identification of your emotional red thread. Just as a perfumer chooses his base note before composing, you must first feel the overall emotion you want to convey: serenity, energy, nostalgia, inspiration, adventure... This emotion then becomes your selection compass for all your elements.
Golden rule of composition: An expression wall that succeeds tells ONE story with several chapters, never multiple different stories. Test your composition by describing in one sentence the emotion it conveys.
| ❌ Spontaneous approach |
✅ Structured approach |
💡 Why it works |
🎯 Concrete result |
| "I put everything I love" |
"I choose what serves my theme" |
Unifying emotional coherence |
Immediate impression of harmony |
| "I align everything perfectly" |
"I create a natural visual balance" |
The eye prefers organized variety |
Visual dynamism without fatigue |
| "I fill it to avoid emptiness" |
"I dose according to my lifestyle" |
Adaptation to your daily pace |
Sustainable pleasure on a daily basis |
| "I often change my mind" |
"I test before fixing" |
Validation before final commitment |
Confidence in your choices |
The 3-step method to create your perfect expression wall
Rassurez-vous, creating a captivating expression wall isn’t rocket science once you understand the logical progression. It's like learning to bake: you need to prepare your ingredients, follow the steps in order, and let time do its work. In 3 weeks, you’ll go from hesitation to creative pride by following this proven method.
🎯 Overview of your transformation: Week 1, you gather and organize your elements according to your emotional theme. Week 2, you compose and test different arrangements without fixing anything. Week 3, you finalize and perfect your creation. At each step, you gain creative confidence and decorating pleasure.
Step 1: Create your thematic collection (Week 1)
This first step is the foundation of your success. Just as an architect never starts without fully understanding their terrain, you must first explore and organize all your potential elements. It's at this moment that you’ll discover surprising connections between your memories and tastes.
🛠️ What you need to get started
-
A large sorting space (bed, table, clear floor): Workspace large enough to spread out all your elements and see them at a glance. Choose a location with good natural light as colors appear differently depending on the light. Avoid the kitchen table where you’ll have to put everything away at each meal.
-
Kraft paper or neutral fabric: Uniform surface that neutralizes the background and allows you to see your elements without chromatic influence. Kraft mimics the color of a wall and helps you anticipate the final rendering. Ban patterned surfaces that distort your perception.
-
Your smartphone in camera mode: Essential tool for capturing your different tests and comparing them objectively. The camera reveals details that your eye, too close, doesn’t immediately perceive. It's your virtual external gaze.
Now, let’s move on to practice with the creative inventory method
🎨 How to proceed concretely
Comprehensive gathering: Retrieve ALL your potential elements from your home: printed photos, paintings, mirrors, decorative objects, framed quotes, postcards, even those in drawers. This thoroughness avoids the “I should have thought of that” regrets later.
⏱️ Time: 45 minutes | ✅ Success when: You have at least 20-30 elements in front of you | ⚠️ Attention: Don’t pre-select, keep even what seems “not good enough”, magic often happens with unexpected items
Sorting by dominant emotion: Create 3-4 piles according to the emotion each element evokes you:
⏱️ Time: 20 minutes | ✅ Successful when: Each pile has a clear emotional consistency | ⚠️ Attention: Some items may go into multiple piles, that's normal, keep them in the one that inspires you most
Selecting your main theme: Observe which pile attracts you the most and contains your favorite elements. This pile becomes your guiding theme. The others can provide contrasting elements to avoid monotony.
⏱️ Time: 10 minutes | ✅ Successful when: You can name your theme in 2-3 words | ⚠️ Attention: Don't seek originality at all costs, prioritize what really looks like you
✨ Validation of step 1: You must have in front of you a selection of 10-15 items that tell a coherent story and make you smile. If some items leave you indifferent, remove them without regret. It's better to have fewer items but more emotion. Bravo, your creative raw material is ready!
Step 2: Compose and test your arrangements (Week 2)
This step transforms you into a true creator. You go from collector to composer, discovering how your elements interact with each other. This is where the magic happens and you gain confidence in your aesthetic choices. The "wow" effect begins to appear.
🎭 Tools for this creative phase
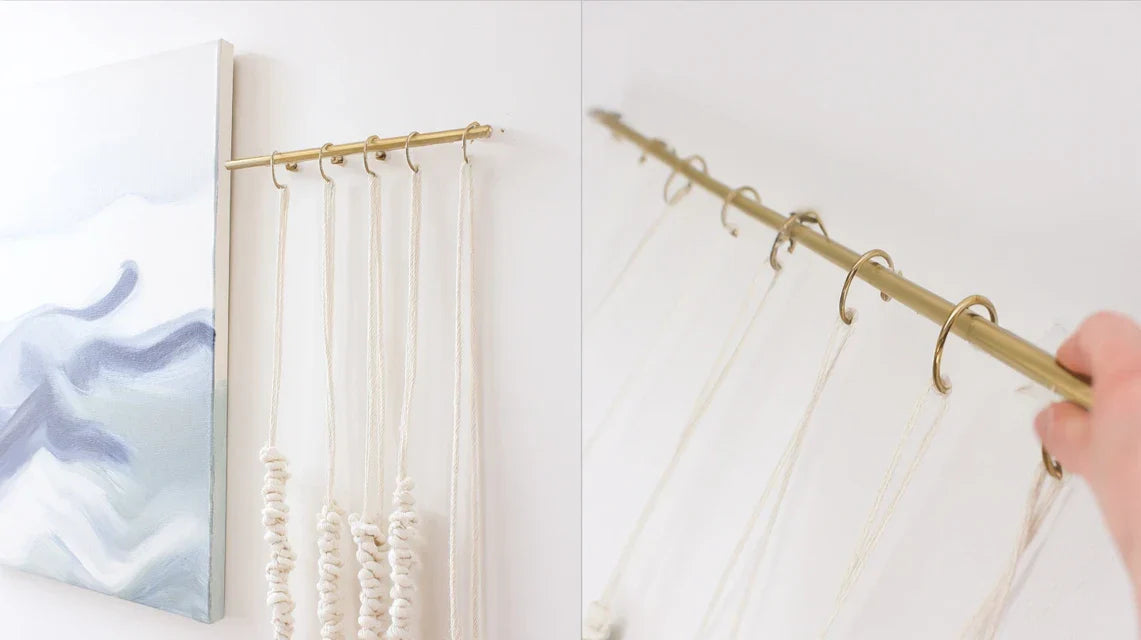
- Newspaper or kraft paper cut out: Templates to simulate your elements on the wall without making holes. Cut shapes corresponding to your frames and objects. This pro technique avoids costly mistakes and walls riddled with nails.
- Repositionable adhesive putty: Temporary fixing of your templates that leaves no trace. Test different configurations without stress or damage. Choose a quality brand to avoid unexpected falls.
- Flexible tape measure and pencil: Measuring tools to maintain harmonious proportions between your elements. The flexible tape measure adapts to non-rectangular shapes and imperfect walls. Opt for a pencil, easily erasable.
🎨 Progressive composition method
Creating the anchor element: First place your strongest element (large painting, striking photo, major quote) slightly off-center, not too high or too low. This element sets the tone and scale of your composition.
⏱️ Time: 15 minutes | ✅ Successful when: The element "holds" visually the wall without overwhelming it | ⚠️ Attention: Resist the urge to center it perfectly, the slightly asymmetrical is more lively
Construction by balance zones: Add your other elements by creating balanced "visual weights". A large element on one side can be balanced by several small ones. Think seesaw rather than symmetry.
⏱️ Time: 30 minutes | ✅ Successful when: No area seems "heavy" or "empty" | ⚠️ Attention: Let it breathe, it's better to have one element too few than one too many
Test distances and visual circulation: Check that the eye naturally circulates from one element to another without snagging. Spacing should create rhythm, neither too tight (oppressive) nor too wide (dispersed).
⏱️ Time: 20 minutes | ✅ Successful when: Your gaze goes around completely naturally | ⚠️ Attention: Photograph and wait until the next day to validate, a fresh eye reveals hidden details
Step 3: Finalization and perfection (Week 3)
You are now at the expert amateur level! This final step transforms your good composition into an accomplished personal work. This is when you adjust the details that make the difference between "it's pretty" and "it's magnificent". Your guests will immediately notice this unique creative signature.
🔧 Professional finishing material
-
Mountings adapted to your wall: Wall plugs, screws, hooks chosen according to the weight of your elements and the nature of your wall (drywall, concrete, brick). An unsuitable fixing ruins all the work and presents risks. Ask for advice in store with a photo of your items.
Precision bubble level: Essential tool for a professional finish. Even a "free" composition requires certain alignments to avoid a "wobbly" effect. A digital level is even more precise but a classic level is sufficient.
Accent lighting (optional): Spotlights or wall lights to sublimate your creation in the evening. Lighting completely transforms the atmosphere and reveals details invisible during the day. Allow for electrical installation if needed.
✨ Expert finalization process
Progressive and controlled hanging: Start with the anchor element, then proceed by zones constantly checking the overall balance. Discreetly mark the locations with pencil before drilling.
⏱️ Time: 1h30 | ✅ Successful when: Each element is securely fixed and perfectly positioned | ⚠️ Attention: Take regular breaks to keep an objective eye on the whole
Detail adjustments and final harmony: Micro-movements to perfect balances, possible addition of a small element if a "visual hole" appears. These details make all the difference between amateur and professional.
⏱️ Time: 45 minutes | ✅ Successful when: No element bothers you anymore | ⚠️ Attention: Know how to stop, perfection can kill spontaneity
Smart progression rule: You can move to the next step when you feel more excitement than hesitation. Enthusiasm is your best indicator of success. Take time to savor each step without rushing to the next.
You've just discovered the secrets of composition that professional decorators use. But a few expert tips can still transform your beautiful creation into a true masterpiece that your friends will want to photograph.
🎨 Little-known pro tip: Create a "chromatic echo" by subtly repeating the same color in 3 non-adjacent elements of your composition. This technique creates an unconscious coherence that unifies the whole without rigidity. For example, the blue of a sea photo, the blue frame of a quote, and a blue decorative object.
🤔 Frequent question from our readers
"I'm afraid to mix my personal photos with real paintings, I'm afraid it will look amateurish or disparate..."
This hesitation is very understandable and even healthy! It shows that you want a quality result. In reality, mixing personal and artistic creates the most touching compositions. The trick? Choose similar quality frames for your personal photos and pay attention to format balance rather than content "nobility". A well-framed travel photo in a beautiful frame rivals any work of art.
💡 Immediate test: Frame one of your most beautiful photos in a quality frame and temporarily place it next to a painting you like. You will see that emotion is what makes art, not the signature.
The 5 mistakes that can ruin your magnificent work
You've done the hardest part, but a few sneaky traps can still compromise your success. These errors are so common that I prefer to talk about them now to avoid the disappointment of seeing your beautiful creation lose its impact.
-
⚠️ Overloading afterwards: Once your composition is finished, resist the urge to add "just one more thing". It's tempting when you find a new favorite object, but each addition unbalances the existing harmony. Note down your ideas for additions and wait 2 weeks before making them happen.
⚠️ Neglecting wall lighting: A magnificent expression wall in daylight can become invisible or dull at night without proper lighting. Provide at least indirect lighting that reveals your elements without creating annoying shadows. The investment is worth it.
⚠️ Fixing too quickly: Enthusiasm pushes to drill immediately, but living with the "test" version for a few days often reveals small adjustments that change everything. Patience, your wall isn't in a hurry to receive its first nails.
⚠️ Ignoring the sightline height: Hanging too high is mistake number one. The center of your main composition should be at eye level (approximately 5ft3in from the floor). A wall that's too high is fatiguing and diminishes the emotional impact of your elements.
-
⚠️ Copying an inspiration from Pinterest exactly: Inspiration, yes! Reproducing it identically, no. Your wall should tell YOUR story with YOUR objects. Use ideas seen elsewhere as a starting point, not as a model to be faithfully reproduced.
🛡️ Safety checklist before finalization: Photograph your composition and show it to 2-3 trusted people. Verify that you still feel joy after 3 days of "testing". Make sure all your elements are securely fastened. Test the effect with artificial lighting. If all these points are validated, you can be proud of your creation!
❓ Practical questions to succeed in your project
🕐 How much time should you plan to create a wall of expression from A to Z, and what is the minimum budget?
Allow 3 weeks working 2-3 hours per weekend for a careful result, without stress. In terms of budget, €150-€300 is enough depending on your ambitions: €50 for frames and fixings, €100-€250 for a few quality artistic elements. The budget trick? Start with what you already have and gradually add pieces you love.
🔧 How do I know if my wall can support the weight of my composition without risk?
Concrete or brick wall: no worries up to 30kg distributed. Plasterboard partition: maximum 20kg with special dowels. For plasterboard, distribute the weight and use Molly dowels or special fixings. If in doubt, consult a professional – it's better to prevent than to have to repair!
😰 I'm afraid of making holes in the wrong direction or that the result won't please me after a few months...
First use the template technique with paper held for a minimum of 48 hours to validate your composition. Start with a single test element in a discreet corner to get acquainted with the drill. To fear the "boredom", choose a timeless emotional theme (serenity, positive energy) rather than a passing decor trend.
🎨 Can I integrate digital elements (digital photo screen, TV) into my composition?
Absolutely! A digital photo frame brings the flexibility to change your ambiance according to your mood. Integrate it as a strong element of your composition, providing discreet power supply. The advantage: being able to adapt your wall to seasons or events without doing everything over.
🔄 How to evolve my composition without starting from scratch?
Plan from the start 2-3 modular locations for seasonal or favorite items. Keep the main structure (70% of your composition) stable and evolve the remaining 30%. Pro tip: create a "second wall" in another room to test your new ideas before migration.


