Winter garden decor: integrating art into a green space
By Alexandre MARY
⏱️ Reading time: 8 minutes
You’ve carefully decorated your sunroom, chosen the most beautiful plants, installed perfect lighting... but something is missing. The space feels empty, impersonal, as if it's still waiting for its true soul.
You stand there, in front of this bright veranda filled with greenery, with that frustrating feeling that your plant-filled haven could be so much warmer, more inspiring. The bare walls seem to scream that they need an artistic touch to reveal their full potential.
You may have tried hanging a few photos or posters, but the result disappoints you. Between the humidity, changing light and the fear that art will be damaged by contact with plants, you ended up abandoning the idea of wall decor in your sunroom.
This hesitation is perfectly normal! Most veranda and sunroom owners make the mistake of considering this space as a simple extension of the garden, forgetting that it is first and foremost a living space that deserves decoration worthy of its natural beauty.
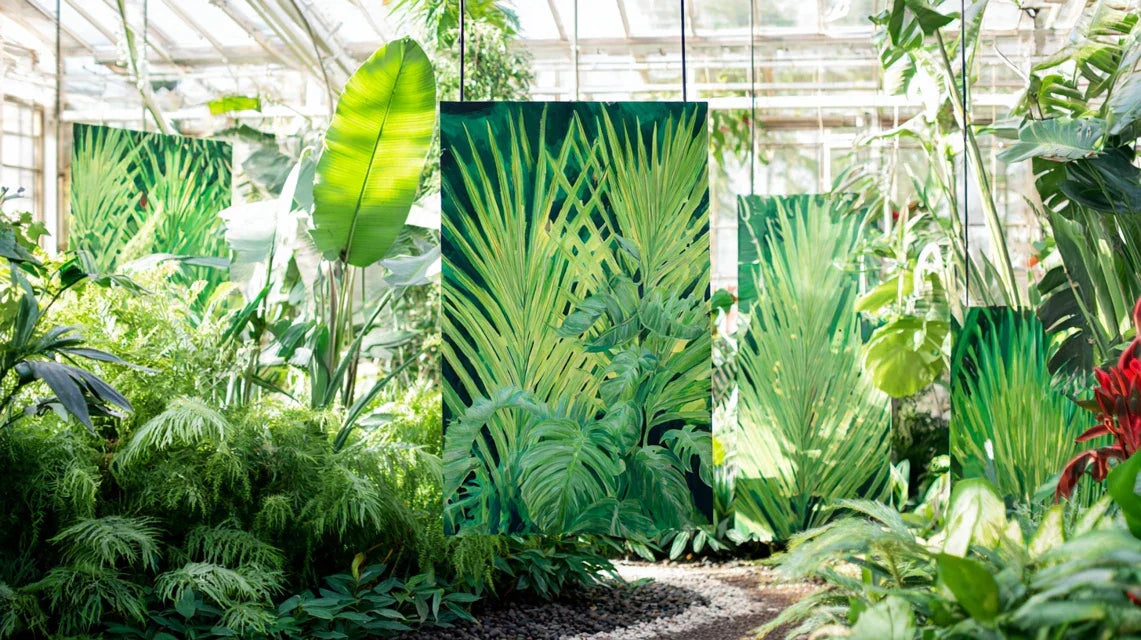
In this article, discover how to transform your sunroom into a plant gallery, with concrete solutions for harmoniously integrating art into your green space, without risking damaging your works.
Why does your sunroom need art now?
Your sunroom represents a considerable emotional and financial investment. Yet, without artistic decoration, it remains a simple sophisticated greenhouse. It's like having a beautiful case without jewelry: the beauty of the container cannot reveal its full potential. The longer you wait to personalize this space, the more moments you miss in an environment that truly resembles you.
🌿 Customer testimonial: "For two years, my veranda has been beautiful but cold. Since I installed three paintings depicting forest landscapes, my guests spontaneously settle into this place to chat. Art has created an atmosphere that plants alone could not bring."
💬 Conversation with a decor expert
"I don't know if it’s a good idea to put paintings near plants... Won't the humidity damage everything?"
It’s like being afraid to cook in your kitchen for fear of the steam! With the right supports and materials (aluminum, plexiglass, treated canvases), art and plants can coexist perfectly. The key is to choose works adapted to the environment.
"I've always been told that you shouldn’t mix nature and culture, that it makes it too busy..."
This rule dates back to an era when everything was compartmentalized! Today, the most beautiful interiors harmoniously blend art and nature. Look at modern botanical gardens: they integrate sculptures and artistic installations that sublimate plant beauty.
Art transforms a functional space into a personal sanctuary: Like a fragrance reveals a person's personality, artworks reveal the soul of your winter garden. In 15 days, you will already feel this difference in atmosphere that makes each moment in this space more precious.
What really happens in your winter garden without art
Do you recognize these situations? You enter your sunroom and your gaze sweeps around in a few seconds, never stopping anywhere.
Your guests admire your plants but quickly return to the main living room.
You yourself, despite the beauty of the place, can't really settle down to read or relax.
What’s happening is that your brain unconsciously seeks visual and emotional anchor points.
Without art, the eye has nothing to focus on, nothing that tells a story or evokes an emotion.
The space remains in a purely functional dimension, without the narrative depth that only artistic expression can bring.
It's like listening to a melody without lyrics: beautiful, but incomplete.
Your winter garden needs this cultural dimension to truly become habitable on an emotional level.
The first cause: the absence of dialogue between nature and culture
Contrary to what one might think, nature alone is not enough to create a warm atmosphere.
It needs a cultural counterpoint to reveal all its poetry.
The presence of art gives meaning and depth to the vegetal beauty.
Think of a mountain landscape: it becomes truly moving when you add a chapel, a bridge, or any trace of human presence.
Similarly, your winter garden takes on a whole new dimension when art dialogues with nature.
Without this interaction, you subconsciously feel a lack, an incompleteness that prevents you from fully appropriating the space.
Art becomes the catalyst that transforms a beautiful environment into an authentic living space.
🧪 Instant test: Temporarily place any artwork in your winter garden and observe. Even a simple reproduction will instantly change your perception of the space and your desire to stay there.
The design error: treating the winter garden as an exterior
Many consider their sunroom as an extension of the garden, when it is a unique hybrid space that deserves its own decorative identity.
This confusion explains why we hesitate to install art there, for fear that it will be "out of place".
It's like treating an open kitchen as simply a hallway to the dining room.
You miss out on its potential by not recognizing its specificity and particular needs in terms of layout.
This approach prevents you from creating a truly personal space, a plant living room where your personality can express itself as much as in your main interior.
The trap of overprotection: the fear of humidity
This excessive fear of humidity leads to avoiding any wall decoration, while modern winter gardens are perfectly ventilated.
It's a bit like avoiding cooking for fear of splashes: you deprive yourself of an essential pleasure through excessive caution.
You can spot this overprotection if you hesitate even to leave a book in your winter garden, or if you systematically put away any "fragile" object after use.
This attitude keeps you at a distance from your space, preventing it from becoming the creative haven it could be with a few well-chosen artworks.
🔍 3 signs that your winter garden lacks art:
The quick passage syndrome: No one spontaneously settles in for more than 10 minutes, it's a transit space rather than a place of residence
The showcase effect: You admire from the outside but don't feel like living there, like in front of a beautiful shop window
Lack of emotional attachment: You have no "favorite corner" or memorable memory, the space remains emotionally neutral
The trigger factor: exceptional natural lighting
Your winter garden has a unique asset: an natural brightness that can sublimate any work of art.
It's like having a free and natural museum spotlight!
This changing light throughout the hours transforms each painting into a living artwork, creating different atmospheres depending on the time of day.
Not exploiting this advantage is wasting exceptional decorative potential.
Golden rule for art in winter gardens: The brighter and more vegetated the space, the more valuable and impactful the art becomes. Test by observing a colorful artwork under the natural light of your veranda.
❌ Common misconception
✅ Modern reality
💡 Why it works
🎯 Concrete benefit
Art and plants don't go together
They sublimate each other
Contrast and complementarity create visual richness
More sophisticated and personalized space
Humidity damages everything
Modern materials resist perfectly
Aluminum, plexiglass and special treatments
Durability without compromising aesthetics
It's too complicated to match
Nature harmonizes with everything
Green is a universal neutral color
Total creative freedom
It will be overloaded
Art structures and purifies the space
Focal points that organize the gaze
Perception of order and elegance
How to create your plant gallery in 3 simple steps
Rassurez-vous, transforming your winter garden into an artistic space doesn't require any special skills or a large budget.
It’s like learning to cook: you start with simple recipes before perfecting your technique.
Follow this logical progression: first secure the environment, then choose the right artworks, finally optimize the harmony.
In 3 weeks, your space will gain personality and human warmth.
🎯 Overview of your transformation: Step 1 - Preparation and protection (space secured for art), Step 2 - Selection and installation (first artworks in place), Step 3 - Harmonization and optimization (balanced and personal final result).
🛡️ Step 1: Secure your artistic environment
Before installing your first artworks, make sure your winter garden offers the right conditions.
It’s like preparing the ground before planting: this solid foundation will guarantee the longevity of your wall decor.
Once this step is complete, you'll already feel a positive anticipation imagining your future paintings in this protected space.
🧰 What you need to get started
Hygrometer: Small electronic device that displays the humidity level in real time, essential for monitoring the environment of your artworks. Choose a model with memory of extremes (available in hardware stores, 15-25€). The ideal humidity is between 40-60% - above that, you need to improve ventilation.
Special humid environment fixings: Stainless steel or aluminum screws and anchors, which will never rust unlike standard fixings. Prefer rail systems that allow you to easily move artworks according to the seasons and plant growth.
Wall protection: Transparent plexiglass plates or protective film to stick behind the location of future artworks. This invisible barrier protects the wall from humidity while creating an air circulation that preserves your paintings.
Now, let's move on to concrete implementation:
🔧 Actions to take this week
Measure and map humidity: Place the hygrometer in different locations for 48h to identify the most stable areas. Locations near openings and away from large plants are generally optimal. This step avoids unpleasant surprises and gives you confidence in your choices.
⏱️ Time: 10 minutes of installation + 2 days of observation | ✅ Success when: You know 3 zones where humidity remains below 60% | ⚠️ Attention: Don't rely on a single measurement - humidity varies depending on the weather and watering
Prepare receptive walls: Clean and degrease the chosen areas, then install the transparent protections. Like putting plastic wrap on a precious book, this invisible step guarantees the durability of your artistic installation.
⏱️ Time: 30 minutes per area | ✅ Successful when: Smooth, clean and protected surface | ⚠️ Caution: Be sure to chase out air bubbles that could retain moisture
Install the fixing system: Mount the rails or hanging points respecting the 2/3 rule (the center of the artwork at 2/3 of the wall height). This height is optimal for visual appreciation, whether you are standing or sitting.
⏱️ Time: 45 minutes per rail | ✅ Successful when: Stable and aligned system | ⚠️ Caution: Check that it's level with a spirit level - a tilted artwork ruins the whole effect
✅ Validation of step 1: Your winter garden now has secure locations with controlled humidity and durable fixings. If you still feel doubts, that's normal - the next step will concretize your vision and reassure you definitively.
OUR RECOMMENDED PRODUCTS
🎨 Step 2: Choose and install your first artworks
You are now entering the creative part!
The infrastructure is ready, it's time to give an artistic soul to your winter garden.
This step is more rewarding because you immediately see the transformation of your space.
The effect will be visible from the first artwork installed - this is when your vision becomes reality.
🎯 Selection criteria for your artworks
Moisture resistant support: Favor aluminum, plexiglass or canvases with water repellent treatment. These modern materials offer the same visual quality as traditional supports while perfectly resisting variations in humidity. Avoid unprotected paper that could warp.
Themes in harmony with vegetation: Natural landscapes, organic abstractions, or botanical representations that create continuity with your plants. The principle is to create a dialogue, not a competition - art should complement nature without exactly copying it.
Colors complementary to green: Warm tones (ochres, reds, golds) or bold colors (deep blues, purples) that highlight the beauty of foliage. Neutral colors (grays, beiges) bring a modern sophistication that enhances the chromatic richness of your plants.
🖼️ Installation of your first artwork
Choose the strategic location: Select the most visible wall from the entrance to your winter garden, where your gaze naturally rests. This first artwork will set the tone for all the decoration - it's your "statement piece" that announces your artistic style.
⏱️ Time: 15 minutes of reflection + test | ✅ Successful when: The artwork is visible and balanced in relation to the plants | ⚠️ Warning: Avoid hiding your most beautiful plants - art should enhance them, not hide them
Test natural lighting: Observe how light plays on your artwork at different times (morning, noon, late afternoon). The magic happens when the interplay of shadows and light creates changing moods that constantly renew your visual pleasure.
⏱️ Time: Observation over a full day | ✅ Successful when: The artwork remains beautiful under all lighting conditions | ⚠️ Warning: Beware of direct reflections that can dazzle or create unreadable areas
🌟 Step 3: Harmonize and personalize your gallery
You now master the basics and can create a true artistic composition.
This final step transforms simple decoration into a refined personal expression.
The final result will be a space where every visitor immediately understands your artistic sensibility and your taste for harmony between culture and nature.
🎼 Create a visual symphony
Establish a visual rhythm: Alternate formats and styles to create a discovery path - like a balanced music playlist. Vary the sizes (large centerpiece + more intimate works) and intensities (vibrant colors + soothing tones) to maintain interest without tiring.
⏱️ Time: 1 hour of composition | ✅ Successful when: The eye naturally moves from one work to another | ⚠️ Warning: Avoid monotonous repetition - maximum 3 similar works
Integrate art into the plant landscape: Play with foregrounds (plants) and backgrounds (art) to create depth. Some artworks can be partially hidden by foliage for a progressive discovery effect, as in a real artistic garden.
⏱️ Time: 30 minutes of adjustment | ✅ Successful when: Art and nature seem to have been thought together | ⚠️ Warning: Anticipate evolution: plants grow and can hide an artwork over time
Rule of artistic progression: Start with a strong work, gradually add complementary pieces, then refine the details. Wait a few weeks in each configuration before adding new elements.
Congratulations! You now master the art of creating a plant gallery.
Here are some professional secrets to take your arrangement to the next level and impress even the most demanding connoisseurs.
🎭 Professional decorator's tip: Create "themed scenes" by pairing a work with a plant that shares the same spirit (forest painting + ferns, graphic geometric abstraction + graphic cacti). This staging technique transforms each corner into a decorative vignette worthy of a magazine.
💭 Frequent question from our readers
"I'm afraid my tastes will change and I'll get tired of my artistic choices..."
This concern is very understandable - we want our investment to remain satisfying over time!
That’s exactly why you should start with "heartfelt” works rather than purely decorative choices.
Your artistic intuition is generally more durable than trends.
Plus, a modular rail system allows you to evolve your gallery according to your desires and discoveries - it's an advantage, not a constraint!
💡 Emotional durability test: Before buying, keep the image of the artwork on your phone for 2 weeks. If it still makes you smile after 15 days, it’s a durable choice that will accompany you for years.
⚠️ Mistakes that can ruin your artistic project
After supporting hundreds of winter garden owners, I have identified the most frequent pitfalls.
These mistakes are human and avoidable - knowing yourself will allow you to avoid them easily and obtain a professional result from the first attempt.
🚫 Trying to install everything at once: Enthusiasm leads to filling all walls immediately, creating a "clutter" effect rather than a thoughtful composition. Consequence: the space becomes oppressive instead of inspiring. Start with 1-2 rooms and take your time to appreciate before adding more. This is a mistake that 80% of beginners make!
🚫 Neglecting supplementary artificial lighting: We only rely on natural light, forgetting that the winter garden also lives in the evening. Result: your works disappear into the shadows after 5 pm. Provide discreet spotlights or LED string lights to prolong the visual pleasure. Art deserves to be admired at all hours!
🚫 Choosing artworks that are too small: Out of caution, we select timid formats that get lost in the space and lush vegetation. The effect is disappointing: art becomes anecdotal. In a winter garden, dare generous formats that dialogue on equal terms with the surrounding nature.
🚫 Forgetting specific maintenance: We install and forget, without adapting maintenance to the particular environment. Consequence: accumulation of dust or traces of humidity which tarnish the brilliance of the works. A monthly dusting with a microfiber cloth is enough to preserve beauty.
🚫 Copying exactly what you see in magazines: We reproduce an atmosphere seen elsewhere without adapting it to our own plants and constraints. The result lacks authenticity and coherence with your personal style. Get inspired but always personalize according to your unique sensitivity.
🛡️ Validation checklist before finalizing: Make sure each artwork remains visible even as plants grow, that the overall composition retains "breathing room" (empty spaces), that colors harmonize under different lighting conditions, and that you feel joy (not just satisfaction) when looking at the final result.
Because you took the time to inform yourself, enjoy 10% discount on your first order:
ART10
⏰ Valid 72h after reading • Applicable to all our products
🤔 Practical questions about art in a winter garden
💰 What budget should I allocate to transform my winter garden into an artistic gallery?
Allow between €200 and €800 for a complete, high-quality layout, depending on the size of your space. Start with a focal point (€100-€200) then gradually complement it. Optimize by choosing medium formats rather than very large ones: they have more impact than small ones without the cost of large artworks. Concrete example: 3 40x60cm paintings create a more spectacular ensemble than one 80x120cm for the same budget.
⏰ How long does it take to see a real difference in my space?
The impact is immediate with the first artwork installed, but the "harmonious gallery" effect develops over 3-4 weeks as you adjust and complete. The real magic happens after 2 months when you and your loved ones have integrated this new art of living. It's at that moment that your winter garden truly becomes "your" signature space.
🌡️ How can I be sure my artworks won’t deteriorate due to humidity?
With modern materials (aluminum, plexiglass, treated canvases) and humidity maintained below 60%, your artworks last as long as in a classic interior. Simply monitor with a hygrometer for the first few months to adjust ventilation if necessary. Well-designed winter gardens rarely have problems with excessive humidity - it's more of a myth than a technical reality.
🎨 How do I choose artworks that will remain beautiful even when my plants have grown?
Prioritize vertical compositions that "grow" with your plants, and place horizontal artworks in height where they will remain unobstructed. Pro tip: photograph your plants and imagine their size in 2 years to anticipate the evolution. Also choose artworks strong enough to compete with dense vegetation - bright colors and marked contrasts age better than subtle nuances.
🔄 Can I modify my gallery over time and according to my whims?
It’s even recommended! A modular rail system allows you to evolve your gallery according to the seasons, your artistic discoveries and the growth of your plants. Many owners create an "artistic rotation" with summer works (warm, energetic tones) and winter works (soft, soothing colors). This flexibility maintains the freshness of your decor over time.
🌿 Your new artistic sanctuary awaits
In a few weeks, you’ll be entering your winter garden with a spontaneous smile.
This space that you found "pretty but impersonal" will have become your favorite creative refuge, a place where nature and culture converse in harmony.
Your guests will linger there naturally, drawn by this unique atmosphere that you will have created.
More than just decoration, you will have expressed your personal vision of the art of living.
This transformation goes far beyond aesthetics: you will have developed your artistic eye, learned to compose a space, and gained confidence to personalize other places in your home.
These interior design skills will serve you in all your future layout projects.
Above all, you will have proven that art and nature can coexist beautifully with the right techniques.
The preparation was the most delicate part - now that you know the method, all that remains is to choose your first work and start this beautiful adventure.
Your winter garden already has natural beauty, simply add the expression of your artistic personality.
The result will surprise you with its ease and emotional impact.
🚀 Your first step towards transformation: Starting today, look at your winter garden with a new eye and identify the wall that naturally draws your gaze. This is where your first work will find its place and bring your dream plant gallery to life.
📚 To go further in your decor project
Now that you master the art of the winter garden, discover our other guides to optimize every aspect of your veranda: lighting, furniture, complementary plants... A real library to perfect your living space.