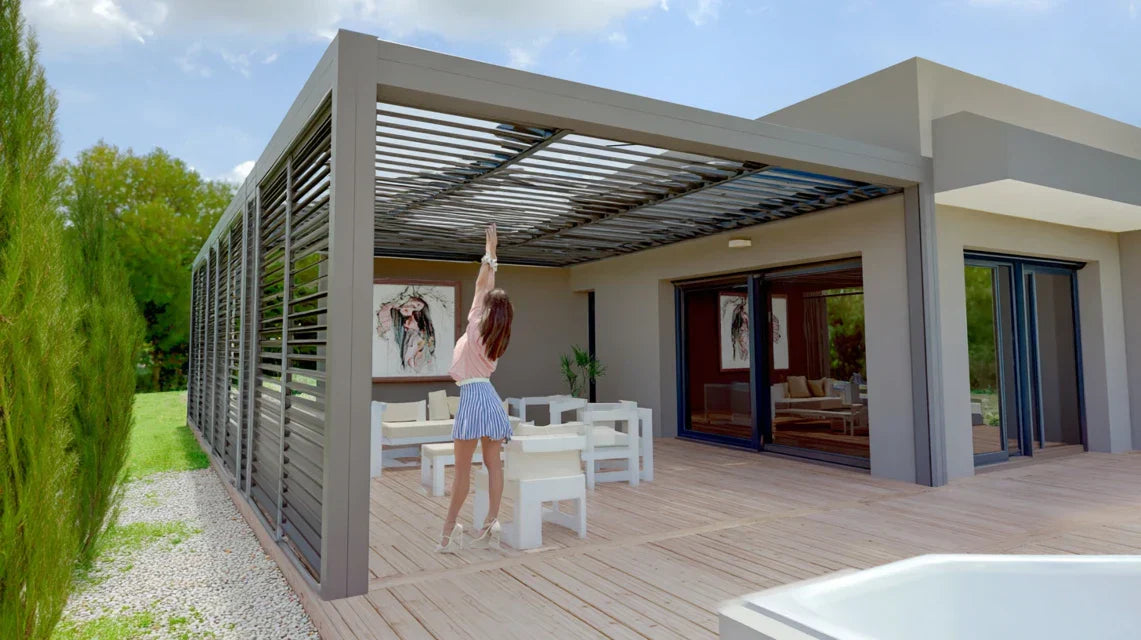
You’re looking at your covered terrace or patio with that frustrating feeling: the space is beautiful, protected from the weather, but the walls remain desperately empty and cold.
Imagine hanging a piece of outdoor artwork, but anxiety sets in: what if humidity damages the painting? What if temperature variations cause the canvas to warp? You oscillate between wanting to personalize this privileged space and fearing making the wrong choice.
Perhaps you’ve already tried solutions: laminated reproductions that look cheap, indoor canvases that have degraded within a few months, or worse, you've given up leaving those bare walls that ruin the potential of your sheltered outdoor space.
This hesitation is perfectly normal. The problem isn't your lack of taste or indecision, but simply the absence of reliable information on suitable materials and installation techniques specific to semi-outdoor spaces.
By the end of this article, you will know exactly how to choose and install durable artworks on your covered terrace, transforming this space into a true personal gallery where you will enjoy welcoming your guests.
Why does your covered terrace deserve immediate decorative attention?
Your sheltered patio represents a unique space in your home: neither totally interior nor completely exposed to the elements. It is precisely this specificity that makes it an exceptional place for wall art, but also a technical challenge that many underestimate. Waiting longer means missing out on every season where you could fully enjoy this transformed space. Imagine the difference between receiving friends in a patio with bare walls and welcoming them into a personalized space that tells your story. It's like comparing an impersonal hotel room to your favorite living room.
🏡 Customer testimonial: "My 25m² covered terrace had become just a place of passage. After installing three weather-resistant paintings, it became our favorite room. My neighbors are now asking me how to transform theirs!"
💬 Conversation with a decor expert
Outdoor sheltered wall art creates an emotional bridge between your interior and nature: it extends your decorative personality to the limits of your private space, transforming a simple terrace into a refined extension of your home. Visible result from installation, guaranteed emotional impact with each use of the space.
Finally understand why your previous attempts failed
Do you recognize yourself in these situations? Your painting faded after a summer, the corners peeled off despite a sheltered location, or the artwork seems out of place with the outdoor ambiance you wanted to create.
The problem doesn't come from your aesthetic choice or your ability to decorate, but from the fact that semi-outdoor spaces obey specific technical rules that few mainstream decor advice address. You applied interior methods to a hybrid environment.
It’s exactly like trying to grow an indoor plant in a pot on a terrace: even sheltered, it will experience variations that its original environment has not taught it to manage.
The confusion between "sheltered" and "protected" sabotages your projects
Here's the revelation that few decorators mention: a space sheltered from rain is not a protected space from humidity and temperature variations. This technical nuance changes everything in the choice of materials and fixings.
Imagine the difference between storing your books in a closed closet versus placing them on a shelf in a conservatory. Even without direct contact with water, the environment remains dynamic and demanding.
This understanding transforms your approach: instead of trying to "protect" art from the elements, you choose materials designed to adapt to natural variations. Your stress decreases, your choices become more secure.
🔍 Verification test: Place a piece of newspaper in your sheltered space for 48 hours. If it curls slightly, your environment actually requires technical materials - let's confirm together that your instinct was right.
The error of "universal" fixings that weaken the installation
Most hanging systems are designed for stable interior walls and lightweight artworks. In a sheltered outdoor setting, even a technical canvas experiences micro-movements due to temperature variations which differently stress the fixing points.
It’s like the difference between carrying a backpack for a walk in town versus a hike in the mountains: the contents may be identical, but the mechanical constraints require an adapted carrying system.
Result: your artworks peel off, the corners lift, or worse, you develop a permanent anxiety about seeing your artistic investments degrade. The solution lies in reinforced fixings and materials that work with the elements rather than against them.
The trap of imitating interior spaces
Many try to recreate exactly the atmosphere of their living room on their covered terrace, by transplanting the same aesthetic codes and the same materials. This is neglecting the unique potential of these transition spaces.
You can detect this error if your outdoor artworks seem "faded" compared to those in your interior, or if the overall look lacks coherence with the surrounding natural environment.
This mimetic approach deprives you of the specific emotional richness of semi-outdoor spaces: that unique feeling of domestic comfort in connection with nature, which only adapted wall art can magnify.
3 signs that your approach needs a rethink:
- You constantly hesitate between interior and exterior: this indecision reveals that you are trying to apply unsuitable rules rather than embracing the specificity of the space
- Your guests don't notice your artworks: this indicates a lack of dialogue between art and environment, a sign of an approach too "transplanted"
- You constantly monitor the condition of your paintings: this anxiety proves that your material choices do not match the real constraints of the space
The trigger factor: technical and aesthetic harmony
The element that shifts an outdoor wall art project from "source of worry" to "daily pride" is the alignment between your aesthetic choices and the technical performance of the materials. Like a domino effect, when this coherence is found, everything else balances naturally. You can identify this success when you stop worrying about durability and focus only on visual pleasure.
Golden rule for sheltered outdoor art: first choose based on the technical constraints of your space, then refine according to your aesthetic tastes. This sequence guarantees durable choices and allows you to immediately check relevance by observing your level of confidence in the installation.
| ❌ Interior transposed approach | ✅ Sheltered outdoor approach | 💡 Why it changes everything | 🎯 Concrete benefit |
|---|---|---|---|
| I seek to protect art from the elements | I choose materials that adapt to variations | Adaptability surpasses passive protection | Zero weather stress |
| I reproduce my interior decor codes | I create a dialogue with the natural environment | The semi-outdoor space has its own aesthetic rules | Originality and visual harmony |
| I prioritize aesthetics first | I start with technical constraints | Durability conditions long-term pleasure | Investment that pays off for years |
| I use standard fixings | I adapt the system to micro-movements | Sheltered spaces remain thermally dynamic | Solid and reassuring installation |
The progressive method for creating your personal outdoor gallery
Rassurez-vous : transformer votre covered terrace into a successful artistic space requires neither specific technical skills nor an excessive budget. The progression is similar to creating a garden: you first prepare the ground (space analysis), then you plant (installing the first artwork), and finally you compose the whole (harmonization and enrichment). Each step brings immediate satisfaction while preparing for the next.
📋 Overview of your project : First, you assess your space to identify optimal areas and specific constraints. Then, you select and install your first artwork with the appropriate technique. Finally, you gradually develop a coherent composition that reveals the unique potential of your covered terrace.
Step 1: Diagnose your space like a professional
Starting with this analysis avoids 90% of costly mistakes and gives you that valuable confidence which transforms the anxiety of choice into the pleasure of discovery. As when building a house, solid foundations determine the success of the entire project. Once this step is mastered, you will feel the satisfaction of finally understanding the specificities of your space.
What you need for the assessment:
- A simple digital hygrometer : this device, the size of a remote control, precisely measures the ambient humidity of your terrace. Get one from a hardware store for 15-20€, make sure it displays both the humidity percentage AND the temperature. Avoid low-cost models that quickly drift, and opt for a brand known for reliable measurements over several years.
- A weather observation notebook : A simple notepad allows you to record humidity variations over a typical week. The principle: measuring at fixed times for 7 days reveals the natural cycles of your space. Choose a pocket-sized, moisture-resistant format; the impact on your future artistic choices justifies this initial documentation effort.
- A meter and photos taken at different times : These tools reveal areas of shade and light depending on the hours, crucial information for positioning your artworks. Measure the available wall surfaces and photograph them at key moments: morning, noon, evening, to visualize the natural lighting effects that will enhance your future paintings.
Let's move on to observing your environment methodically now
How to analyze your terrace in 3 key measurements
Measure humidity levels over 7 days: Place your hygrometer in the center of the terrace and record the values morning and evening. This measurement reveals whether your space experiences significant variations (more than 20% difference) that require specifically adapted materials. Also note the rainy days to identify the indirect impact of inclement weather on your sheltered space.
⏱️ Time: 5 minutes per day for 1 week | ✅ Success when: You have 14 measurements revealing natural cycles | ⚠️ Attention: Do not measure only on sunny days - variations are most evident in changing weather
Identify circulation and contemplation areas: Observe how you and your guests naturally use the space. Mark the floor (chalk or post-it notes) with frequently used passages versus those where people stop willingly. This mapping determines where to place your artworks for maximum impact without hindering the functionality of the space.
⏱️ Time: One evening of observation | ✅ Success when: You clearly distinguish 2-3 zones with different functions | ⚠️ Attention: Usage evolves according to the seasons - re-evaluate at least once a year
Test the solidity of wall supports: Gently tap your walls to identify solid versus hollow areas. A dull sound indicates a solid support, a hollow sound reveals the need for special anchors. This verification determines the appropriate fixing systems and avoids unpleasant surprises during installation.
⏱️ Time: 15 minutes | ✅ Success when: You know the nature of each wall (concrete, brick, partition...) | ⚠️ Attention: Exterior walls may hide insulation or technical cavities - do not hesitate to drill a small test hole
✅ Validation of step 1: Your terrace is ready for wall art when you can predict its humidity variations, you have identified 2-3 optimal locations for the artworks, and you know the fixings needed for each wall. If you are unsure about the measurements, repeat the observation during a different weather period - the security of your future artistic investments depends on it.
OUR RECOMMENDED PRODUCTS
Step 2: Select and install your first reference artwork
This second step marks your transition from observer to informed designer. You are practically experimenting with techniques specific to sheltered spaces, which gives you valuable confidence for all your future projects. The feeling of satisfaction is immediate: after the first successful installation, you feel proud of mastering a specialized know-how.
Specific materials for outdoor installation:
- Artwork on durable support material: prioritize aluminum dibond or high-density expanded PVC rather than traditional canvas. These supports resist humidity variations without warping or deforming. Expect a 30% higher cost compared to a classic canvas, but this difference pays off from the first season thanks to the absence of degradation and your peace of mind.
- Reinforced anti-corrosion fixings: stainless steel or galvanized wall plugs with pivoting hooks adapt to micro-movements in the support. Absolutely avoid standard fixings that rust or deform. The investment (20-30€ more) saves you annual retouching and guarantees the safety of your artwork for several years.
- Sealing kit for fixing points: a tube of transparent silicone sealant protects drill holes from moisture infiltration. This invisible protection preserves your walls and avoids unsightly halos that can appear around attachment points exposed to climatic variations.
Technical step-by-step installation
Optimal positioning according to natural lighting: Install your first artwork in the area that benefits from stable lighting (neither full sun nor permanent shade) at eye level from your favorite relaxation position. This rule guarantees optimal visual comfort and avoids annoying reflections on technical supports. Mark the fixing points with a pencil before drilling.
⏱️ Time: 30 minutes of positioning | ✅ Successful when: The artwork is comfortably visible from your living areas | ⚠️ Attention: Test different times of day before final fixation
Drilling and reinforced fixing: Use a drill bit suitable for the material of your wall (concrete, brick, etc.) with a diameter slightly smaller than your wall plugs. Drill cleanly without chipping the edges, insert the wall plugs firmly, then apply a dot of sealant to each point before screwing in the hooks. This technique ensures durable and watertight fixing.
⏱️ Time: 20 minutes | ✅ Successful when: The fixings do not move when you pull on them | ⚠️ Attention: Wait 24 hours before hanging the artwork to allow the sealant to set
Hanging and stability check: Hang the artwork checking its horizontality with a level, then test its solidity by slight lateral movements. The whole must remain stable without play or creaking. Photograph the installation to keep a reference and be able to reproduce this success on your next artworks.
⏱️ Time: 15 minutes | ✅ Successful when: The artwork remains perfectly stable even with a slight breeze | ⚠️ Attention: Check stability after 48 hours of climatic variations
🎯 Step 2 Validation: Your installation is mastered when you can admire your artwork without any concern about its stability, when the lighting naturally enhances it, and when your guests spontaneously notice it. If you still feel a hint of apprehension, that's normal - it will disappear after a few weeks of observing the perfect stability of your installation.
Step 3: Compose a Coherent and Evolving Gallery
This final step takes you to the level of "curator of your own space": you develop an expert eye for harmonizing artworks with each other and with the natural environment. The difference from an amateur is immediately felt: where others accumulate decorative elements, you create a coherent artistic experience that evolves with the seasons and your desires. Result: your terrace becomes a unique place of contemplation that your loved ones secretly envy.
Advanced Composition Tools:
- Visual Layout Plan: A simple sketch of your terrace with the locations of artworks helps you visualize the overall balance before investing. Draw areas of high activity versus contemplative spaces to create visually adapted rhythms. This planning avoids impulsive purchases that disrupt the whole. Adjustable Accent Lighting: Orientable LED spotlights or technical string lights that resist humidity allow you to reveal your artworks in the evening. Lighting completely transforms the atmosphere of your outdoor gallery and extends your visual pleasure into the late hours. A profitable investment from the first successful dinner with friends. Seasonal Rotation System: Multiple hooks or discreet rails facilitate the changing of artworks according to your moods or the seasons. This flexibility maintains the freshness of your space and allows you to gradually invest in several pieces without visually saturating your terrace.
Professional Composition Techniques
Create Visual Dialogues Between Works: Arrange your paintings to create visual links (colors that respond to each other, themes that complement each other, formats that balance) while respecting the technical constraints of each location. This approach transforms a collection of objects into a true artistic journey that naturally guides the eye and enriches the experience of the space.
⏱️ Time: 2-3 hours of testing and adjustment | ✅ Success when: The gaze circulates naturally from one work to another | ⚠️ Attention: Avoid overload - it is better to have fewer well-placed works than too many competing elements
Integrate Existing Natural Elements: Compose with vegetation, shadows, architectural materials to create a global harmony. A work can dialogue with foliage, lean on an exposed beam, or elegantly contrast with the texture of a wall. This integration reveals the unique potential of your specific space.
⏱️ Time: 1 hour of observation and positioning | ✅ Successful when: The artworks seem "in their place" in the environment | ⚠️ Attention: Changes in vegetation can alter these relationships - allow for seasonal adjustments
Plan for evolution and maintenance: Establish a simple schedule for checking fixings (quarterly) and cleaning artworks (as needed). Document your successful choices so you can reproduce or adapt them. This organization perpetuates your investments and maintains the aesthetic quality of your personal gallery.
⏱️ Time: 30 minutes of organization | ✅ Successful when: You have a simple system to preserve your artworks | ⚠️ Attention: Neglecting maintenance can quickly compromise years of aesthetic effort
🏆 Validation of step 3: Your outdoor gallery is complete when you feel that quiet pride of receiving in a space that resembles you perfectly, your guests spontaneously ask for advice for their own terrace, and you are already anticipating your next artistic enrichments. You have then reached this mastery which transforms decoration into art de vivre.
Rule of progression for experts: Do not move on to the next step until you fully master the previous one, but always keep a lead by observing future possibilities. This method balances perfectionism and ambition, avoiding stagnation as well as haste that spoils decorative projects.
Congratulations on acquiring this specialized expertise in sheltered outdoor wall art! You now master the technical subtleties that even some professional decorators neglect, giving you a decisive advantage for creating truly unique and durable spaces.
🎨 Little-known expert tip: Install your first artwork slightly higher than the calculated optimal position (5-10cm). Seasonal variations in vegetation and changes in your outdoor furniture will subtly alter perspectives, and this margin avoids future tedious adjustments. Professionals systematically apply this rule to perpetuate their installations.
💭 Question from an attentive reader
“And if I make mistakes in my choices and my artworks do not resist as well as expected to the conditions of my terrace?”
This concern reveals exactly the seriousness and caution that guarantee the success of your project! It is perfectly normal to be apprehensive about an artistic investment, especially in a semi-outdoor environment. The reassuring reality: by following the analysis steps we have detailed, you already have 90% of the information needed to make the right choices. The remaining 10% are acquired through experience, and even minor errors can be easily corrected with appropriate techniques. Start with an affordable test piece to validate your approach - your confidence will naturally grow with the first successes.
🛡️ Beginner safety: Choose your first artwork in a price range that allows you to experiment without financial stress. Observe its behavior for a full season before investing in more expensive pieces - this progression will give you the technical confidence for all your future artistic projects.
Avoid these pitfalls that compromise even well-prepared projects
Despite all your preparation, some subtle errors can still creep into your project and reduce its success. These traps are not due to a lack of competence on your part, but to technical details that only experience reveals - it's better to benefit directly from this feedback to save yourself costly lessons.
- ⚠️ Underestimating the impact of seasons on materials: It is tempting to choose artworks in good weather, when everything seems stable and bright. Problem: materials react differently depending on seasonal variations, and a work perfect in summer can reveal defects in humid winter. Systematically test your choices over at least two contrasting seasons, or request samples to display in your space before purchase. This initial patience avoids frustrating replacements. 🔧 Neglecting the evolution of furniture around artworks: You install your paintings with the current furniture, but that evolves (new cushions, plants growing, changes in layout). A perfectly positioned artwork can become masked or unbalanced. Anticipate these changes by keeping a margin of maneuver around each installation, document your choices so you can adjust them. The error is classic but easily avoidable. 💡 Ignoring artificial lighting in color choices: The colors of your artworks change radically under artificial lighting (LED, halogen, garlands...), and what you love in natural light may disappoint you in the evening. This disappointment even happens to experienced decorators. Always check the effect of your accent lights on your artworks before final installation, or plan for lighting adapted to your artistic choices. 🏠 Copying the successes of other terraces without adapting: Inspirations from Pinterest or advice from friends relate to different environments (exposure, climate, architecture). What works elsewhere can fail for you due to subtle technical reasons. Feel free to be inspired but always adapt to your specific constraints. This personalization, far from being a constraint, often reveals more original and better integrated solutions.
- 📅 Indefinitely postponing due to perfectionism: Analysis can become paralyzing if you seek the perfect solution before acting. This quest for absolute optimization deprives you of the immediate benefits of a decorated space and learning by experience. Launch with a first test piece as soon as your basic analysis is complete - perfection is refined through practice, not just reflection.
🔍 Quick verification system: Before each installation, check that your works remain beautiful under your nighttime lighting, that their positioning harmonizes with your current furniture AND its probable evolutions, that the materials correspond to the climatic variations of your region, and that you can simply explain why this choice suits YOUR space specifically. These four control points prevent 95% of post-installation disappointments.
🎁 Special offer for readers
Because you took the time to inform yourself, enjoy 10% discount on your first order:
⏰ Valid 72h after reading • Applicable to all our products
Practical questions to finalize your project with confidence
Allow between €200 and €800 depending on your ambitions: €200-€400 for 2-3 quality pieces with suitable fixings, €400-€800 for an elaborate composition with additional lighting. Optimize by starting with an affordable test piece (€50-€100) to validate your approach, then gradually enrich it. A budget spread over 6-12 months allows you to refine your choices without financial regret.
2-3 weeks are enough: 1 week analyzing your space (humidity measurements, observation of uses), 1 week to select and receive your first piece, then a few hours for installation. The pleasure is immediate with the first installed piece, expertise develops naturally afterwards. Do not rush the analysis phase - it is this that guarantees the durability of all your future choices.
Absolutely not if you choose the right materials! Even very variable climates (high heat, freezing temperatures, humidity) can be perfectly managed with modern technical supports (aluminum, high-density PVC, UV-resistant inks). Your prior moisture analysis will guide you to the appropriate solutions. Difficult regions simply require more technical materials, not abandoning the project.
Favor works that dialogue with the architecture and natural environment of your terrace rather than those that follow temporary decorative trends. An abstract landscape echoing the colors of your garden will remain relevant for years, unlike a very "fashionable" pattern. Test your attachment: if you still appreciate a work after having observed it for 2 weeks, it is likely to satisfy you durably.
Installation is within your reach with the right techniques! Only very specific walls (cellular concrete, complex hollow partitions) may require the advice of a professional for fixings. For 90% of covered terraces, basic tools and the techniques detailed in this article are sufficient. Start with a light work to gain confidence, expertise is quickly acquired with practice.
Your covered terrace: from simple shelter to personal gallery of exception
In a few weeks, you will admire your transformed space with the profound satisfaction of someone who has known how to reveal the hidden potential of a place. Your guests will immediately notice this unique atmosphere created by well-chosen and perfectly integrated works. Your covered terrace will no longer be a simple functional extension, but a true open-air living room that expresses your personality and recharges you daily.
This transformation goes far beyond the decorative aspect: you will have developed an expert eye on the harmonization of spaces, acquired technical skills in installation, and above all gained that precious confidence that will allow you to dare other creative projects. Your entourage will come seeking your advice, intuitively recognizing your new mastery of the art of outdoor living.
The most complex - understanding the technical specifics of semi-outdoor spaces - is now behind you. All you have to do is choose your first work by applying the analysis method that you now master. Start this weekend by measuring your space, your future personal gallery awaits only this first action to come to life.
🚀 Your next creative move: Your covered terrace already has all the necessary potential, it lacks your enlightened eye to reveal it. In 30 days, you will savor your morning coffee in a decor that inspires and represents you perfectly.