⏱️ Reading time : 8 minutes
Your living room looks like an art gallery... during the day. But as soon as night falls,
your beautiful paintings disappear into the shadows, losing all their brilliance and ability to enhance your interior.
You turn on the central ceiling light which transforms your room into an administrative office, or that living room lamp which projects unsightly shadows on your artwork. The warm atmosphere you had imagined evaporates instantly.
You may have tried to install a few spotlights, but the result was too harsh, creating annoying reflections on the protective glasses. Or you opted for wall sconces that ultimately light up everything except your paintings.
It's not your fault: ambient lighting is a subtle art that no one teaches us. Most standard lighting solutions are designed for functionality, not to reveal the beauty of your artwork.
By the end of this article, you will know how to create that private gallery atmosphere which transforms your living room into a luxurious showcase, where each painting becomes a star under perfectly controlled LED lighting.
Why LED lighting is revolutionizing the art of living with paintings?
The days when our works of art lived in the shadows after 6 p.m. are over. With the advent of smart LED lighting, we finally have the tools to create those private museum atmospheres that we dream of. It's like having a professional lighting designer at home, available 24/7 to reveal every nuance of your artistic favorites.
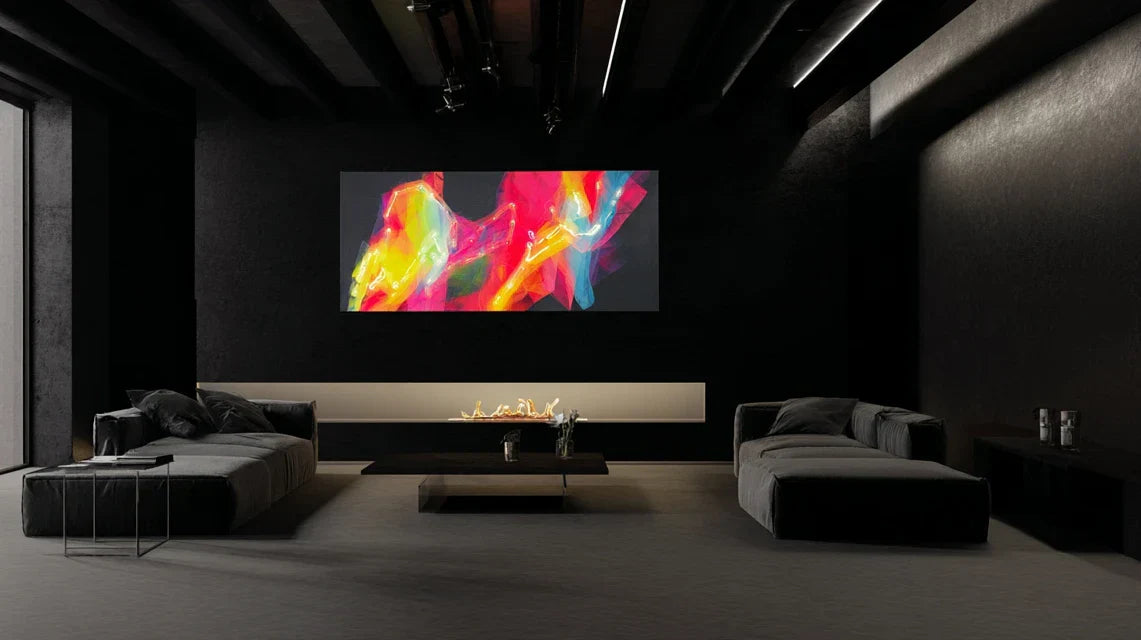
🎨 Testimonial of a transformation: Marie, a Parisian interior architect, tells us: "I invested in a magnificent abstract canvas for my living room. Magnificent... until the lighting transformed it into a shadow zone at night. By installing a rail LED system with dimmer, this same work became the focal point of my room. My guests now systematically stop in front of it, intrigued by its changing reflections."
💬 Conversation with a decor expert
"I'm afraid my new painting won't match if I change my wall color..."
Relax! It’s quite the opposite. A true artistic crush adapts and even reveals itself with new colors. It's like a diamond that shines differently depending on the lighting!
"But I was told you always had to match colors..."
Who told you that? Modern decor plays on subtle contrasts. A painting with warm tones on a cool wall is like a fireplace in a blue room: magical!
The golden rule of art lighting: Well-lit artwork transforms the atmosphere of an entire room, creating areas of intimacy and contemplation that naturally invite relaxation. In 15 minutes with thoughtful LED installation, you get a result that rivals the most beautiful interiors in magazines.
Why your current lighting is sabotaging your finest artworks?
Do you recognize these situations? Your guests pass by your artwork without noticing it. You yourself no longer enjoy your artistic acquisitions once night falls. Your living room loses its soul as soon as you turn on the main lighting.
What happens is that traditional lighting uniformly "flattens" the space, without creating a visual hierarchy. Your artworks are drowned in general lighting that does not enhance them. It's like trying to admire jewelry in a supermarket: the lighting environment doesn't match the preciousness of the object.
Imagine your living room as a theater stage: without spotlights to direct attention, even the greatest actors go unnoticed in the darkness of the set.
Mistake #1: Believing that powerful lighting equals beautiful lighting
Contrary to popular belief, more light doesn't mean better illuminating your artworks. The art of lighting lies in precision, not intensity. A well-oriented 10W LED spotlight reveals more details than a poorly positioned 100W ceiling light.
It’s exactly like the difference between a precise flashlight and stadium lighting: one reveals details, the other drowns them in uniform light.
This misunderstanding makes you waste the emotional investment that each artwork represents. You lose those moments of contemplation that make all the charm of an artistic interior.
🔍 Immediate test: Tonight, turn off your main lighting and illuminate a painting with your phone's flashlight at 45°. Observe how the colors reveal differently. That’s exactly the effect of well-thought-out directional LED lighting!
The confusion between functional and ambient lighting
Many think that a single type of lighting is enough for all activities. In reality, your artworks need specific lighting, independent of the general lighting, to reveal their personality.
It's like wanting to use the same intensity of fire to cook eggs or grill a steak: each element of your decoration has its own lighting needs.
Result: you suffer from a compromise lighting that satisfies no one, and your artworks remain anonymous when they could be the stars of your living room.
The illusion of "neutral" lighting
Did you know that color temperature (warm or cool) of your lighting completely transforms the appearance of your artworks? Lighting that is too cold can dull reds and ochres, while lighting that is too warm can distort blues and greens.
Few people notice that their paintings change appearance depending on the time of day and available lighting. Yet, it is this detail that makes the difference between a commonplace interior and a true artistic showcase.
This lack of awareness deprives you of the true personality of your works, as if you were wearing tinted glasses all the time.
5 signs that your lighting is not doing justice to your paintings:
- You no longer look at your works in the evening: Sign that the current lighting does not enhance them
- Colors seem different depending on the time: Your artificial lighting is not calibrated to reveal the true nuances
- Your guests don't notice your new purchases: The lighting doesn’t create an attractive focal point
- You hesitate to buy new paintings: Subconsciously, you know they won't be highlighted
- Your living room lacks atmosphere in the evening: Uniform lighting kills the magic of your spaces
The trigger factor: Accessible LED technology
The LED revolution has changed everything: no more constraints of halogen spotlights that heat up and consume energy. Today, you can create professional gallery lighting with affordable and scalable home solutions. It's like having access to the tools of art professionals, but in your living room.
Universal rule of thumb: Each painting deserves its own directional lighting, adjustable in intensity and orientable according to your wishes. Test it by directing a desk lamp towards your favorite artwork tonight!
| ❌ Traditional Lighting |
✅ Artistic LED Lighting |
💡 Why this changes everything |
🎯 Immediate Benefit |
| One ceiling light to illuminate everything |
Multiple directional spotlights |
Each area has its adapted lighting |
Your paintings become magnetic |
| Standardized white light |
Adjustable temperature (2700K-4000K) |
Reveals the true colors of the work |
Rediscover your acquisitions |
| All or nothing (on/off) |
Fine intensity variation |
Adapt the atmosphere according to the moment |
Personalized visual comfort |
| Complex and fixed installation |
Modular and scalable solutions |
Change the configuration according to your wishes |
Total freedom of rearrangement |
The progressive method to transform your paintings into luminous works
Rassurez-vous, creating this private gallery atmosphere does not require electrician skills or a castle budget. I will guide you step by step, as if we were building together a light showcase to reveal the beauty of your works. At each step, you will see a visible transformation that will motivate you for the next one.
🎯 Overview of the transformation: We will proceed like a professional lighting designer: first analyze and prepare (choosing locations), then install the foundations (main lighting), and finally refine the atmosphere (adjustments and optimization). Each step will give you an immediately visible result.
Step 1: The art of choosing the perfect location (the foundations)
Starting with analyzing your spaces is crucial because poorly positioned lighting, even high quality, will never reveal the potential of your artworks. It's like planting a tree: the right location determines all future growth. This first step will already give you a clear vision of your transformed living room.
What you need for this analysis
-
A measuring tape: To measure the distances between artworks and potential light sources. Precision here avoids regrets later. Get a 5m (16ft) minimum measuring tape, available in any hardware store. Check that it retracts properly - a stuck measuring tape will make you lose patience.
Your smartphone with flashlight: To simulate different lighting angles and visualize the final effect before installation. The advantage of a phone: you already have one, and its LED light is close to what you'll get with your future spotlights.
Paper and pencil: To note your observations and create a simple plan. Don’t underestimate this step - a sketch avoids costly mistakes and helps you visualize the whole thing. Use graph paper if possible, it facilitates proportions.
Now, let's move on to concrete practice:
How to proceed without making mistakes
Map your art zones: Take your measuring tape and measure the distance between each artwork and potential light sources (electrical outlets, existing tracks, ceiling). The goal is to identify areas where you can install spotlights or LED strips without major work. Note everything on your sketch - even details that seem obvious now.
⏱️ Time: 15-20 minutes | ✅ Success when: You have a plan with exact distances and outlet locations noted | ⚠️ Attention: Don’t neglect hidden constraints like beams or pipes - check the ceiling too
Test angles with your phone: For each artwork, use your smartphone's flashlight to simulate lighting at 30°, 45° and 60° from different positions. Observe which angle best reveals the colors without creating annoying reflections. This is your "eureka" moment where you discover the magic angle for each artwork.
⏱️ Time: 5 minutes per artwork | ✅ Successful when: You have identified the optimal angle that makes each work "stand out" | ⚠️ Attention: Reflections on the glass are normal - they will disappear with well-adjusted LED lighting
Define your artistic priorities: Rank your artworks in order of visual importance in your living room. Start with the one you want to highlight most - it will guide the ambiance of the room. The others will harmonize around it.
⏱️ Time: 10 minutes | ✅ Successful when: You have identified your main artwork + 2-3 secondary works | ⚠️ Attention: Don't seek perfection - your instinct guides you well towards your favorites
✨ Check of step 1: You must have a clear plan with measured distances, optimal angles identified, and artistic hierarchy defined. If something seems unclear, retest with your phone - it's normal to do several tests. This solid foundation will radically transform the effectiveness of your future LED purchases.
Step 2: Install directional LED lighting (the revelation)
Now that your locations are defined, time for the magic of transformation. This step is particularly rewarding because you immediately see the spectacular effect on your artworks. This is when your living room goes from "lit" status to a "staged" status - the snowball effect begins here.
The LED hardware that changes everything
-
3000K adjustable LED spotlights (warm white): They look like miniature projectors and create this golden light that reveals the warmth of colors. Choose them with built-in dimmer (often a wheel on the side). Avoid 4000K "neutral white" - too cold for art. Hardware stores or Amazon, count 15-25€ per quality spotlight.
-
Modular electrified rail: It's the "railway" of your spotlights, which allows you to move them without reinstalling. The principle: sliding metal clips on a powered rail. Check compatibility with your chosen spotlights. A good rail should click firmly - a loose rail will create false contacts.
-
Remote control or wall dimmer: To play with the intensity according to your wishes and the time of day. This detail transforms functional lighting into custom ambiance. Prefer dimmers with memory that retain your favorite settings.
Step-by-step installation
Fix the rail to the ceiling: Position the rail parallel to your paintings, at approximately 1.5-2m from the wall depending on the ceiling height. Use fixings suitable for your ceiling (drywall = Molly plugs, concrete = Fischer plugs). Pro tip: test with a single fixing point first to check alignment before drilling the other holes.
⏱️ Time: 30-45 minutes | ✅ Success when: The rail is stable, straight, and spotlights fit easily | ⚠️ Caution: Turn off the electricity before plugging in - even "just to test" can be dangerous
Position and orient the spotlights: Place a spotlight facing your main painting, angled downwards at 45° to avoid reflections. Turn on and observe: the colors should "pop out" without unsightly shadows. Adjust until you achieve this "revealing" effect that you tested with your phone.
⏱️ Time: 10 minutes per spotlight | ✅ Success when: The painting “catches the eye” immediately, vibrant colors, no shadows | ⚠️ Caution: Too direct lighting creates reflections - move the spotlight slightly if necessary
Adjust intensity according to the ambiance: Start at 70% of maximum power for a comfortable ambient lighting, then adjust according to your preferences. The goal is not to dazzle but to subtly reveal the beauty of your works. Test different times of day to find your preferred settings.
⏱️ Time: 15 minutes of testing | ✅ Success when: The lighting creates a warm atmosphere without straining the eyes | ⚠️ Caution: What seems perfect in the evening may seem too weak during the day - that's normal


