

You've just acquired this stunning artwork that completely transforms your living room, but every time you try to photograph it to share, a disgraceful reflection comes to spoil the rendering. Frustrating, isn’t it?
That white glare across the artwork, those overexposed areas that mask precious details, this inability to capture the true beauty of your acquisition... You're not alone in this predicament!
You’ve probably tried to change angle, turn off some lights, or even photograph from across the room. Result? Either the reflection persists, or the image becomes too dark and blurry.
Rest assured, this isn't a problem of equipment or photographic talent. The issue simply comes from the fact that 99% of people ignore the physical rules governing light reflection on artistic surfaces.
By the end of this article, you will master the exact techniques of professional photographers to capture your paintings in all their splendor, without any parasitic reflections, and with a rendering worthy of an art gallery.
Why are your painting photos so important today?
In our era where personal decorative art becomes a real statement on social networks, a failed photo can make you miss precious sharing moments. It's like having a diamond and presenting it in a dull case!
📸 Customer testimonial: "I had invested in a superb artwork for my office, but I couldn’t take a correct photo to show it to my family. I ended up moving it three times before realizing that the problem came from my technique, not the location!"
💬 Conversation with a decor expert
The golden rule of pros: A well-photographed painting reveals 3 times more detail than with the naked eye thanks to the perfect angle and mastered lighting. Visible result in less than 5 minutes of application!
Why do your photos consistently fail?
Do you recognize yourself in these situations? You photograph facing the painting and hop, reflection guaranteed. You use the flash on your phone and the image becomes whitish. You try it at night and the colors appear dull and yellowish.
The problem isn't your equipment or your "artistic eye". It’s simply that no one has explained the basic physical laws that govern the photography of artworks to you.
It's like driving without knowing the rules of the road: you can get there by chance, but it's much more complicated!
💡 First hidden cause: The angle of reflection
Contrary to what one might think, standing directly in front of the painting guarantees a perfect reflection! In physics, the angle of incidence equals the angle of reflection.
Imagine a mirror: if you stand directly in front of it, you see yourself perfectly. Same principle with your painting and light sources!
This mistake turns your magnificent acquisition into a reflective surface that sends the light directly into the lens. Result: your artwork disappears behind a white veil.
🔍 Quick test: Stand in front of your painting and slightly move your head from left to right. Do you see the reflection moving? That's proof that the angle of incidence is working!
⚡ Second hidden cause: The confusion between lighting and flash
Many people think they need more light to photograph well. In reality, you need the right light, in the right place.
It's like the difference between lighting a theater scene (diffused and directional lighting) and turning on a flashlight (brutal and direct light).
The flash from your phone creates a momentary burst of light that saturates the surface of the artwork and erases all subtle details.
🌅 Third hidden cause: The trap of daylight
You think that photographing near a window guarantees beautiful light? Not necessarily! Direct sunlight creates the same problems as a flash.
Observe your painting at different times of the day: very sunny morning (too contrasted), noon (harsh light), late afternoon (golden but directional light).
This lack of knowledge makes you miss the perfect moments and photograph at the worst times of the day.
🚨 3 signs that your lighting isn't working:
- You see your own reflection in the painting: The light source is behind you, like a car rearview mirror
- Part of the painting disappears into white: Too direct and powerful light, "headlight in fog" effect
- The colors appear faded or yellowish: Inappropriate color temperature, like looking through tinted glasses
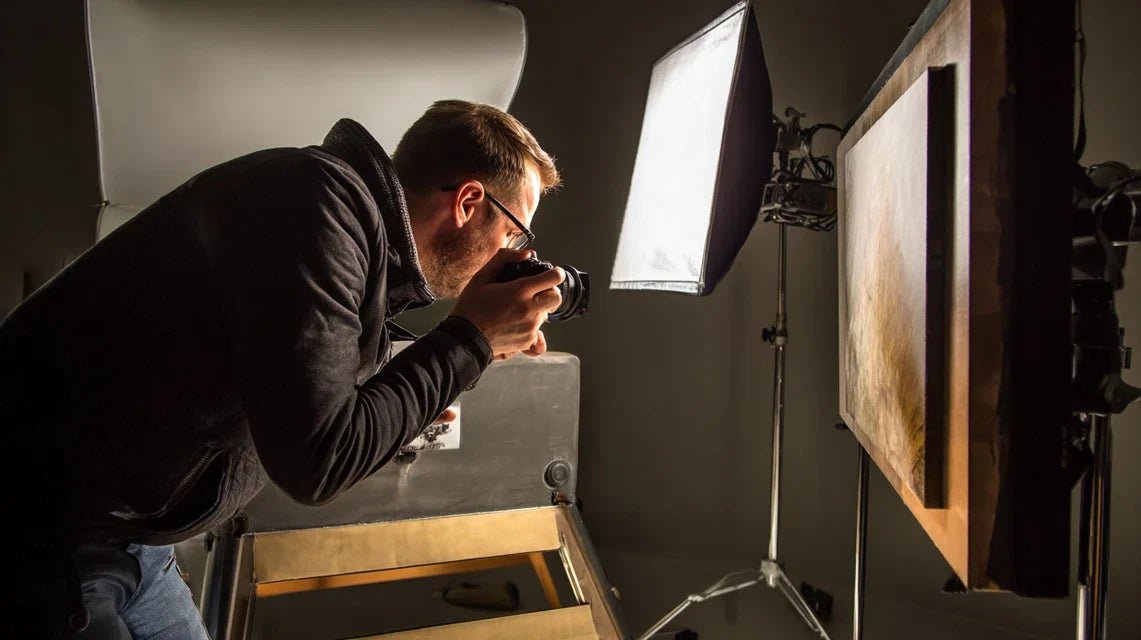
🎯 The trigger element: The 45-degree rule
The professional secret lies in the 45-degree rule: your position, the lighting and the painting form a perfect triangle. It's the domino effect that instantly solves 90% of reflection problems! Visualize: if the light arrives at 45° from the left, place yourself at 45° from the right.
Universal pro rule: "Never be at a right angle between you, the light and the artwork". Check by observing where your hand's shadow falls near the painting.
| ❌ Amateur reflex | ✅ Pro technique | 💡 Why it works | 🎯 Visible result |
|---|---|---|---|
| Position yourself facing directly | 45° diagonal position | Diverts reflected light | Reflections instantly eliminated |
| Activate automatic flash | Exploit ambient light | Diffuse and natural lighting | Authentic colors preserved |
| Photograph in full sun | Prefer indirect light | Controlled contrast without glare | Details revealed in all areas |
The foolproof method of art photographers
Now that you understand why it wasn't working, let's move on to the solution! This method follows a simple logic: we prepare the environment, correctly position ourselves, then finely adjust. It’s like building a house: solid foundations, clear structure, perfect finishes!
🗺️ Method overview: Step 1 (Preparation) = eliminate sources of reflections | Step 2 (Positioning) = master angles | Step 3 (Capture) = optimize settings. Each step brings you closer to a professional result!
🎬 Step 1: Prepare your shooting environment
Starting with the environment is laying solid foundations. Like a chef who prepares their kitchen before cooking! This step avoids 80% of future problems and gives you the satisfaction of starting on a good footing.
🔧 What you need (everyone has this at home)
- Your smartphone or camera: Any will do! The secret lies in the technique, not the technology. Just check that the lens is clean. Forget the myth of mandatory professional equipment.
- Existing ambient lighting: Your usual lamps or window light are perfectly sufficient. The principle is to exploit what exists rather than add more. Impact: guaranteed naturalness and zero additional purchase.
- A stable wall or support: To stabilize your arms during shooting. It's your "human tripod" that eliminates camera shake and guarantees professional sharpness.
Now, let’s move to concrete action:
🚀 Actions to perform in order
Neutralize parasitic light sources: Turn off all lamps that shine directly on the painting. The goal is to keep only one source of light coming from one side. It’s like creating a studio lighting setup with your makeshift means!
⏱️ Time: 2 minutes | ✅ Successful when: Only one main light source visible | ⚠️ Attention: Don't turn everything off - keep the general ambient lighting to avoid excessive contrast
Check for reflective objects: Look around the artwork and temporarily remove mirrors, glass frames, turned-on screens in the reflection. These "light traps" create sneaky secondary reflections that ruin even a perfect technique.
⏱️ Time: 3 minutes | ✅ Successful when: No bright spots visible in the nearby environment | ⚠️ Attention: Think about jewelry you are wearing - it can create micro-reflections
Position your optimal lighting: If using a window, position yourself so that light arrives at an angle on the artwork. If using lamps, only turn on those on the side of the artwork, never facing it.
⏱️ Time: 5 minutes | ✅ Successful when: The artwork is well lit but you see no reflections from your starting position | ⚠️ Attention: Beware of ceiling lighting which often creates horizontal reflections
✨ Step 1 Check: Your artwork should be evenly lit, with no marked shadows or visible reflections from where you plan to stand. If you still see reflections, adjust the lighting before moving on to step 2. It's normal to take a few minutes to find the perfect setting!
OUR RECOMMENDED PRODUCTS
📐 Step 2: Mastering Shooting Angles
We are now entering the heart of the technique! This is where you will feel the difference between tinkering and mastering. This step literally transforms your photos and gives you that "I succeeded like a pro" pride!
🎯 The Magic Positioning Technique
Apply the 45-degree rule: Position yourself at 45° relative to the center of the artwork. Imagine the artwork as the center of a clock: if the light comes from 3 o'clock, position yourself towards 9 o'clock. This simple geometry eliminates 95% of reflections.
⏱️ Time: 1 minute | ✅ Successful when: No more reflections visible in your viewfinder | ⚠️ Attention: Don't get too much to the side, otherwise the artwork will appear distorted
Adjust shooting height: Position your device at the height of the center of the artwork. Neither too high (bird's eye view), nor too low (worm's eye view). It is the neutral perspective that respects the artist's intention.
⏱️ Time: 30 seconds | ✅ Successful when: The artwork appears perfectly rectangular in your viewfinder | ⚠️ Attention: For large artworks, step back rather than bending down
Calculate the optimal distance: Step back until you can see the artwork in its entirety with a little margin around it. Too close = distortion, too far = loss of detail. The right distance allows you to clearly see the texture and details without distortion.
⏱️ Time: 2 minutes | ✅ Success when: The artwork occupies about 70% of your screen | ⚠️ Attention: Do not use digital zoom, physically move closer if needed
🔍 Validation test: From your position, the artwork should appear sharp, without reflections, perfectly straight and large enough in the frame. Move slightly: if a reflection appears, adjust your angle by a few degrees. You have found the right position!
This is the icing on the cake! Your positioning is perfect, now we are going to capture the image with quality worthy of an art catalog. This step reveals details that even your guests do not see with the naked eye!
⚙️ Professional capture settings
Disable auto flash: Force "no flash" mode on your device. Flash destroys all the positioning work you just did. Your controlled ambient lighting is a thousand times more beautiful than a brutal flash.
⏱️ Time: 10 seconds | ✅ Success when: Visible crossed-out flash symbol on your screen | ⚠️ Attention: Some phones reset auto flash by default, check each session
Stabilize your shot: Press your elbows against your ribs or a nearby wall. Breathe deeply and trigger at the end of exhalation. This technique eliminates micro-blur that ruins so many technically successful photos.
⏱️ Time: 20 seconds | ✅ Success when: The image is perfectly sharp even when zooming in later | ⚠️ Attention: If your hand trembles, use the 2-second timer
Take several shots with micro-adjustments: Take 3-4 photos varying your position very slightly. This gives you a choice and compensates for small imperfections. It's the pros' method: always have a choice!
⏱️ Time: 1 minute | ✅ Success when: You have several slightly different versions to compare | ⚠️ Attention: Don't move too much, stay within the "no reflection" zone found in step 2
🏆 Final result: You should have a sharp photo, without reflections, with faithful colors and all details visible. The artwork appears "alive" and you want to show it immediately! If this is not the case, go back to the step where things went wrong.
Pro's progression rule: First master this method on one artwork before moving on to multiple works simultaneously. Objective criterion: 3 successful photos in a row = technique acquired!


