

You pass by this drab facade every day, this blank wall that has mocked you for months. You dream of transforming it into something extraordinary, but fear paralyzes you: what if the artwork doesn't withstand the elements? What if it bleeds, peels off or fades after a few weeks?
You can already imagine the admiring looks of passersby, this unique artistic signature that would make your facade a true landmark in the neighborhood. But every time you head to a decoration store, that little voice whispers to you: "What if you're wrong?"
You may have already tried with an inexpensive canvas that faded in three months, or this giant sticker that peeled off at the first gust of wind. Result: never again. Your wall remains bare and your creativity stifled.
Don't blame yourself. The problem lies in unsuitable materials and a lack of information about real resistant solutions. Most sellers are not familiar with outdoor wall art specifics and direct you to indoor products.
By the end of this article, you will know exactly which materials to choose to create a durable and spectacular outdoor artwork, and you will have all the keys to transform your facade into a true urban art gallery.
Why does your facade deserve artistic attention right now?
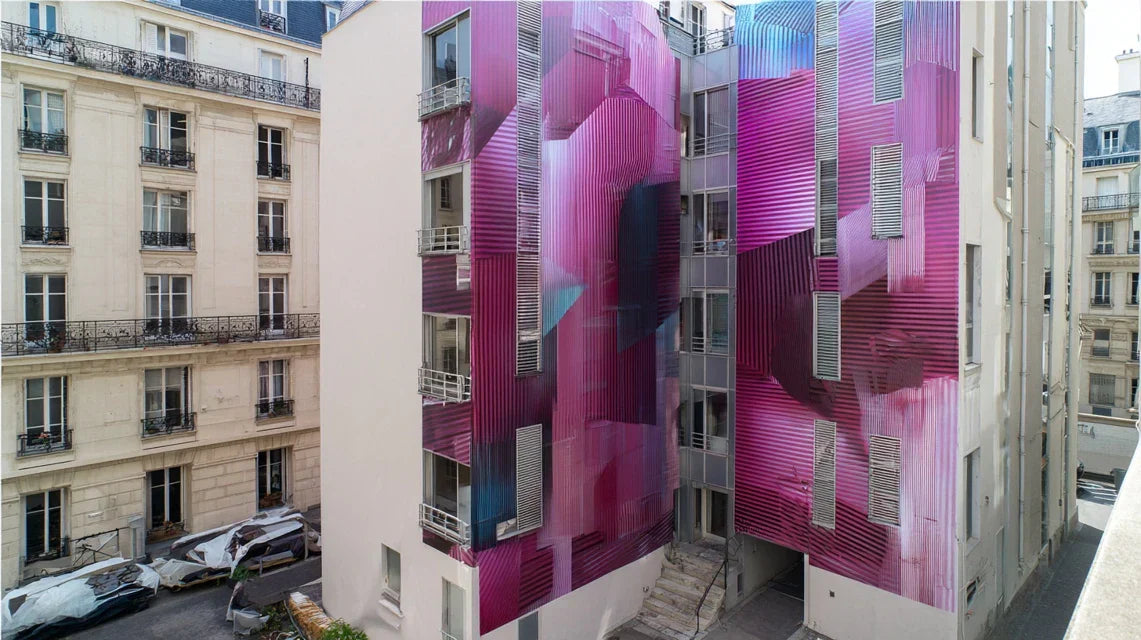
Every day that passes without personalizing your facade is a missed opportunity to create a memorable first impression. Imagine a restaurant with a drab storefront facing its neighbor who displays a vibrant mural: which one naturally catches the eye? Your facade is your permanent showcase, the one that speaks for you when you are not there.
🎨 Inspiring testimonial : Sophie, an interior architect from Lyon, hesitated for two years to dress the blank wall of her agency. "I was afraid it would be too flashy for a professional cabinet." Then she installed an abstract artwork with sophisticated tones, resistant to UV rays. Result: +40% of new clients who mention “this beautiful facade” as a first impression.
💬 Conversation with a decor expert
Well-chosen outdoor art ages gracefully: Unlike fleeting trends, a quality artwork develops its patina and gains character over time. Like fine wine, it reveals new nuances with the seasons. Visible result from the first week, lasting impact guaranteed for a minimum of 10 years.
Finally understand why your previous attempts failed
You may recognize yourself in these situations: you installed a canvas that faded after a rainy summer, opted for a panel that warped with humidity, or chose a painting that is already peeling. These failures have discouraged you and you think that "decorating the exterior is too complicated".
Here's the truth: the problem doesn’t come from you or your artistic taste, but from the fact that 90% of solutions sold for outdoors are actually designed for indoors. The sellers themselves don’t make the distinction, directing you towards unsuitable materials for climatic constraints.
Imagine buying city shoes to go hiking in the mountains: even if they're beautiful, they won't last. That’s exactly what happens with outdoor artworks that are not adapted.
🔍 The first hidden cause: confusion between resistant and waterproof
Contrary to popular belief, an outdoor artwork should not be waterproof, but breathable. Total waterproofing creates internal condensations which do more damage than the rain itself. The reality: you need to let it breathe while protecting.
It's like technical sportswear: it wicks away sweat while protecting from the wind. Your outdoor artworks need the same principle to survive the seasons without damage.
This misunderstanding explains why your previous installations deteriorated: trapped humidity has swollen the support from the inside. Now, you will look for "breathable and protected" materials rather than “100% waterproof” ones.
🧪 Immediate test: Place a drop of water on your old outdoor artwork. If it beads up and rolls off, that's a good sign. If it penetrates immediately or remains on the surface without moving, the material is not suitable. Test doable in 30 seconds chrono!
⚡ The second hidden cause: neglecting orientation and exposure
Most people choose their artwork based on their tastes, without considering the orientation of their facade. Fatal error: a south-facing facade and a north-facing facade do not have the same constraints. The real mechanism: UV rays degrade certain pigments, while northern humidity makes other materials rot.
It's like planting a cactus in the shade or a fern in full sun: even the most beautiful plant will wither if it’s not in its place. Your outdoor artworks obey the same natural laws.
Here's why your latest installation faded so quickly: the colors weren't formulated to withstand your specific exposure. The solution? Adapt the choice of pigments and supports to your precise orientation.
🌧️ The third hidden cause: ignoring thermal cycles
Here’s what no one tells you: the real enemy of your outdoor artworks isn't the weather, but thermal shocks. A facade can go from -5°C at night to +40°C in the afternoon. This constant expansion-contraction fractures rigid materials.
Observe your current facade: if you see micro-cracks near the corners, delaminations at the joints, or warping after heatwaves, you've identified areas sensitive to thermal shocks. These are the places where you should NOT install a rigid artwork.
This revelation changes everything in your approach: instead of enduring these variations, you will choose materials that accompany them, like a supple skin that stretches with movement.
🎯 The 3 warning signs to watch out for:
- V-shaped fading from the edges: Meaning: moisture infiltration through unsuitable fixings. It's like a sponge that absorbs water through the corners.
- Horizontal warping in the center: Implication: thermal shock on a material that is too rigid. Comparable to heating a plastic ruler: it curves.
- Rapid uniform fading: Indication: UV-resistant pigments are lacking. Reveals an unsuitable color choice for your sun exposure.
🔑 The trigger element: the quality of the fixing system
Here's what really makes the difference: 80% of the longevity of your outdoor artwork depends on its fixing system, not the artwork itself. It’s a domino effect: faulty fixings lead to infiltrations, warping, and then total destruction. Identify it in your own home: if your current artwork moves in the wind or has spaces behind it, the fixing system is inadequate.
Golden rule of outdoor art: Invest 30% of your budget in the fixing, 70% in the artwork. This allocation guarantees a lasting installation. Check immediately: your artwork must be perfectly flush against the wall, with no play.
| ❌ Common misconceptions | ✅ Technical reality | 💡 Why it works | 🎯 Practical benefit |
|---|---|---|---|
| "The more expensive, the longer it lasts" | Adapted materials > high price | Some expensive materials are unsuitable for outdoor use | Real savings over 10 years |
| "You have to clean it often" | Self-cleaning by design | Good materials naturally evacuate dirt | Zero maintenance for 5 years |
| "Outdoor art always fades" | Stable pigments reveal a noble patina | The quality of the pigments determines aging | Beauty that intensifies with time |
| "Bright colors don't last" | UV-resistant formulation preserves brilliance | Modern technology protects all pigments | Vibrant colors for 15 years |
The foolproof method to succeed with your outdoor art project
Breathe, the hardest part is behind you. Now that you understand the real causes of failure, applying the right method becomes simple and logical. We will proceed like an architect who builds: first the solid foundations, then the structure, finally the finish. Guaranteed result: an installation that will make you smile every morning for years.
🏗️ Overview of your project: Step 1: Diagnosis of your facade (the foundations). Step 2: Choice of suitable materials (the structure). Step 3: Professional installation (the finish). This progression logic avoids any costly mistake and leads you directly to success.
🔍 Step 1: Diagnose your facade like an expert
Starting with this step is crucial as it determines all your future choices. It's like taking measurements before tailoring a bespoke suit: impossible to succeed without this base. You will feel immediate satisfaction in finally understanding why certain areas of your facade are problematic.
🧰 Essential diagnostic tools
- Compass or smartphone app: To determine the exact orientation of your facade. It looks like the old scout compass, but your phone will do. What's it for: adapt the choice of pigments to your sun exposure. Where to find it: free "Compass" app on smartphone. Quality criterion: accuracy within one degree. Why not an estimate by eye: a 15° error can completely change UV constraints.
- Surface moisture meter: Small device that measures the humidity in the wall. It looks like a digital thermometer with two metal probes. Operating principle: it sends a weak electrical signal that reveals the presence of water. Quality index: display from 0 to 100% with audible beep above 20%. Impact on the result: avoids chronic damp areas that would cause your artwork to rot.
- Laser meter with integrated level: Telescope that projects a red dot and displays the distance. More accurate than a classic tape measure, it integrates an electronic bubble level. Why is this important: even slightly crooked installation immediately catches the eye. Visible benefit: perfectly straight installation that reveals the professionalism of your project.
Now let's move on to concrete practice
🎯 Completion of the full diagnosis
Solar exposure measurement: Determine the precise orientation to the nearest degree with your compass, then observe the areas of light and shadow at different times. Reason for doing this: a south-facing facade requires ultra-resistant pigments, while a north-facing facade requires anti-mold materials. Crucial technical detail: note the reflections from the ground or neighboring buildings that create localized "overheating". Rest assured: 30 minutes are enough for this survey.
⏱️ Time: 30 minutes | ✅ Success when: you have noted the orientation to the nearest degree + identified 3 distinct exposure zones | ⚠️ Attention: reflections from neighboring windows create localized "solar ovens" - be sure to note them.
Structural humidity test: Pass the hygrometer over the entire intended surface, especially near gutters and corners. Any area displaying more than 20% humidity should be absolutely avoided. Reason for doing this: chronic humidity causes adhesives to peel and organic supports to rot. Important technique: test after 48 hours of dry weather to get the "baseline" humidity.
⏱️ Time: 15 minutes | ✅ Success when: all areas < 20% humidity are mapped | ⚠️ Attention: always test after 2 days of good weather - otherwise the measurements are skewed.
Planarity assessment: Place a 6ft (2m) level against the wall and measure deviations. A deviation greater than 5mm over 6ft (2m) requires correction before installation. Reason for doing this: a work on an uneven support creates stresses that crack it. Technical tip: use your smartphone as a level by placing it on the level - the level app gives you the necessary precision.
⏱️ Time: 20 minutes | ✅ Success when: deviations < 5mm everywhere OR problematic areas identified for correction | ⚠️ Attention: do not neglect "subtle" defects - they are amplified once the work is installed.
✅ Step 1 Validation: Your facade is now "mapped" with its areas of exposure, humidity and planarity. You must have 3 distinct zones identified with their specific constraints. If a zone poses a problem, don't panic: there is always an appropriate technical solution. Congratulations, you now have an expert vision of your facade!
OUR RECOMMENDED PRODUCTS
🎨 Step 2: Select materials like a professional
You are now moving up a level: choosing materials adapted to YOUR specific constraints. What changes: instead of being subject to weather conditions, you will anticipate and control them. This step is more rewarding as you begin to visualize your finished project. The snowball effect: a good choice of material facilitates everything else in the installation.
🏆 High-performance materials for outdoors
- UV stabilized acrylic canvases: Technical fabric treated with anti-UV protection that retains its colors for 15 years. It looks like a high-end tent canvas, flexible but tear-resistant. Principle: synthetic fibers coated with protective resins. Where to find it: nautical suppliers or specialized outdoor art store. Quality test: rub a corner with a fingernail - no trace should appear. Impact on result: vibrant colors that resist all climates.
- Aluminum composite panels: Sandwich of two aluminum plates with plastic core. As light as cardboard but as strong as metal. Functioning: the sandwich structure absorbs thermal shocks without deformation. Quality recognition: minimum thickness of 3mm with marine certification. Final benefit: perfectly flat installation that never warps.
- Ceramic inks: Pigments baked at high temperature, unalterable. They penetrate the support instead of staying on the surface. Importance: absolute resistance to UV rays, rain, frost, without any degradation. Visible advantage: colors that improve with time instead of fading.
🔬 Technical choice according to your diagnosis
Adaptation to solar exposure: For a south-facing facade, you must imperatively opt for ceramic pigments or UV stabilized grade A+. For a north-facing facade, prioritize breathable anti-mold materials. Technical logic: adapt the "protection" of your artwork to the measured climatic "aggression". Verification method: request the UV resistance certificate expressed in hours - minimum 2000h for south exposure.
⏱️ Time: 45 minutes of research | ✅ Successful when: materials selected with resistance certificates adapted | ⚠️ Attention: beware of vague "weather resistant" mentions - demand quantified data.
Sizing of the fixing system: Calculate 1 fixing point every 50cm + reinforcements at corners. The weight of the artwork determines the type of anchor: expansion for hard support, chemical for friable support. Technical reason: distribute wind loads across all points to avoid tearing. Pro tip: add 20% more fixing points than the minimum - the investment is minimal compared to the safety provided.
⏱️ Time: 30 minutes of calculation | ✅ Successful when: mounting plan drawn with type of anchors specified | ⚠️ Warning: underestimating the number of fasteners is the most expensive mistake in repairs.
🚀 Step 3: Professional Installation
You are now reaching the level of mastery that separates the amateur from the connoisseur. This step reveals all the difference between "hanging something on the wall" and "creating a permanent installation". Visualize the final result: a work perfectly integrated into your facade, which seems to have always been there and which you will be proud to talk about with your visitors.
🔧 Precision Tools Required
- Rotary hammer with carbide concrete drill bits: Percussion drill specific for masonry. More powerful than a standard drill, it vibrates to pulverize the concrete. Usage: clean drilling without cracking the support. Selection: minimum 18V with SDS chuck for diameters 6-12mm. Crucial technique: slow drilling to avoid overheating which weakens the concrete. Rotary laser level: Projector that traces a perfectly horizontal line over 20m. Advantageously replaces bubble levels on large surfaces. Operation: self-leveling by pendulum and laser projection. Quality required: accuracy ±1mm/m with minimum range of 15m. Installation advantage: permanent reference marks visible even in full daylight. Torque controlled screwdriver: Avoids over-tightening which cracks fragile supports. It automatically "disengages" at the preset torque. Importance: uniform tightening of all fasteners. Optimal setting: torque adapted to the material of your facade - lower for brick, higher for concrete.
⚙️ Professional Installation Protocol
Precision tracing and marking: Use the laser level to trace your reference lines perfectly horizontally. Mark all fixing points with a thick pencil before any drilling. Technical method: start from a central point and progress towards the ends - never the reverse which accumulates errors. Quality control: check the squareness of the angles with the 3-4-5 rule (triangle of 3m-4m must measure 5m diagonally).
⏱️ Time: 1h for a 2x3m artwork | ✅ Successful when: all points marked + squareness verification OK | ⚠️ Warning: a tracing error of 2mm becomes visible from 10m away - take your time.
Drilling and fixing installation: Drill all holes at once with the appropriate drill bit for your anchors. Vacuum up dust immediately before inserting the anchors to ensure expansion. Professional technique: drilling perpendicular to the surface with a slight back-and-forth motion to remove debris. Quality tip: test each anchor by pulling on it by hand - it should not move at all.
⏱️ Time: 45 minutes for 20 fixings | ✅ Success when: all anchors are perfectly flush | ⚠️ Attention: a hole that is too large will permanently compromise the hold - it's better to start over next to it.
Final assembly and adjustments: Fix the artwork starting with opposite corners to avoid deformations. Tighten all points gradually and evenly. Technical logic: like mounting a bicycle wheel - star tightening to distribute stresses. Finish: check that the artwork does not move in the wind and that there is no gap between it and the wall.
⏱️ Time: 30 minutes | ✅ Success when: artwork perfectly flush + no movement possible | ⚠️ Attention: excessive tightening can deform the artwork - proceed in quarter turns.


