

You visualize that magical moment when your painting takes its place on that wall that has been waiting for it for weeks. But between your purchase and this dream, there is this perilous journey that keeps you awake at night. What if the frame cracks? What if the canvas warps?
You may have already tried to transport a valuable artwork with a cover and lots of hope. Result: micro-scratches invisible at first glance, but which tarnish the shine of your investment. Or worse, that slight fold that constantly reminds you of your mistake.
Rest assured, it's not your fault. The advice found everywhere is either too generic, or designed for museum works with an unlimited budget. No one explains to you how to effectively protect your painting without expensive professional equipment.
In 8 minutes, you will know exactly how to transport your large format painting safely, with simple but foolproof techniques. You will discover the critical mistakes that 90% of amateurs make, and above all, you will feel that serene confidence of someone who perfectly masters their subject.
Why can a simple transport ruin months of waiting?
Imagine: you've been searching for the perfect painting for weeks, comparing sizes, visualizing the effect on your wall. And everything can turn around in 30 seconds of negligence. It’s like preparing a gourmet dinner and burning it at the last moment. Today, with large format wall artworks becoming increasingly popular, transport accidents are exploding. The opportunity? Mastering these gestures gives you a huge advantage over everyone who improvises.
📱 Recent testimonial: Sarah, an interior designer, told me last week about her mishap: "I had found THE centerpiece for my living room. 120x80cm of pure beauty. I transported it 'protected' in a cover. Arrived at my home: a 15cm scratch on the side. Invisible from afar, but me, I only see it."
💬 Conversation with a decor expert
The golden rule of art transport: A large artwork well prepared always arrives intact, even in a small car. A 10-minute preparation avoids eternal regrets and allows you to fully enjoy your acquisition from day one.
What really happens when you improvise
Do you recognize these situations? You look at your artwork against the wall wondering how to fit it into your car. You turn around hoping a magical solution will appear. You end up placing it haphazardly, "just to see".
It's not a lack of intelligence, it's that no one has explained the physics of art transport to you. Your brain wants to do well, but it doesn't have the codes. It’s like trying to cook gourmet food without knowing cooking temperatures.
Imagine a tightrope walker crossing without a safety net: he masters every gesture because he knows the laws of movement and balance. The same goes for your artwork.
Mistake #1: Believing that "flat against the bench" is enough
This is the mistake of 95% of amateurs. You intuitively think that a painting laid flat will be stable. In reality, it's the opposite: vibrations from the road create micro-movements that wear down the surface like fine sandpaper.
It’s like placing a mirror on a vibrating plate. After 20 minutes, you have micro scratches everywhere, invisible at first glance but which permanently tarnish the brilliance.
Result: your investment loses its splendor instantly. And the worst part? You often only realize it once hung, under the right lighting, when it's too late.
🔍 Immediate test: Carefully look at a valuable object you have already transported "flat". Under direct light, tilt it slightly. You will probably see those famous micro scratches diagonally. That’s what you need to avoid!
Mistake #2: Underestimating the power of angles
Everyone thinks that frontal impacts are the most dangerous. It's false: the real enemies are angled contacts, especially on the corners of the frame.
It’s like the difference between receiving a tennis ball in the stomach (unpleasant) and receiving a pointed pebble (penetrating and destructive). The angle concentrates all the force on a tiny point.
Direct consequence: your frame cracks in impossible places to repair properly. And even repaired, it always shows from certain angles.
Mistake #3: Neglecting the "accordion" effect
Here's what almost no one notices: when your car brakes, your artwork continues its momentum and compresses against the obstacle. Then it “rebounds” backwards. This compression-decompression deforms the structure.
You can check this in your own car: place your hand on the back of a seat and brake gently. Do you feel that pressure increase then release?
For your artwork, this repeated effect over a 30-minute journey creates internal tensions that can permanently distort the canvas or affect the frame.
🚨 The 3 warning signs to recognize:
- Your artwork "moves" with the slightest turn: It's not stable enough and is subject to destructive twisting forces
- You hear small friction noises: Surface in direct contact with something else = guaranteed scratches in progress
- The frame "works" visibly: If you see the artwork deform slightly, internal damage is already present
The trigger factor that no one sees coming
The real problem is accumulation. Each small shock, each vibration, each friction adds up. It's the straw that breaks the camel’s back: imperceptible moment by moment, devastating over time. A 20-minute journey poorly prepared is equivalent to months of normal wear and tear. You can check it yourself: compare the condition of an artwork transported once carefully vs one rattled three times "quickly".
The universal rule of protection: An artwork immobilized on 3 axes (vertical, horizontal, depth) cannot be damaged. If your piece can move in any direction, even by a millimeter, it is in danger.
| ❌ What most people do | ✅ The effective reality | 💡 Why it works | 🎯 Concrete benefit |
|---|---|---|---|
| Laying flat "for stability" | Transport vertical and secured | Eliminates surface friction | No scratches, finish preserved |
| Wrapping in a blanket | Targeted multi-layer protection | Each material has a specific role | Total protection without excess weight |
| Hoping that "it will pass" | 3-point fixing system | Physics: immobile object = intact | Absolute confidence during transport |
| Rushing to "limit the risks" | Methodical 10-minute preparation | Anticipation > emergency reaction | Serenity and guaranteed result |
The foolproof method in 3 steps (simpler than expected)
Forget what you may have read elsewhere. This method works whether you have a small city car or an SUV, a 60cm artwork or a 150cm one. It's like learning to tie bowline knots: once you know the technique, it works every time. In 20 minutes, you will master the 3 gestures that make the difference between amateur and connoisseur.
🎯 Overview of the PRO method: Preparation (securing the artwork), Positioning (installing it safely), Final protection (locking the system). Each step takes 3-4 minutes but guarantees you a perfect transport. After step 1, no scratches possible. After step 2, zero movement. After step 3, professional level transport.
STEP 1: Prepare your artwork (the essential foundation)
Starting with this step is like laying a solid foundation: everything else depends on it. Once your artwork is properly prepared, 80% of the work is done. You'll immediately feel that satisfaction of a job well started.
What you need (probably already at home)
- Food wrap film: This clear kitchen film becomes your first layer of protection. Look for a brand that sticks well without leaving residue. Avoid the cheapest ones that slip: they protect nothing and complicate everything. The extra 3€ investment changes everything. Bubble wrap (or alternatively, thick towels): Bubble wrap absorbs shocks like a miniature airbag. Make sure the bubbles are well inflated - if they pop under finger pressure, that's perfect. Thick bath towels also work if they don’t shed lint. Straps or soft rope: They hold everything together without tightening like a vise. A good strap is recognized by its width (minimum 2cm) which distributes the pressure. Avoid thin strings that mark and can cut.
Now, let's move on to stress-free practice
The preparation sequence (crucial order)
Gently clean the surface: Wipe the glass or surface with a slightly damp microfiber cloth. Remove any dust that could scratch under the protection. This step prevents particles from becoming "sandpaper" during transport.
⏱️ Time: 2 minutes | ✅ Successful when: Surface is flawless in direct light | ⚠️ Attention: Never press hard - residue sticks to the corners and that's where it scratches the most
Apply the plastic film in a spiral: Start from one corner and unroll while turning around the artwork. The film must adhere without air bubbles but without excessive tension. This is your primary scratch protection.
⏱️ Time: 3 minutes | ✅ Successful when: Film is smooth, transparent, and wrinkle-free | ⚠️ Attention: If you pull too hard, the film may shrink and distort the frame
Wrap in bubble wrap with the smooth side facing the artwork: The bubble side against the outside absorbs shocks better. Secure with wide tape to the corners only - never on the sides where it can leave marks.
⏱️ Time: 4 minutes | ✅ Successful when: Artwork is completely wrapped, corners reinforced | ⚠️ Attention: Tape directly on the frame may peel off the finish when removed
🔍 Final check of step 1: Your artwork now looks like a "precious package". You can handle it without anxiety, place it down without fear of scratches. If you still feel hard corners to the touch, add an extra layer of protection to those areas. Step 2 will be a pleasure!
OUR RECOMMENDED PRODUCTS
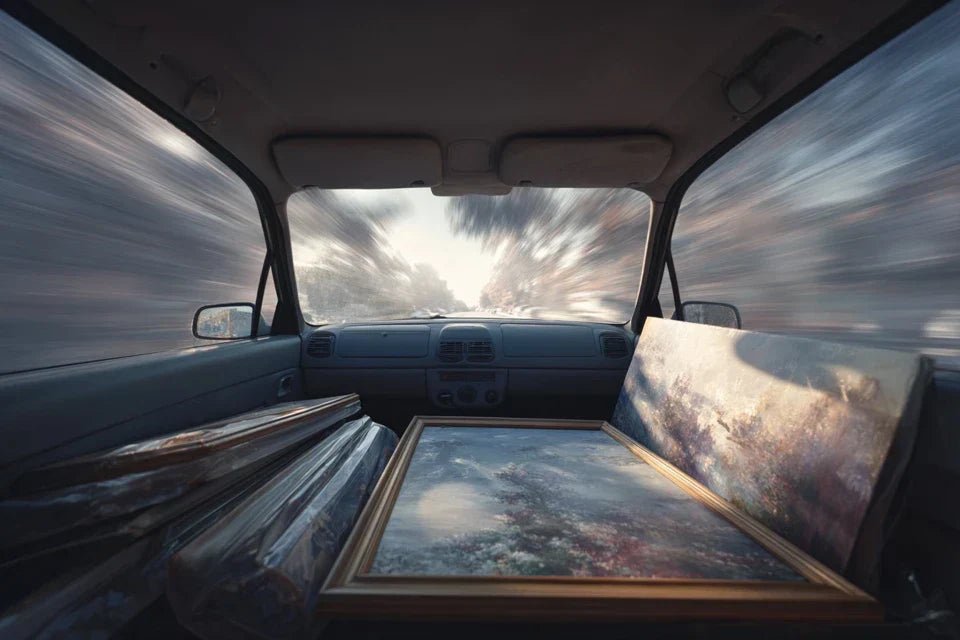
STEP 2: Strategically Position in Your Vehicle
Now that your artwork is shielded against accidents, you need to place it intelligently. This step transforms your car into a "mobile gallery". You will discover positions you never imagined, and understand why they are so effective.
Identifying Your Transportation Space
- Rear area between seats and bench seat: The most stable vertical space in your car. The front seats act as perfect guides. Measure the available height - often more generous than you think. Avoid the trunk where shocks are amplified.
- Headrests as anchor points: These fixed elements become your best allies. They don't move and can easily support the weight of a piece of art. Make sure they are securely locked in the high position before you start.
- Thick floor mats or backing cover: This soft base absorbs any remaining residual vibrations. A thick polar fleece blanket is ideal. It should cover the entire area to avoid direct contact with the hard plastic of the seats.
Secure Vertical Installation
Place the artwork upright against the seat backs: Natural vertical position, as in a gallery. The weight is distributed over the entire base instead of creating pressure points. Your front seats act as a mobile gallery wall.
⏱️ Time: 1 minute | ✅ Success when: Artwork stable, straight, without forcing | ⚠️ Attention: If it doesn't fit naturally, never force it - fold down a front seat
Carefully shim the sides: Use firm cushions or rolled clothing to eliminate any lateral play. The goal: create a "soft clamp" that holds without compressing. Test by shaking the car slightly.
⏱️ Time: 3 minutes | ✅ Success when: No movement even when shaken | ⚠️ Attention: Too tight can distort the frame - just maintain enough to lock it
Secure with headrest straps: Pass the strap behind the headrests and around the protected artwork. Moderate tension: just enough so that it doesn't slide forward when braking.
⏱️ Time: 2 minutes | ✅ Success when: Artwork is solid with the car | ⚠️ Attention: A strap that is too tight can "stress" the frame in turns
✅ Step 2 validation test: Sit behind the wheel and simulate an emergency stop (while stationary!). Your artwork should not move a millimeter. Take a tight reverse turn in your driveway: still immobile? Perfect, you’ve mastered it!
STEP 3: Final Protection and Adapted Driving
You are now at the expert level! This final step makes the difference between "it should be fine" and "it's perfectly guaranteed". You will adopt driving reflexes that protect your artworks like a professional art transporter.
Last details that matter
- Visible "FRAGILE" indication: A sign or post-it stuck to your rear window modifies the behavior of other drivers. They give you more space and honk less. It's psychological but very effective. Use letters large enough to be read from 10 meters.
- Verification of fixing system: A final check before starting avoids 90% of problems. Gently pull on each fixing point. If something gives way, you know before it’s too late.
- Progressive validation journeys: Start by driving around the block. Then a few kilometers. This intelligent progression gives you confidence and allows for adjustments if needed.
Artistic protection driving
Adoption of "smooth driving" style: Anticipate all your movements to avoid jolts. Brake earlier but more gently. Accelerate gradually. It's more relaxing for you too and saves fuel.
⏱️ Time: Throughout the journey | ✅ Successful when: Passengers feel no jolts | ⚠️ Attention: Don’t drive too slowly either - it annoys others and creates dangerous situations
Regular visual checks: Take a look in the rearview mirror every 5 minutes. You should see your artwork exactly in the same position. Even a slight shift indicates a fixing problem.
⏱️ Time: 5 seconds every 5 minutes | ✅ Successful when: Constant position throughout the journey | ⚠️ Attention: If you see a change, stop immediately to check
Adaptation to road conditions: Slow down on cobblestones, take wide turns in tight corners, avoid potholes. Your artwork becomes your most valuable co-pilot guiding you towards perfect driving.
⏱️ Time: Continuous vigilance | ✅ Successful when: No jolts felt | ⚠️ Attention: Speed bumps are your worst enemies - drive slowly over them and well centered
🏆 Complete expert validation: Upon arrival, your artwork is in the exact same condition as when it left. You feel that pride of a job perfectly done. Now you can transport any work with the same absolute confidence!
Rule for progression towards mastery: After 3 successful transports using this method, you will never again have apprehension. The technique becomes automatic, your eye instantly spots important details, and you inspire confidence in those around you. Be patient with the first two, be ambitious with the following!
You are now an expert in art transportation! These additional subtleties give you that distinct advantage which impresses professionals and completely reassures your surroundings.
🎨 Professional gallery tip: For artworks of very high value, create a "protective sandwich" with two rigid cardboard panels on each side, held together by tape only on the edges. This museum technique divides impact risk by 10 and even allows you to transport multiple works together without contact.
💭 "What if my artwork is really very large?"
"I fell for a piece measuring 180x120cm, but my car is only 170cm long... is it over?"
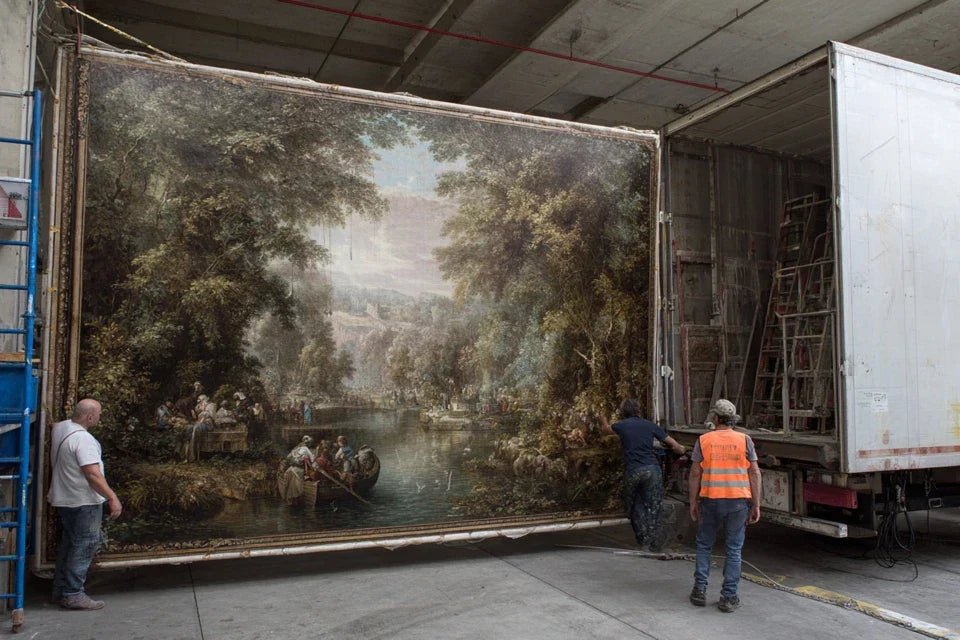
Not at all! It's even more common than you might think. First, measure diagonally: often, your artwork fits perfectly on the diagonal. Otherwise, the "shared transport" technique works perfectly: the front of the artwork in the passenger compartment, the rear in the open trunk, with an X-shaped fixing. I've seen 2-meter artworks transported like this in a Clio! The essential thing is that 2/3 of the surface area are in the stable zone of the passenger compartment.
🔧 Immediate action: Measure right now the diagonal of your trunk + passenger compartment, it gives you your "real artistic capacity". You will be surprised to discover that you can transport artworks much larger than expected!
The mistakes that cost money (and how to avoid them)
Now that you have mastered the technique, let's protect your investment against classic pitfalls. These errors seem trivial but cause 95% of the damage. The good news? Once you know them, they become obvious to avoid.
- 🚫 Transporting in rainy weather without extra protection: Moisture seeps in everywhere and causes canvases to warp. It's tempting to think "it's only 10 minutes", but water always finds a way. Solution: add an additional waterproof plastic tarp over all the protection. Professionals never take this risk. 🚫 Stacking multiple artworks "to save time": Even well protected, they rub against each other with every vibration. It's like rubbing two mirrors together: invisible at first, disastrous in the end. Transport one by one, it is the only guarantee. can cost hundreds of euros in damage. 🚫 Forgetting to check the car’s temperature: An overheated car in the sun can warp the frame's adhesives and cause wood to flex. Let it cool for 10 minutes before loading, or use the air conditioning. This mistake is sneaky because the damage doesn't appear until hours later.
- 🚫 Relying on "it holds, let’s go": Improvisation is the mortal enemy of art. If your installation seems approximate, it is. Start over rather than risk it. A shaky fixing always ends badly, often at the first roundabout.
- 🚫 Neglecting the condition of your straps or ropes: A worn strap snaps at a critical moment. Systematically check for wear, seams, and tension points. Replace at the slightest doubt: a new strap costs €5, a damaged painting can be worth €500.
🛡️ Express 4-point verification system: Before starting, check: 1) Painting stable when you shake the car, 2) No visible hard contact, 3) Fixings tight but not excessively, 4) Visual access in the rearview mirror. If one point is off, don't leave.
🎁 Special offer for readers
Because you took the time to inform yourself, enjoy 10% discount on your first order:
⏰ Valid 72h after reading • Applicable to all our products
Questions you may have (expert answers)
Allow 15 minutes of preparation for perfect results. That's less than the average waiting time at a gas station! To optimize: prepare your materials before removing the painting from its storage location. A rushed amateur takes 5 minutes and risks a lot. An expert takes 15 minutes and arrives calmly.
Absolutely! This method is used by professional gallery owners for artworks worth five figures. The difference with museum transport? The equipment costs 50 times more, but the principle remains the same. Total immobilization + multi-layer protection = maximum security, regardless of the value of the work.
Yes, but not as you think! The golden rule: one painting = one journey, even for a move. Or invest in professional transport cases (€50 rental). Try to bulk up your precious works, it's courting disaster. Professional movers know this well.


