

You've just hung your new high-end artwork on the wall, the one that made you fall in love in this gallery... But something feels off. In the store, it radiated, it captivated everyone’s attention. At home, it seems dull, early invisible.
The colors look faded, the details are lost in the shadows, and that striking texture you admired? Completely flattened. Your guests walk past without even noticing it, while you had imagined their admiring compliments.
You may have already tried changing its position, adjusting the ceiling light, or even modifying the hanging angle. It doesn't work: your artwork remains anonymous, as if it had lost its soul in crossing the threshold of your home.
Rest assured, this is not your fault, nor that of your painting. The real reason? Inadequate lighting that completely betrays the beauty of your artistic investment. Light isn't just a decorative detail: it reveals or hides the magic of your work.
By the end of this article, you will know exactly how to transform your painting into a true attraction thanks to perfectly controlled lighting, and your guests will no longer be able to take their eyes off your art collection.
Why does artwork lighting determine all your decor?
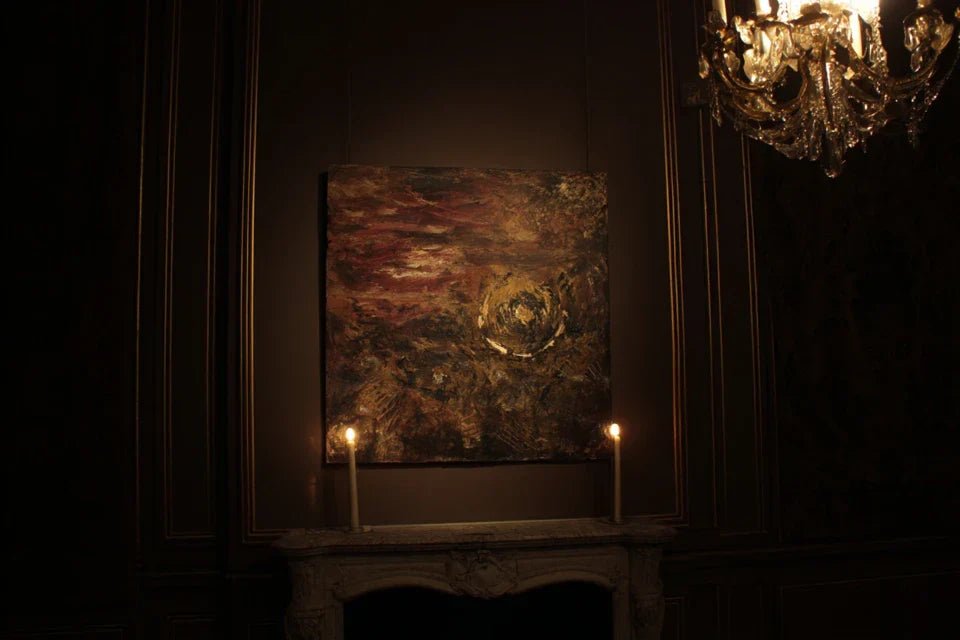
High-end artwork lighting is not a luxury: it’s the difference between an ordinary wall and a true focal point that structures your entire room. Imagine a diamond under supermarket lighting versus the same diamond under an expert jeweler's lighting: the same stone, completely different effect. Waiting to properly light your painting is to miss the opportunity to create that unique atmosphere that makes people say "Wow!" upon entering your living room.
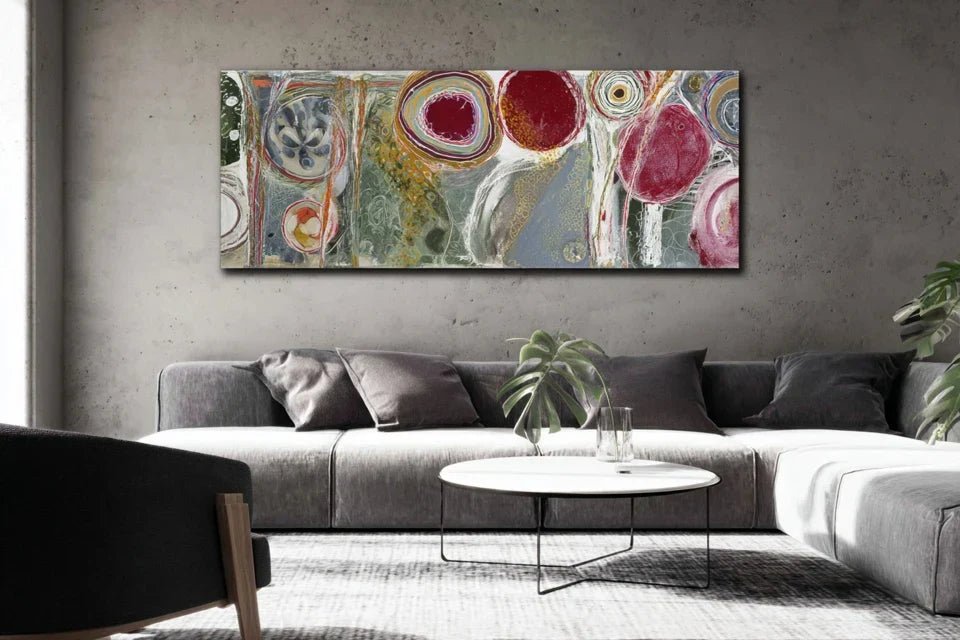
🎨 Collector's testimony: "I bought a magnificent abstract canvas for €2,500. For months, it remained invisible on the wall, my friends didn’t even notice it. The day I installed two quality directional spotlights, everything changed: the texture of the paint was revealed, the colors took on incredible depth. Now, it's the first thing all my guests comment on!"
💬 Conversation with a decor expert
The golden rule of art lighting: A painting without dedicated lighting is like a concert without acoustics. With the right premium artwork lighting, you instantly reveal 80% of your artwork's aesthetic potential, and the effect can be felt throughout the room in less than 24 hours.
What really happens when your painting lacks light
Do you recognize these situations? Your painting seems to "fade" as soon as natural light decreases. The details you loved become blurred. Your guests look elsewhere, as if your artwork were transparent.
What's happening is a simple optical phenomenon: without directional lighting, your painting receives a "flat" light that crushes the relief, even out the colors and erases contrasts. The problem isn’t your artistic choice, it’s that you deprive your artwork of what makes it exist: revealing light.
It's like looking at a beautiful landscape through a fogged windshield: the landscape is still there, but you can’t really see it anymore.
The first hidden cause: general lighting kills art
Here's what no one tells you: the general lighting in your room (ceiling lights, wall sconces) is the worst enemy of your painting. This diffuse and uniform light glosses over all the reliefs and nuances that make your artwork rich.
Imagine a sculptor mounting their statue in full midday sun: no shadows, no modeling, no mystery. Just a flat and banal shape. That’s exactly what happens to your painting under a ceiling light!
As a result, you lose that emotion you felt at first glance, and your artistic investment becomes just an anonymous "decorative object". The solution? A dedicated lighting that brings life and character back to your acquisition.
🔍 Quick test: Tonight, turn off all the lights in your room and shine a flashlight on your painting from different angles. You'll immediately see the striking difference between directional lighting and your usual lighting!
The second cause: the angle of lighting changes everything
Many think that all it takes is to add some light to reveal a painting. In reality, it’s the angle and direction of that light that creates the magic. A frontal lighting crushes, a side lighting reveals.
Think about the difference between a selfie taken with flash straight on and a portrait photo taken with ambient light from the side: the same face, completely different impact!
It’s the same with your painting: it remains flat and without relief when poorly lit. When well-lit with the right angle, it gains depth and presence that completely transforms the atmosphere of your room.
The third hidden cause: color temperature matters enormously
Here's a secret few people know: the "color" of your lighting (warm, cold or neutral) can completely change the tones of your painting. A work with warm tones under cool light will appear dull and lifeless.
How to spot it in your home? If the reds in your painting are tinged with purple in the evening, or if the whites appear yellowish, then the color temperature of your lighting is not suitable.
This translates to a painting that "changes" depending on the time of day, always less beautiful than in your memories of the gallery where you bought it.
🎯 The 3 telltale signs:
- Your painting "disappears" in the evening: This means it depends entirely on natural light, like a plant that wilts without sun Colors appear different depending on the time: This is a sign of artificial lighting whose temperature does not match your artwork No one notices your painting: It lacks that "spotlight" effect that naturally draws attention to points of interestThe trigger element: the optimal distance changes everything
What really makes the difference is the distance between your light source and your painting. Too close: glare and harsh shadows. Too far: inefficient and diffuse light. It's like a domino effect: once you find the right distance, everything balances naturally and your decorative wall art lighting finally reveals all the beauty of your artistic investment.
The universal 30° rule: Place your light source at a 30° angle to the vertical of your painting, at a distance equivalent to its width. Immediately check by observing whether annoying reflections disappear and details stand out better.
| ❌ General lighting | ✅ Dedicated lighting | 💡 Why it works | 🎯 Visible benefit |
|---|---|---|---|
| My painting blends into the background | It becomes the focal point of the room | Directional light creates a natural contrast | Your guests notice it immediately |
| Colors appear faded in the evening | They retain their intensity 24/7 | The color temperature is adapted to the artwork | Your investment retains its aesthetic value |
| I don't rediscover the emotion of purchase | The emotional impact is preserved | Lighting restores gallery conditions | You rediscover that crush daily |
| The painting seems flat | All the texture comes back to life | Shadow play reveals the material | Every artistic detail becomes visible |
The 3-step method to reveal your masterpiece
Rassurez-vous : creating high-end wall art lighting is neither an electrician's skill nor a collector's budget. It’s like making a recipe: it just takes following the right ingredients and proportions, step by step. In 3 simple phases, you will transform your ordinary wall in a private art gallery that will impress all your visitors.
🎯 Overview of the transformation: Step 1 - Choosing the right equipment (like selecting your brushes). Step 2 - Positioning the lighting (like framing a photo). Step 3 - Adjusting the perfect intensity (like tuning an instrument). Final result: your artwork regains its original magic and becomes irresistible!
Step 1: Selecting Your Revealing Equipment
Starting with the right material, is like building on solid foundations: it determines everything else. Once this base is laid, you'll immediately feel that satisfaction of knowing you have the right tools to enhance your artistic investment.
🛠️ Your Professional Lighting Kit
- 3000K Directional LED Spot: It's a small, discreet projector that looks like a mini car headlight. It serves to create a precise and warm beam that doesn't heat up. Available in specialized lighting stores or online. Make sure it is dimmable (adjustable intensity). Avoid low-cost models that create harsh shadows - you will quickly regret this economy.
- Adjustable Lighting Rail or Wall Mounting: This is a system that allows you to precisely adjust the angle of your spot. The principle: being able to move your light like a camera on a tripod. To recognize good quality, check that the joints remain firm after several manipulations. The impact: you can always optimize the lighting even if you move your artwork.
- Compatible Intensity Dimmer: This is a small box that controls the power of your lighting. Important because it allows you to adapt the light according to the desired atmosphere, like a volume for your work of art. Look for models without flicker to protect your eyes and your artwork.
Once your equipment is gathered, let's move on to smart installation
🔧 Stress-Free Installation
Define the optimal location: Measure the width of your artwork and place a mark on the wall at that distance, offset 30° upwards. This position guarantees even lighting without annoying reflections. The technical detail: this angle prevents light from reflecting directly into your eyes. Don't worry if it seems precise, it's simpler than it appears!
⏱️ Time: 10 minutes | ✅ Success when: No visible reflections from your usual viewing position | ⚠️ Attention: Many place the spot too high for fear that it will be seen - this is the mistake that makes the lighting ineffective
Fix the support with precision: Use a spirit level to ensure your rail is perfectly horizontal. Why? A crooked rail will create uneven lighting. Drill according to the type of wall (drywall, concrete, brick) with suitable plugs. The secret: mark with pencil first, check twice before drilling.
⏱️ Time: 20 minutes | ✅ Successful when: The support doesn't move even when pulled on | ⚠️ Warning: Inappropriate wall plugs are the #1 cause of installations that come loose
Connect and test your system: Connect your spotlight to the electrical network (by an electrician if necessary) and test all possible orientations. The goal: verify that your spotlight evenly covers the entire surface of your artwork. First, set the intensity to a minimum then gradually increase it.
⏱️ Time: 15 minutes | ✅ Successful when: Your artwork is illuminated uniformly without shadows | ⚠️ Warning: Many forget to test settings before finalizing everything
✅ Check of step 1: Your artwork should now "pop out" of the wall and naturally attract attention, even with room lights on. If you see annoying reflections, adjust the angle slightly. If an area remains in shadow, move the spotlight closer or further away. Congratulations, you have completed the most technical step!
OUR RECOMMENDED PRODUCTS
Step 2: Mastering the art of positioning
Now that your equipment is installed, you enter the creative phase: the one where you sculpt light to reveal every nuance of your work. This is where you understand why professionals speed so much time on these "invisible" settings. The snowball effect begins: each small adjustment dramatically improves the overall rendering.
🎨 Precision Adjustment Tools
- Your trained eye: It is your most reliable measuring instrument. It detects lighting imbalances that even professionals use. Train it by observing your artwork from several positions in the room. Quality criterion: if the effect pleases you from all usual viewing angles, it's perfect. Impact: you develop your artistic sensitivity at the same time. Timer or variable ambient lighting: This is a way to test your setting under different conditions (day, evening, party). The principle: your artwork lighting must remain effective even when natural light changes. Good quality: when your artwork retains the same impact at all hours. Visible benefit: constant decorative effect 24/7.
🎯 Precision Settings
Adjust horizontal angle: Orient your spotlight so that the center of the light beam corresponds to the center of your artwork. This symmetry guarantees balanced lighting. The technical detail: even a slight misalignment creates a brighter area on one side. Take your time, it's the basis for everything else.
⏱️ Time: 5 minutes | ✅ Successful when: The light intensity seems even across the width | ⚠️ Attention: The eye gets used to it quickly, change position to check
Optimize vertical angle: Tilt your spotlight to avoid reflections while maximizing uniformity. The trick: observe your painting from your usual armchair - you should not see any annoying reflections. If so, tilt slightly more downwards. The correct angle also prevents light from scattering on the ceiling.
⏱️ Time: 8 minutes | ✅ Successful when: Zero visible reflection + uniform lighting | ⚠️ Attention: Many over-tilt out of excessive caution and lose efficiency
Refine distance for uniformity: Move your spotlight closer or further away so that the entire painting is evenly illuminated. The further it is, the more uniform but less intense; the closer it is, the more powerful but with a risk of uneven lighting. Find the right balance for your painting format.
⏱️ Time: 10 minutes | ✅ Successful when: No dark areas visible on the edges | ⚠️ Attention: Test with all other lights off to see clearly
🎨 Validation of step 2: Your painting should now have that magnetic presence it had in the gallery. Colors regain their intensity, reliefs stand out, and the artwork "dialogues" with the space. If any area seems perfectible, adjust in small increments. Congratulations, you now master the art of highlighting!
Step 3: Adjusting Perfect Intensity
You've reached expert level: creating that subtle atmosphere that makes all the difference between lighting that "works" and lighting that creates emotion. This is the phase where your living room transforms into a true showcase for your collection, and where you feel proud of having created something unique and personal.
⚙️ Fine Adjustment Tools
- Progressive dimmer: This is your "volume pedal" for light. It allows you to adapt the intensity according to the desired atmosphere (day, intimate evening, reception). Essential quality: smooth variation without flickering. Where to get it: electrical stores or home automation solutions. Visible impact: your painting adapts to all your moments of life. Optional timer: System that automatically turns on your decorative wall art spotlight at the times you enjoy it most. The principle: extend the pleasure without thinking about it. Advantage: energy saving and preservation of the artwork. Selection criteria: simple and reliable programming.
✨ Mastering Lighting Ambiance
Calibrate for the day: Adjust the intensity so that your artwork retains its impact even in full natural light. The goal is to complement without competing with daylight. The technical secret: your artwork lighting should add that "signature" which distinguishes your work from the rest of the decor. Test in cloudy and sunny weather.
⏱️ Time: 15 minutes | ✅ Success when: The artwork "stands out" even with windows open | ⚠️ Attention: Avoid overdoing it - elegance comes from subtlety
Optimize for the evening: Reduce the intensity to create that cozy atmosphere where your artwork becomes mysterious and captivating. This is when details are best revealed and emotional impact is maximized. Seek this balance where the work attracts without dazzling.
⏱️ Time: 12 minutes | ✅ Success when: Warm ambiance + all details visible | ⚠️ Attention: Too low = loss of impact, too high = visual aggression
Create your personalized scenarios: Define 2-3 favorite intensities according to your activities (reading, reception, relaxation). Save these settings on your dimmer or note them down. The advantage: instantly find the perfect atmosphere for every occasion. Your artwork becomes a living element of your decor.
⏱️ Time: 20 minutes | ✅ Success when: 3 distinct and memorized atmospheres | ⚠️ Attention: Test settings over several days to validate
🏆 Final validation: Your high-end artwork lighting system is now perfectly calibrated. Your work radiates with elegance, adapts to all your moods, and truly transforms your living space. Observe the reaction of your loved ones: they will no longer be able to ignore your artwork! You have just created your own private gallery.
Expert progression rule: You can move on to the next artwork when it spontaneously attracts compliments from your guests and when you feel that daily pleasure in looking at it. Objective criteria: uniform lighting + no distracting reflections + three mastered intensities. Patience and ambition: each perfectly lit artwork adds to the signature of your interior.
Congratulations! You now master the subtleties of decorative artwork lighting that even some decorators ignore. Here are now the pro tips that will really make a difference and give you that edge over everyone who settles for "standard" lighting.
💎 Professional gallery insider secret: Create a slight color temperature contrast between your artwork lighting (3000K warm) and the general room lighting (4000K neutral). This subtle difference makes your work "pop" from its environment, just like in prestigious galleries. For example: if your living room has white LED lighting, your painting under slightly golden light instantly becomes more valuable to the eye.
🤔 Frequent question from our readers
"Can I use the same lighting for multiple aligned paintings?"
Excellent question that shows you're already thinking like a collector! Yes, but with an important nuance: each painting deserves its own light beam to reveal its specific characteristics. A rail with several adjustable spotlights is the ideal solution - you keep the visual harmony while respecting the individuality of each work. The mistake would be to use a single wide spotlight that flattens all nuances. Think "constellation" rather than "parking lot lighting"!
🎯 Test to do now: If you already have multiple paintings, illuminate just one with your new technique and observe how it visually "overpowers" the others. This demonstration will convince you of the importance of individual lighting for each work.
⚠️ Pitfalls to avoid to protect your investment
Now that you know how to reveal the beauty of your paintings, I must warn you about common mistakes that can ruin all your work. These mistakes are tempting and seem logical at first glance, but they sabotage the desired effect.
- 🚫 Lighting from too close to save money: It's tempting to bring the spotlight closer to have more power with fewer watts, but you create hard shadows and overexposed areas. Result: your painting loses its natural modeling. Solution: keep the optimal distance and increase the LED power instead. This is mistake #1 for beginners, don't worry!
- 🚫 Multiplying light sources to "be sure": More light doesn't mean better illuminated! Several poorly coordinated spotlights create crossed reflections and visual fatigue. Consequence: your painting becomes aggressive to look at. Prefer a single spotlight well positioned and powerful enough. Sophistication comes from precision, not quantity.
- 🚫 Using low-cost LEDs to save money: Cheap LEDs often have poor color rendering that distorts your work. Worse: they can subtly flicker and tire your eyes. Impact: your painting loses its charm and you no longer feel like looking at it. Invest in IRC>90 (color rendering index), this is the guarantee to preserve the original beauty.
- 🚫 Neglecting seasonal orientation: Many set their lighting once and don't think about it anymore. Problem: natural light changes with the seasons, and your summer setting may seem too weak in winter. Consequence: your painting "dims" during certain periods. Plan to readjust twice a year, it's normal and necessary.
- 🚫 Forgetting optics maintenance: A dusty spot loses 30% of its efficiency and changes the color temperature. Pernicious result: the degradation is so gradual that you don't notice it, but your guests no longer find the initial impact. Solution: quarterly cleaning with a microfiber cloth, that's all.
🛡️ Your monthly safety checklist: Check that your painting still "catches" the eye when entering the room. Control that no reflections appear from your usual viewing positions. Test that the lighting remains uniform over the entire surface. Observe if the colors retain their intensity compared to your memories. Warning signs: decrease in visual impact, appearance of new reflections, new shadows.
🎁 Special readers offer
Because you took the time to inform yourself, enjoy 10% discount on your first order:
⏰ Valid 72h after reading • Applicable to all our products
❓ Your lighting questions answered
Allow between €80 and €200 for a complete quality system (LED spotlight + adjustable bracket + dimmer). To optimize: start with a "pilot" painting to familiarize yourself with the technique, then gradually equip the rest of your collection. Concrete example: a collector started with an investment of €120 on her main painting, the effect was so successful that she equipped all her collection in 6 months!
Excellent news: a decorative painting spotlight LED of 10W used for 4h/day costs less than €8 per year in electricity! That's 10 times less than an old halogen bulb. Rest assured with this calculation: even illuminating 5 paintings daily, your bill will only increase by €3 per month. The investment is largely justified by enhancing your collection.
Yes for rail solutions or with existing sockets, no for direct connection to the electrical grid. A very popular intermediate solution: cable-suspended spotlights with a transformer, elegant and easy to install yourself. Technical note: comply with electrical safety standards, especially in damp rooms. In case of doubt, an electrician can install a rail in 1 hour for 80-120€ labor cost.
It's even the opposite! Modern LEDs emit neither UV nor heat, unlike older light sources. Your works are better protected than with indirect lighting using classic bulbs. Conservation tip: just avoid excessive intensities (stay below 200 lux) and your painting will be perfectly preserved. Museums widely use LED for this reason!
Universal rule: one spotlight for a maximum width of 60-80cm. For large formats, use several coordinated spotlights rather than a single powerful one. Pro tip: very small paintings (less than 30cm) benefit from a specialized mini-spot that avoids visual crushing. Adaptation: always test uniformity from multiple angles before validating your installation.
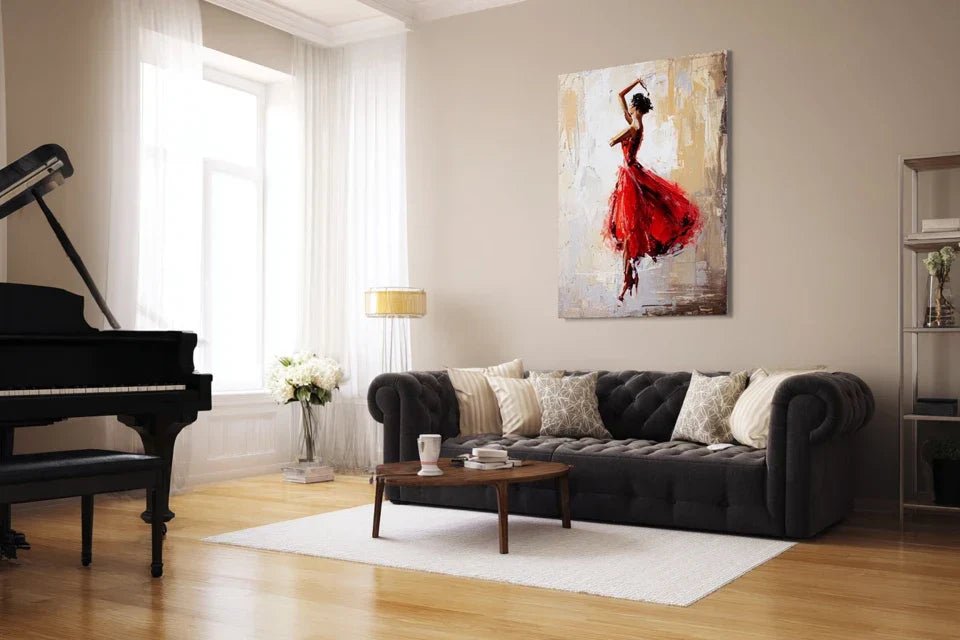
🌟 Your new life with sublimated paintings
In a few weeks, when you enter your living room and your gaze is immediately drawn to your works beautifully highlighted, you will feel that deep satisfaction of having created something unique. Your guests will no longer be able to pass before your paintings without stopping, and you will finally hear those compliments you have been waiting for since the purchase: "Where did you find this masterpiece?" "Your interior really has character!"
But beyond external recognition, you will have developed an expert eye for lighting and highlighting that will transform your approach to all your decoration. This new confidence in your aesthetic choices will radiate throughout all your arrangements, and your home will become that refuge personalized and inspiring you have always dreamed of.
Understanding the technical aspects was the most difficult thing, and you now master it. Your first move? Start tonight by observing your favorite painting with improvised directional lighting (desk lamp, flashlight...). This revelation will give you the momentum to take action tomorrow and permanently transform your relationship with art at home.
✨ Your artistic breakthrough awaits you: Every day without proper lighting is a day your artwork remains invisible. You now have all the keys to reveal the beauty that lies dormant in your walls. Your collection deserves this respect, and you deserve this daily pleasure!


