

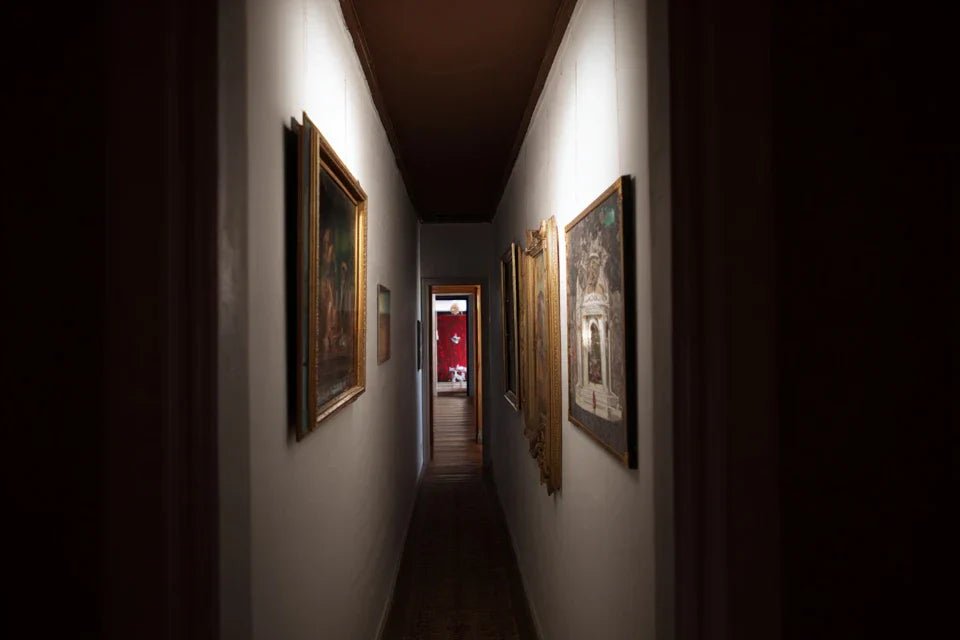
You come home every evening and walk through this narrow hallway that frustrates you. The white, empty walls make you feel like you're entering a hospital corridor rather than your cozy retreat.
You look at this restricted space with a sigh, already imagining the perfect artwork that would transform everything. But then anxiety hits: what if it’s too big? Too small? What if it makes the passage even narrower?
You've already tried some solutions: tiny frames that disappear, or worse, you gave up thinking that decorating a narrow hallway was an impossible mission.
Rest assured, it’s not your lack of taste that’s the problem. It’s simply that no one has explained the specific rules for small spaces. A hallway isn't decorated like a living room!
By the end of this article, you will know exactly how to choose and position the ideal artwork to transform your narrow hallway into a true art gallery that will impress your guests from the moment they arrive.
Why does your narrow hallway deserve as much attention as a living room?
Your entrance or hallway is the first impression you give. It’s like a book cover: in 3 seconds, your guests form an idea of your personality. A bare hallway screams "no one really lives here," while a well-decorated hallway whispers “people with taste live here.” The opportunity? These few square meters can become your most memorable decor signature.
🏠 Customer testimonial: "My neighbor Sophie had this dark 80cm wide hallway. After installing a large artwork with warm colors, she now receives compliments on every visit. Her secret? She dared to go big in a small space."
💬 Conversation with a decor expert
The golden rule for narrow hallways: The smaller the space, the bolder your artistic choice should be. A artwork for a narrow entrance well chosen visually expands the space by creating a powerful focal point that diverts attention from architectural constraints.
Why have your previous attempts failed?
Do you recognize yourself? You bought a small "discreet" frame that disappeared on the wall. Or maybe you installed several small items that turned your hallway into a mess. Perhaps you even tried a large painting but positioned it poorly, creating a “wall falling” effect.
The problem isn't your decorating instinct; it’s that narrow hallways obey particular optical laws. Contrary to popular belief, you need to create visual density, not discretion.
Imagine a hallway as a tunnel: either it draws the gaze towards the end (oppressive effect), or it captures it on the sides (gallery effect). Your mission? Transform the passage into a destination.
🔍 First hidden cause: The illusion of proportionality
Everyone believes that a small space requires small objects. That's mistake number one! In reality, a small painting in a narrow hallway creates a “stamp” effect that emphasizes the smallness of the space.
It’s like carrying a small bag with a long dress: the proportions destroy each other instead of enhancing each other. In decoration, contrasts in scale create dynamism and elegance.
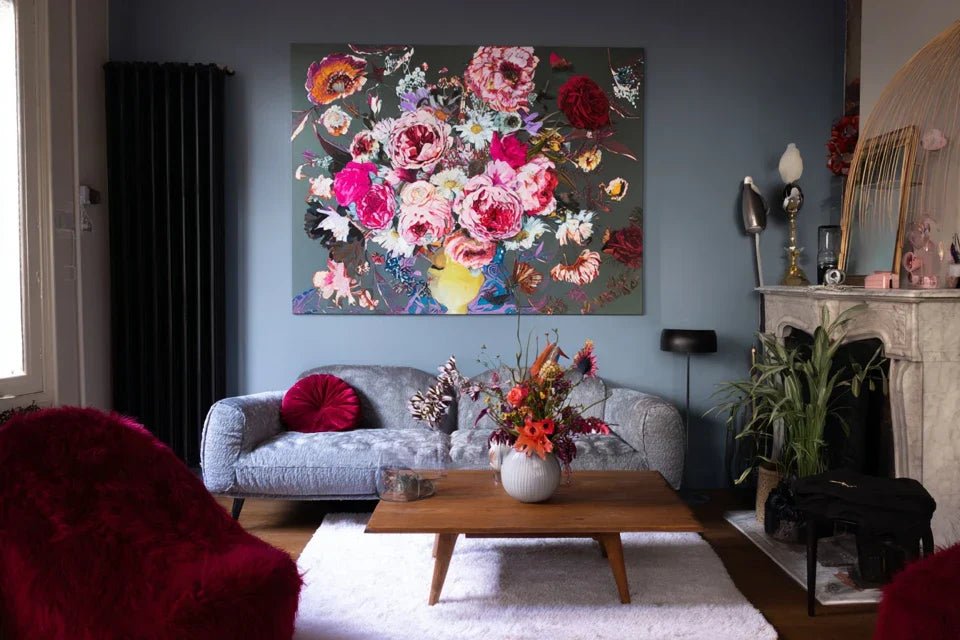
Result: your hallway looks narrower and sadder than before. The solution? Dare to use a generously sized painting that asserts its presence and creates a “wow” effect from the entrance.
✨ Quick test: Hold an open magazine against your hallway wall. Observe how the space suddenly seems more structured and welcoming. That’s exactly the effect you want with a painting of the right dimensions.
💡 Second hidden cause: The standard height trap
The classic rule “center of the painting at 1m65 from the floor” does NOT work in a narrow hallway. This height, perfect for a living room, creates a visual cut-off effect that further shortens your space.
It’s like wearing a belt with a short dress: it cuts the silhouette in two. In a hallway, you need to create lines that accompany movement, not interrupt it.
Consequence: you feel oppressed when passing through, and your guests keep their eyes down. The good news? A simple height adjustment can completely transform the atmosphere.
🎯 Third hidden cause: Neglected lighting
No one thinks about hallway lighting, yet it’s what reveals or kills your hallway wall art. A standard ceiling light creates shadows that dull colors and flatten reliefs.
Observe your hallway at different times: morning, afternoon, evening. The variations in light completely transform the appearance of your decor. A magnificent painting in full daylight can become dull in the evening.
Impact: your decorating investment never expresses itself to its full potential, and you wonder why “it doesn’t look like it does in the store”.
🔍 The 3 signals that don't lie:
- Your guests never comment on your hallway: Sign that nothing catches their eye, like a book without an attractive title
- You avoid showing this area in your photos: Your instinct tells you that this part of your interior doesn't represent you
- You feel rushed when passing through: The space doesn’t invite you to slow down, proof that it lacks soul and personality
⚡ The trigger element: The strategic focal point
What really makes the difference is creating an irresistible focal point that transforms the passage into an experience. It's like a domino effect: a perfectly placed element redefines all the space around it. Your hallway ceases to be an "in-between" and becomes a room in its own right.
The rule of magnetic gaze: In a successful hallway, the eye must be immediately captured by a strong element, then circulate naturally within the space. Test it: does your gaze stop somewhere or does it glide without catching on?
| ❌ Instinctive approach | ✅ Expert approach | 💡 Explanation | 🎯 Visible benefit |
|---|---|---|---|
| Small, discreet painting to avoid cluttering | Generous painting that asserts its presence | Scale contrasts create dynamism | Hallway that impresses from the entrance |
| Standard height at 1m65 from the floor | Height adapted to traffic flow | The eye naturally follows the movement of walking | Sensation of expanded and fluid space |
| Basic existing ceiling lighting | Directional lighting towards the artwork | Light reveals colors and reliefs | Painting that lives and changes according to the hours |
| "Safe" choice that goes with everything | Personal choice that expresses your taste | Art reflects the personality of the owner | Memorable and unique decor signature |
The 3-step method for a hallway that impresses
No more guesswork! You will follow a proven process that transforms any narrow hallway into a true personal gallery. It's like building a house: solid foundations, then structure, finally finishes. Each step reveals the potential of the next, until that magical moment when you rediscover your space.
🎨 Overview of your transformation: Measurements and analysis (reveals hidden possibilities), selection of the perfect painting (creates the wow effect), expert installation (reveals all the potential). In 3 steps, your hallway goes from "obligatory passage" to "daily moment of pleasure".
🔧 Step 1: Analyze your space to reveal its hidden potential
This first step is your personalized diagnosis. Like an architect studying a plot of land before building, you will discover the unsuspected assets of your hallway. This analysis will give you total confidence for your next choices.
🛠️ What you need (already at home!):
- Measuring tape or ruler: To accurately measure width, length and ceiling height. Avoid "eyeball" estimates that skew the entire project. A decimeter can change the desired visual effect.
- Smartphone with camera: To capture the space from different angles and lighting conditions. Photos reveal details you don't see with the naked eye, such as shadows or reflections that will influence your choice.
- Notebook: To note your observations and feelings at different times of the day. Your hallway changes atmosphere depending on natural and artificial light.
Let's move on to concrete action now:
📐 Detailed instructions:
Map out your space: Measure the width at eye level (1m70), as this is where your artwork will be perceived. Also note the distance between wall and opposite wall to calculate the optimal viewing angle. This data determines the maximum possible size of the painting.
⏱️ Time: 10 minutes | ✅ Success when: You have width, length, height and viewing distance noted | ⚠️ Attention: Many forget to measure taking into account skirting boards and cornices which reduce the actual space
Test the visual path: Walk normally in your hallway observing where your gaze naturally rests. Mark "dead" zones (where the eye glides) and natural attachment points (angles, interruptions, light sources) with a light pencil mark.
⏱️ Time: 5 minutes | ✅ Success when: You identify 2-3 potential locations | ⚠️ Attention: Don't rely on your first impression, repeat the test in reverse
Analyze natural light: Photograph your hallway at 9am, 2pm and 7pm to capture variations in atmosphere. Observe how the light caresses the walls and creates more or less welcoming areas. This analysis determines the ideal orientation of your future painting.
⏱️ Time: 15 minutes spread over a day | ✅ Success when: You have 3 photos showing the different atmospheres | ⚠️ Attention: A hallway can seem perfect in the morning and dull in the evening, hence the importance of this study
✅ Validation of step 1: Your hallway has no secrets for you. You know its exact dimensions, strengths and lighting challenges. You already feel excited about transforming it! If something still escapes you, calmly repeat the measurements.
OUR RECOMMENDED PRODUCTS
🎨 Step 2: Select your artwork according to the "just enough" rule
Now that you know your space, you'll choose the artwork that will reveal it. This step transforms your technical data into an artistic crush. The effect is immediate: you go from "I would like to decorate" to "I found MY piece".
🎯 Your expert selection criteria:
- Optimal size: Between 50% and 70% of the width of your main wall. Smaller = shy effect, larger = stifling effect. This proportion creates the perfect balance between presence and breathing space.
- Format orientation: Landscape format to visually lengthen a short hallway, portrait format to elongate a too-long hallway. The format dialogues with architecture to correct its natural defects.
- Color palette: A dominant color that subtly contrasts with your walls, plus accents that recall your existing decor. This harmony creates an elegant continuity with the rest of your interior.
🛍️ Your selection process:
Calculate your ideal dimensions: Multiply the width of your wall by 0.6 to get the optimal width of the painting. For example, a 120cm wall = a 72cm wide painting. This formula guarantees a strong presence without visual oppression.
⏱️ Time: 3 minutes | ✅ Successful when: You have a precise size range | ⚠️ Attention: Always round up to standard sizes available in stores
Virtually test your favorites: Print out an A4 photo of your favorite paintings and stick them on the wall at the planned height. Step back and observe the overall effect. This simulation avoids unpleasant surprises and validates your choice before purchase.
⏱️ Time: 20 minutes | ✅ Successful when: A painting makes you smile every time you pass by | ⚠️ Attention: Resist the temptation to "see bigger", respect your proportion calculations
🎨 Validation of step 2: Your choice is made and you can't wait to receive it! The selected painting respects your technical constraints while making you vibrate emotionally. This is a sign of a perfectly balanced choice between heart and reason.
🔨 Step 3: Expert installation for a professional result
The final step reveals all the magic of your project. Poorly done installation can spoil even the most beautiful painting, while expert hanging enhances even a modest work. You will discover the immense satisfaction of seeing your vision become reality.
🔧 Your pro installation kit:
- Minimum 60cm spirit level: Essential for perfectly horizontal hanging. A tilted painting immediately spoils the desired effect and gives an impression of neglect. Invest in a good level, you will reuse it for all your decor projects.
- Wall plugs suitable for your wall: Molly for hollow walls, expansion plug for concrete/brick. The safety of your artwork depends entirely on the quality of the fixing. Check the weight of your work and choose plugs supporting double.
- Pencil and eraser: To temporarily mark your reference points before drilling. Permanent marks with pen are impossible to erase perfectly and create unsightly stains.
📏 Perfect hanging procedure:
Find the optimal height: In a narrow hallway, place the center of the artwork 155cm from the floor (10cm lower than the standard rule). This height naturally accompanies the walking movement and avoids the "wall falling" effect.
⏱️ Time: 5 minutes | ✅ Successful when: The height seems natural to you as you walk | ⚠️ Attention: Adjust according to your height if you are less than 1m60 or more than 1m80
Center horizontally with precision: Measure the width of your wall, divide by 2, then measure the width of your artwork and divide by 2. The difference between these two measurements gives you the distance between the edge of the wall and the edge of the artwork.
⏱️ Time: 8 minutes | ✅ Successful when: Your level confirms perfect horizontalness | ⚠️ Attention: Double-check before drilling, a centering error is very visible in a hallway
Check the final effect: Step back to the end of your hallway and observe the whole. Your artwork should create an immediate focal point that structures all the space. If something bothers you, don't hesitate to adjust by a few centimeters.
⏱️ Time: 5 minutes | ✅ Successful when: You feel an immediate satisfaction | ⚠️ Attention: Have it validated by someone outside, your eye can get used to a defect
🏆 Final validation: Your hallway has been transformed! The space breathes, your personality expresses itself, and every passage becomes a pleasure. You have succeeded in creating this gallery atmosphere you dreamed of. Savor this moment of pride, you deserve it!
The safe progression rule: Validate each step before moving on to the next. Accurate measurements ✓, heart check confirmed ✓, millimeter installation ✓. This methodology guarantees a professional result from the first time, without stress or regrets.
Congratulations! You now master the subtleties of narrow hallway wall decoration. These techniques give you a considerable advantage over those who decorate "by feel" without understanding the optical mechanisms at play.
🎯 Professional decorator tip: Add discreet LED lighting above your artwork (wall lamp or rail). This directional light reveals textures and makes colors vibrate, even in full daylight. Your hallway then becomes a real gallery that lives 24/7.
💭 "What if I choose a style that's too bold?"
"I'm afraid of regretting a choice that’s too strong and won’t please everyone..."
I perfectly understand this apprehension! Many of my clients feel this fear before taking the plunge. But here's the truth: a neutral, "safe" hallway doesn't appeal to anyone because it expresses nothing. On the contrary, a confident choice that reflects you attracts sincere compliments. Your interior should tell YOUR story, not that of a generic decor catalog. Start with a painting that makes you smile every morning: that’s the infallible criterion for a good choice.
🛡️ Your safety net: Choose a work with a timeless dominant color (blue, green, ochre) and more daring accents. You will get a reassuring base with a touch of personality that makes all the difference.
⚠️ The 5 mistakes that ruin everything (and how to avoid them)
Before you start, here are the classic pitfalls that turn a beautiful project into disappointment. I'm sharing these mistakes with you to protect you, as they are unfortunately very common among motivated beginners.
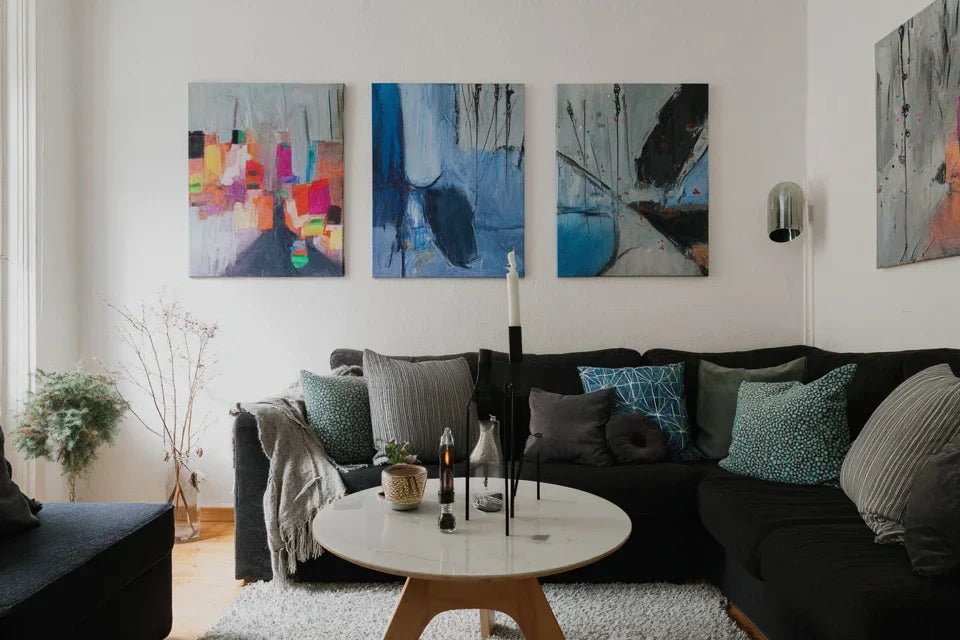
- 🚫 Choosing several small paintings "to create a composition": It’s tempting to create a miniature gallery, but the result is a cluttered wall that visually shrinks the space. In a narrow hallway, the rule is simple: one strong work is better than three average works. Opt for impact over quantity. ⚖️ Neglecting the total weight of the installation: An 80cm painting can weigh 5kg with its frame! Many underestimate this data and end up with a painting that falls after a few weeks. Weigh your work and multiply by 2 to choose your wall plugs. Safety is never negotiable. 💡 Installing without testing artificial lighting: Your perfect painting in full daylight can become dull in the evening under your ceiling light. Be sure to test the rendering in the evening before finalizing the installation. Additional lighting may be necessary to reveal your work after sunset. 📐 Copying the hanging height of a living room: The 1m65 rule from the floor doesn't apply in a hallway! This height creates a visual break that shortens the space. Go down to 1m55 to naturally accompany the movement of circulation. 🎨 Choosing a frame wider than the painting: An oversized frame visually eats up available space and weighs down the whole thing. In a narrow hallway, prioritize a thin frame that highlights the work without competing with it. The painting should remain the star, not its frame.
🔍 Your 4 final check points: Does your painting respect the 60% rule of wall width? Does the installation hold securely with suitable wall plugs? Does the lighting reveal the colors in the evening? Do you feel an immediate satisfaction when looking at the whole thing? If one answer is negative, adjust before considering the project finished.
🎁 Special offer for readers
Because you took the time to inform yourself, enjoy 10% discount on your first order :
⏰ Valid 72h after reading • Applicable on all our products
❓ Your most frequently asked questions about hallway wall art
Allow half a day for a professional result: 1h for analysis and measurements, 2h to make your choice online or in store, 30 minutes for the actual installation. To optimize: prepare your tools in advance and don't hesitate to order several sizes of wall plugs. Sophie, our customer, transformed her hallway of 3 meters in a morning and has been receiving compliments for 6 months!
Between €80 and €200 for a complete successful transformation: €50-150 for a quality artwork in the right dimensions, €10-30 for professional fixings, €20 for optional additional lighting. Prioritize size and print quality over a luxurious frame. A beautiful painting in a simple frame always surpasses an average painting in an expensive frame.
Absolutely! This installation only requires simple gestures: measure, mark, drill, screw. If you know how to use a level and a drill, you have the necessary skills. If in doubt about the nature of your wall, ask for advice at a hardware store: they will identify the type of wall plug needed in 2 minutes. The real difficulty is not technical but artistic: choosing THE artwork that moves you.
Use the "mirror test" rule: your artwork should contain at least one color present elsewhere in your interior (cushion, rug, decorative object) to create a natural harmony. Avoid seeking perfect agreement: an assumed contrast with a subtle reminder creates more elegance than too exact a matching. Trust your first emotion when you look at the work: if it makes you smile immediately, that's the right choice.
A quality choice evolves with you! Choose a work that touches you personally rather than a fleeting trend. Artwork with natural colors (earth, ocean, vegetation) adapts to all changes in decoration. Plus, a simple change of lighting or framing can completely renew the appearance of your artwork. It's more economical and ecological than replacing everything.
🌟 Your hallway transformed: the new signature of your home
In a few days, you will walk through your hallway with a smile of satisfaction. Your guests will spontaneously stop to admire your artistic choice, and you will feel that discreet pride of someone who masters the art of living. Your hallway painting will no longer be just a decoration, but a reflection of your personality and your taste for beautiful things.
This transformation goes far beyond simple hallway wall decor. You have developed an expert eye for proportions, light and the harmony of spaces. These skills will serve you for all your future decorating projects, and your confidence in your aesthetic choices will grow naturally. Your interior gradually becomes a faithful reflection of who you really are.
You now know that beauty is not a question of budget but of understanding the rules of harmony. Your first step? Measure your hallway tonight and let your instinct guide you to choose this work that awaits you. In a week, you will wonder how you could have lived so long with empty walls!
✨ Your moment has come: You have all the keys to create a hallway that resembles you and impresses lasting. Trust yourself, your personal taste combined with these expert techniques guarantees an exceptional result. Your new private gallery awaits you!


