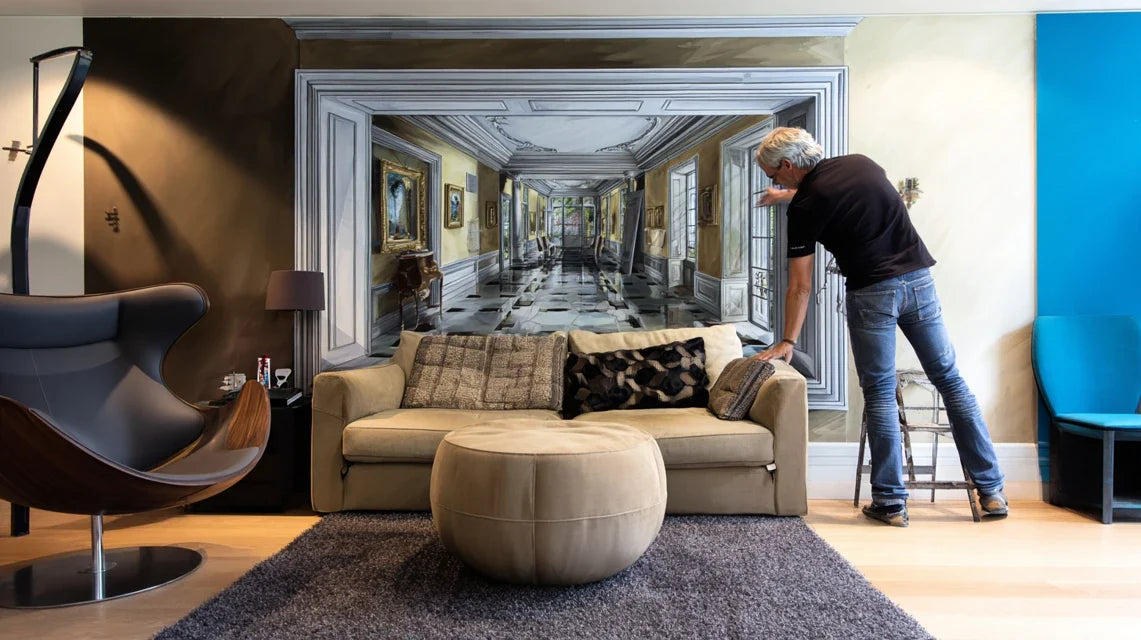
Contemporary optical illusion wall art, transform your space without renovation
By Alexandre MARY
⏱️ Reading time : 8 minutes
You’ve been staring at that blank wall for weeks, imagining a thousand ways to transform it. You've scrolled through Pinterest, flipped through decor magazines, but every project seems to require work, time, and a significant budget.
You already envision that partition opening onto a secret garden, that library with thousands of antique books, or a window overlooking the rooftops of Paris. But reality sets in: painting company, deadlines, dust, and a budget that soars.
You've probably tried some wall stickers that peel off, wallpapers that don’t deliver the expected effect, or even considered hiring a local artist. But either the result was disappointing, or the price was prohibitive.
It's perfectly normal to feel this frustration. The problem isn’t your vision or your budget, but rather the traditional illusionist approach that hasn’t yet incorporated contemporary possibilities.
By the end of this article, you will know exactly how to create a contemporary mural illusion that transforms your space in just a few hours, without work or artist intervention, for a stunning result that your guests won't forget.
Why contemporary trompe-l’œil is revolutionizing interior decoration?
Contemporary mural illusion meets an urgent need: to transform your interior quickly without undertaking heavy work.
Imagine being able to change the atmosphere according to your desires, create a sense of space in a small apartment, or add a unique artistic dimension to your living room.
That’s exactly what this modern technique allows, combining traditional illusionist art with current technological innovations.
🎨 Customer testimonial: "I had a blank wall in my 25m² living room that was depressing me. I installed a trompe-l’œil representing a large bay window overlooking a Zen garden. My guests are now looking for the door handle! The effect is so realistic that I really feel like I've expanded my living room." - Marie, interior architect
💬 Conversation with a decor expert
"I always thought that trompe-l’œil was necessarily kitsch and outdated... It always looks like the theater sets of our grandparents."
It's like comparing a dial-up phone to a smartphone! Contemporary trompe-l’œil uses high-definition photographic techniques and innovative supports that create a perfect illusion. No more oil paint yellowing, but museum prints on canvas or dibond that retain their brilliance for decades.
"I was always told that you needed a huge room for the trompe-l’œil to work, otherwise it looks strange."
This rule dates back to the era when trompe-l'oeil paintings were hand-painted with fixed perspectives. Today, we adapt the perspective to your exact space: a window trompe-l'œil will be perfect in a 1m20 wide hallway, while a fake library will enhance a 3-meter wall. The key is custom adaptation.
The golden rule of contemporary trompe-l'oeil: The more naturally the illusion integrates into your existing architecture, the more convincing it will be. It’s like adding a window where it would logically have been built. You will get a stunning result from the first day of installation.
What makes your wall decor so bland?
You probably experience one of these three situations: your walls seem dull despite your efforts, you lack depth in your rooms, or you feel that your decoration lacks distinctive personality.
What's really happening is that traditional wall decor only works on the surface, without creating dimension. Your eye doesn’t find a vanishing point, an opening, or an element that permanently captures attention.
It’s like trying to create ambiance with sconces alone: you illuminate, but you don't create atmosphere. Contemporary trompe-l'oeil literally sculpts the visual space.
The trap of "quick" wall decor solutions
Contrary to what magazines suggest, multiplying frames or decorative objects doesn’t necessarily create a harmonious ambiance. Often, it produces the opposite effect: a feeling of visual clutter.
Imagine your wall as a blank page. Rather than covering it with small elements, trompe-l'oeil creates a complete visual narrative, a story that your eye can follow and get lost in.
This approach radically transforms your relationship to space: instead of suffering the limitations of your walls, you transcend them to create an opening towards an inspiring elsewhere.
🔍 Quick test: Look at your main wall for 30 seconds. Does your eye find a captivating focal point or does it wander aimlessly? If it's the latter, that’s exactly what a contemporary trompe-l'oeil can solve.
The illusion of space: why does your room seem cramped?
Many people think that a room appears small only because of its actual size. In reality, it’s often the absence of visual perspective that creates this feeling of confinement.
A trompe-l'œil works like a magic window: your brain perceives depth where there is only a flat wall, instantly creating a sensation of enlarged space.
This psychological transformation is immediate and lasting. Your guests and you will feel this openness every time you pass by, transforming your daily life into a more inspiring experience.
The "wow" factor: creating a unique decorative signature
You’ve probably noticed that even with beautiful furniture and accessories, your interior looks like many others. This is the “decor catalog” syndrome: pretty but without distinctive soul.
Contemporary trompe-l'oeil allows you to create a signature element impossible to reproduce elsewhere. It’s your personal vision that takes shape, not that of a designer or brand.
This personalization creates a strong emotional attachment to your space and consistently generates reactions of admiration from your visitors.
5 signs that your wall art needs a trompe-l'oeil:
You avoid certain angles in your room: Your eye naturally avoids areas with no visual interest, creating "dead zones" in your own home
Your guests don’t know where to focus their gaze: The lack of a focal point creates a subtle discomfort that harms the conviviality of your space
You feel a sense of confinement: Even with beautiful windows, the absence of artificial perspective can create a feeling of suffocation
Your decor seems "flat" despite your efforts: 2D elements do not create the depth necessary for a rich and captivating atmosphere
You are constantly looking to “change something”: This persistent dissatisfaction often reveals the lack of a strong element that visually structures the space
The trigger moment: when illusion becomes reality
The real difference lies in the quality of the depth illusion. A successful trompe-l'oeil works like a domino effect: it transforms not only the wall, but reveals and enhances the entire surrounding space.
It’s exactly like architectural lighting: good lighting doesn’t just illuminate, it sculpts the atmosphere.
In your case, look for this feeling of “surprise” when you look at the wall: if you feel a hesitation, a question about the reality of what you see, then the illusion is working perfectly.
Immediate validation rule: A successful trompe-l'oeil makes you forget the existence of the wall for a few seconds. Test this effect by looking away and then back at the artwork: the illusion should “grab” you each time.
❌ Classic wall decor
✅ Contemporary trompe-l'oeil
💡 Key difference
🎯 Immediate benefit
Accumulation of objects without coherence
A single work that structures the space
Holistic vs fragmented approach
Visual serenity and ease of maintenance
Impression of walls that "close" the space
Visual opening towards elsewhere
Created perspective vs. experienced perspective
Instant sensation of expanded space
“Catalog” decor without personality
Unique creation adapted to your vision
Personal expression vs conformity
Pride in owning something unique
Temporary effect that quickly becomes tiresome
Renewed fascination with each look
Constant stimulation vs habituation
Sustainable investment in your well-being
The simple method to create your contemporary trompe-l'oeil
Rest assured, creating a contemporary trompe-l'œil doesn't require artistic talent or technical training. It’s more like assembling a sophisticated puzzle: each step is logical and the result unfolds gradually.
The progression follows a construction logic: first choose the right support and image, then master installation, and finally optimize the visual effect.
At each stage, you'll see your wall transform, culminating in that magical moment when the illusion comes to life before your eyes.
🎯 Method overview: In 3 simple steps (selection, installation, finalization), you will go from an ordinary wall to a stunning trompe-l'œil. Each step brings you closer to the final result, with concrete validations to ensure you are on the right track.
Step 1: Choose the perfect support for your trompe-l'œil
This first step is crucial as it determines the final quality of your illusion. It’s like choosing the foundations of a house: invisible once finished, but determining the solidity of the whole.
Contrary to popular belief, not all supports are equal. The satisfaction you will feel seeing your trompe-l'œil take shape depends entirely on this initial selection.
Essential contemporary supports
Premium canvas: It’s the king support for artistic trompe-l'œil. Imagine a painter's canvas, but with a high-definition photographic print. You will recognize it by its slightly grainy texture and matte finish that avoids reflections. Avoid basic canvases that shine: they betray the illusion at first glance.
Dibond (composite aluminum): Perfect for architectural trompe-l'œil like fake windows. It’s a sandwich of ultra-thin aluminum with a plastic core that remains perfectly flat. The matte surface naturally diffuses light, creating a striking sense of depth. The impact on realism is immediate and spectacular.
Special trompe-l'œil non-woven wallpaper: For large surfaces, this is the most economical solution. You will recognize it by its thickness (minimum 150g/m²) and its ability to mask wall imperfections. It brings that subtle texture which perfectly imitates natural materials.
Now, let's move on to selecting your visual
How to choose the perfect image without making a mistake
Analyze the architecture of your wall: Precisely measure height, width, and note surrounding elements (sockets, switches, furniture). This analysis determines the type of trompe-l'œil that will naturally integrate. A fake bookcase requires a minimum height of 2m40, while a window can adapt from 1m80.
⏱️ Time: 15 minutes | ✅ Successful when: You clearly visualize where and how the illusion will fit | ⚠️ Attention: Don't neglect existing lighting - a window trompe-l'œil will be less convincing facing a real window
Select the style that matches your interior: Harmonize the trompe-l'oeil with your existing decor. A contemporary style goes well with clean lines, while a classic style enhances a traditional interior. The goal is to create perfect visual continuity.
⏱️ Time: 20 minutes | ✅ Success when: The image looks naturally in place in your space | ⚠️ Attention: Avoid excessive contrasts that immediately reveal the trickery
Check the image quality: Require a minimum resolution of 300 DPI to avoid pixelation. Verify that perspectives are consistent with your main viewing angle. A blurry or poorly framed image will ruin the illusion even on the best support.
⏱️ Time: 10 minutes | ✅ Success when: The image remains sharp even zoomed in at 200% | ⚠️ Attention: Free images from the internet are often of insufficient quality for a convincing trompe-l'oeil
✅ Validation of step 1: You have selected a suitable support and a high-definition image that harmonizes with your space. You can visualize the final result and feel confident about installation. If in doubt, don't hesitate to ask for advice - this is the time to adjust, not after printing!
OUR RECOMMENDED PRODUCTS
Step 2: Professional installation in DIY mode
You are now entering the most rewarding phase: seeing your vision take shape concretely. This step transforms your preparation into a tangible reality.
The secret to a successful installation lies in the precision of positioning and the quality of fixation. Every gesture counts to create this perfect illusion that will surprise your guests.
Essential tools for a perfect installation
Laser level: Essential to guarantee the perfect horizontalness of your trompe-l'oeil. A few millimeter deviation is enough to betray the illusion. Choose a model with laser projection for large surfaces - your eye will immediately detect any alignment defect.
Tape measure: For precise measurements and dimension transfers. Prefer a 5 meter minimum model with a magnetic hook. Millimeter-perfect precision is essential for a professional result that will last.
Special trompe-l'oeil adhesive or invisible fixing system: Depending on your support, use repositionable glue (wallpaper) or a discreet rail system (canvas/dibond). The goal is an invisible fixation that does not compromise the illusion with unsightly elements.
Step-by-step installation for a professional result
Wall preparation: Clean the surface perfectly and fill imperfections with smoothing compound. An uneven wall will create shadows that reveal the artifice. Apply a primer suitable for your support to ensure optimal adhesion.
⏱️ Time: 45 minutes | ✅ Success when: The wall is perfectly smooth and matte | ⚠️ Attention: Respect the complete drying time - rushing is the enemy of quality
Positioning and marking: Mark the exact location with a thick pencil and check the alignment with your architectural references (baseboards, outlets, corners). This step determines the final visual impact - take all the time necessary to achieve perfect positioning.
⏱️ Time: 30 minutes | ✅ Success when: The markings are clear and the alignment is verified from all angles | ⚠️ Attention: A crooked optical illusion immediately destroys the illusion - check three times before fixing
Final fixation: Proceed in sections, gradually smoothing to eliminate air bubbles. Work from the center towards the edges with a regular motion. Patience at this stage guarantees an impeccable result that will last for years.
⏱️ Time: 60 minutes | ✅ Success when: No visible bubbles and perfect adhesion over the entire surface | ⚠️ Attention: Air bubbles are most visible with flat lighting - check with a flashlight
🎯 Validation of step 2: Your optical illusion is perfectly positioned and fixed. No visible defects, impeccable alignment, smooth surface. You can already see the impressive visual effect. The final stage will enhance this already convincing result.
Step 3: Finalization and optimization of the illusion
You are now reaching expert level: transforming a beautiful optical illusion into a perfect illusion. This step makes all the difference between a satisfactory result and a truly stunning effect.
Final optimization consists of perfecting visual integration and eliminating the last clues that could reveal the artifice. It is at this moment that your optical illusion becomes truly convincing.
The finishes that make the difference
Accent lighting: Adjustable LED spotlights to create shadows and light games that reinforce the illusion of depth. Position them to avoid direct reflections that reveal the flatness of the support.
Raccord elements: Finishing strips, sealants or profiles to perfectly integrate the optical illusion into its architectural environment. These technical details make all the difference.
UV protection varnish: For optical illusions exposed to direct sunlight, this treatment preserves colors and extends the life of your artistic investment.
Fine adjustments for a perfect illusion
Lighting optimization: Adjust the intensity and orientation of lighting to create shadows consistent with the image. A faux window should receive lighting that mimics natural light. Test different settings depending on the time of day.
⏱️ Time: 40 minutes | ✅ Successful when: Lighting enhances the illusion without creating reflections | ⚠️ Attention: Direct or poorly oriented lighting can reveal the texture of the support
Finishing and joints: Install finishing elements to hide joints and seamlessly integrate the faux window into its environment. Every detail counts for perfect visual continuity.
Final validation tests: Observe your faux window from different angles and lighting conditions. Perform the "first glance" test: the illusion must work immediately, even for someone discovering your space.
⏱️ Time: 20 minutes | ✅ Successful when: The illusion works perfectly from all angles | ⚠️ Attention: If you detect a defect, this is the time to adjust it before finalization
🏆 Final validation: Your contemporary faux window is complete and perfectly integrated. The illusion works flawlessly, the finishes are impeccable, the lighting is optimal. You can be proud of the exceptional result you have created.
Expert progression rule: A successful faux window must deceive its creator as well. If you still feel hesitation when looking at it, that means the illusion is working perfectly. Rely on this feeling of renewed surprise with each look.
Congratulations! You now master the subtleties of contemporary faux windows. These expert techniques give you a considerable advantage: you can create effects that even professional decorators do not always know how to achieve.
🎨 Master decorator tip: For an even more striking effect, create a "visual echo" by placing a real object that refers to your faux window. For example, a few real books in front of a faux bookcase, or a green plant near a fake window overlooking a garden. This technique completely confuses perception and reinforces the illusion of reality.
🤔 Frequent question from our readers
"I'm a tenant, can I still install a faux window without risking my deposit?"
Absolutely, and that’s even one of the great advantages of contemporary trompe-l'oeil! Unlike traditional painting, modern supports allow for totally reversible installation.
Choose a discreet rail fixing system or repositionable adhesives specifically designed for this application. You can remove your trompe-l'oeil without leaving any traces, or even take it to your next home.
It’s the ideal solution for personalizing your rental space without constraints or risks.
💡 Practical tip: First test the adhesive on a hidden area of the wall (behind furniture) to check compatibility with your coating. You will then be certain of a perfect removal when the time comes.
The mistakes that can ruin your project (and how to avoid them)
Even with the best intentions, some mistakes can compromise the effect of your trompe-l'oeil. These mistakes are predictable and avoidable if you know how to identify them. I will help you circumvent them to guarantee a result that meets your expectations.
⚠️ Neglecting the room’s lighting: It's tempting to focus only on the image, but existing lighting can reveal or mask the illusion. A trompe-l'oeil of a sunny window in a dark room will appear artificial. First analyze your natural and artificial lighting, then adapt your choice of image. This harmonization is key to a natural result.
⚠️ Choosing an image that’s too perfect: Paradoxically, an image that’s too polished can reveal the artifice. Reality has its imperfections, its variations in light. Prefer an image with subtle nuances and imperfect details that imitate reality. It's this "controlled imperfection" that makes the illusion credible.
⚠️ Ignoring the proportions of the room: A magnificent trompe-l'oeil can appear overwhelming in a small space or lost in a large volume. Respect the rule of thirds: your trompe-l'oeil should not occupy more than one third of the visible wall surface. This proportion guarantees a harmonious visual balance.
⚠️ Rushing the wall preparation: An uneven surface will create shadows that immediately reveal the artifice. Invest the necessary time in preparation: patching, sanding, smoothing. This tedious step determines 70% of the final quality. Never neglect it.
⚠️ Incorrectly positioning the main viewpoint: Your trompe-l'oeil should be optimized for the most frequent viewing angle. If you mainly view it from your sofa, that perspective must be perfect. A trompe-l'oeil positioned to be seen head-on but viewed at an angle will lose its effect.
✅ 4-point verification system: Before final installation, check: harmony with existing lighting, consistency of proportions, quality of wall preparation, optimization for your main viewpoint. If any of these points pose a problem, this is the time to adjust - not after installation.
Because you took the time to learn, enjoy 10% discount on your first order :
ART10
⏰ Valid 72h after reading • Applicable on all our products
🤔 Your questions about contemporary optical illusions
💰 How much does a quality contemporary optical illusion actually cost?
For an optical illusion of 2m x 1.5m, expect to pay between €200 and €600 depending on the chosen support and the complexity of the image. A canvas support costs around €300, dibond €450, and non-woven wallpaper €250. To optimize your budget, start with a medium format (1.5m x 1m) which already offers a remarkable visual impact for about €180. The investment is recouped in the first year by enhancing your space.
⏱️ How long does it take to install an optical illusion yourself?
Allow half a day for a perfect result: 2h for preparation and measurements, 1h30 for the actual installation, 1h for finishing touches and adjustments. This duration may seem long, but it guarantees a durable professional result. A rushed installation in 1h will quickly reveal its flaws and frustrate you. Take your time - it's a long-term investment.
🔧 Can an optical illusion be installed on all types of walls?
Yes, but with adaptations. Plasterboard wall: perfect with standard glue. Stone or concrete wall: use special porous materials glue. Wall with existing wallpaper: peeling recommended or installation over it with reinforced glue. Humid wall (bathroom): choose a waterproof support like dibond with waterproof glue. Each situation has its adapted technical solution.
🎨 How do I know if my optical illusion will harmonize with my decor?
Use the "3 dominant colors" rule: identify the 3 main colors of your room (walls, furniture, textiles) and choose an optical illusion that incorporates at least 2 of these colors. Avoid too strong contrasts which create a visual break. To reassure yourself, order a first 20cm x 20cm sample that you will temporarily position. Your eye will immediately tell you if the harmony works.
🌟 What are the most requested optical illusion styles currently?
The 3 leading trends are: fake windows overlooking zen gardens (relaxing effect), old libraries (intellectual sophistication), and modern architectural openings (space enlargement). Nature styles dominate with 40% of requests, followed by urban contemporary styles (30%) and classic styles (30%). This distribution reflects the need for escape and connection with nature in our urban interiors.
Your transformation is within reach
In a few weeks, you will look at the wall that used to frustrate you so much with a smile of satisfaction. Your guests will stop, intrigued, seeking to understand this opening which seems so natural.
You will feel that particular pride of having created something unique, that satisfaction of mastering a technique that few people know.
Your transformed space will inspire you daily, reminding you that you have the power to shape your environment according to your dreams.
This achievement goes far beyond mere decoration. You will have developed an expert eye for volumes, perspectives, and harmony of colors. These skills will serve you in all your future decor projects.
More importantly, you will have proven that you can realize your most ambitious visions with method and patience.
Now that you understand the mechanisms of contemporary trompe-l'oeil, the hardest part is done. All you have to do is choose your first project and get started.
Start by visualizing the final result, then simply follow the steps we have detailed. In a few days, you will experience the incomparable satisfaction of seeing your vision come to life.
🚀 Your first success awaits you: You now have all the keys to create a trompe-l'oeil that will amaze your loved ones and transform your daily life. Trust your vision - it only asks to be expressed in your space.
📚 Deepen your knowledge
Discover other wall optical illusion techniques to enrich your creative palette and multiply the possibilities of transforming your spaces.