

You just discovered that your favorite painting is tilting dangerously, hung by a fitting that crumbles before your eyes. Your heart races, and you imagine your artwork crashing to the floor with a crash that would wake up the whole neighborhood.
That feeling of panic as you walk past this wall, the worried look you cast mechanically towards that fitting that creaks with every draft. You no longer dare invite anyone over, for fear that they will notice this failing mounting system that betrays your negligence.
You've already tried tightening the screws, adding an extra dowel, even changing the location. But nothing works: either the fitting comes loose again, or it damages the wall further, or it simply cannot support the weight of your painting.
Rest assured, it’s not you at fault. Most fittings sold in stores are unsuitable for artwork and modern walls. They are designed for light and temporary objects, not to permanently support your decorative investments.
By the end of this article, you will master professional techniques to restore or replace any mounting system without damaging your artwork or your wall, and regain that peace of mind when admiring your decor.
Why is your fitting playing tricks on you now?
A fitting coming loose is never a good time. But now is the time to act, because each day of waiting increases the risk of permanently damaging your artwork. It's like ignoring a crack in a dam: the longer you wait, the more irreversible the damage will be.
📸 Customer testimonial: "I waited three months before changing the fitting on my vintage painting. One morning, I found it on the floor, the frame split in two. €800 of restoration to save €15 of hardware..."
💬 Conversation with a decor expert
The golden rule of professional hanging: A fitting should be replaced at the first signs of weakness. Like an umbrella that is repaired before the storm, anticipation saves you time, money and nerves.
Let's decipher together what’s really happening with your fitting
Do you recognize these situations: do you have to straighten your picture every week, do you hear small noises when you vacuum, or do you notice plaster dust under the frame? These signals reveal that your hanging system is slowly dying.
What's happening is that your fixing is undergoing constant mechanical fatigue. Every micro-vibration, every temperature variation, every walk through the hallway creates invisible tensions that degrade it progressively. It’s not your fault, it’s the natural cycle of materials.
Imagine an elastic band that you stretch slightly thousands of times a day. At first, it returns perfectly to its original shape. Then one day, it snaps. Your fixing works exactly the same way.
🔍 First hidden cause: The wrong initial choice of materials
Most people choose their fixing based on price or ease of installation. But a wall fixing must be adapted to three criteria: the weight of the artwork, the nature of the wall, and the desired lifespan. That's where everything is at stake.
It’s like buying shoes: you can take the cheapest ones, but if they are not your size or suitable for your use, you will suffer with every step. An unsuitable fixing will make you suffer with every glance at your picture.
As a result, you live in constant anxiety that your decor will collapse and you lose the pleasure of contemplating your interior. You will never fully enjoy your artwork again because part of your mind will always be on alert.
🔧 Quick test: Place your ear against the wall near the fixing and tap the frame gently. If you hear a hollow or metallic sound, your fixing is working too hard. A muffled sound indicates a good distribution of forces.
Many people think that all it takes is to drill a hole and insert an anchor. But the drilling angle, the exact depth and alignment determine the longevity of your installation. A few millimeter deviation can divide the resistance by three.
It’s like hammering a nail into wood: if you hit it sideways, it bends and doesn't hold. Your wall fixing obeys the same physical laws, but with much greater forces.
This approximate installation condemns you to constantly straightening your picture and living in anxiety. You deserve better than this daily frustration that spoils your decorative pleasure.
🏠 Third cause: The evolution of your wall
Your wall is not a monolithic, immutable block. It expands, contracts and settles over the seasons and years. A fixing installed two years ago must accommodate a wall that has evolved, creating new tensions.
You can spot this evolution by observing whether your picture always leans to the same side or if small cracks appear around the fixing. These clues reveal that your wall is "working" and that the fixing must adapt.
This natural evolution creates micro-movements on a daily basis which fatigue your mounting system. Your decoration becomes unstable, and you lose that serenity that comes from a perfectly mastered interior.
🎯 4 warning signs to watch out for:
- The artwork tilts regularly: Sign that the fixing no longer distributes forces evenly, like an unbalanced scale
- Rub marks on the wall: Indicates that the system is moving and gradually wearing down its support
- A metallic noise during vibrations: Reveals that the fixing elements are loosening and clashing
- Unusual resistance when adjusting: Shows that the mechanisms are becoming clogged or seized
⚖️ The trigger point: Progressive overload
The decisive factor is often the progressive addition of weight that you did not anticipate. A change of frame, the addition of a mat, or simply the accumulation of dust can tip the balance. It's like the straw that breaks the camel's back, but applied to your wall decoration.
The universal prevention rule: Check your fixing every 6 months just as you check your tires. A 30-second visual and tactile inspection avoids months of stress and repair costs.
| ❌ Misconception | ✅ Reality | 💡 Explanation | 🎯 Benefit |
|---|---|---|---|
| A fixing that has lasted for 2 years will always hold | A fixing ages and needs to be monitored | Materials fatigue due to micro-stress | Anticipation = safety and serenity |
| The more screws, the stronger it is | A well-sized fixing is better than several DIY jobs | Multiplying weak points weakens the whole | Clean and durable installation |
| All walls are the same | Each type of wall requires its specific fixing | Plasterboard, concrete, brick have different properties | Suitable fixing = maximum longevity |
| Price determines quality | Suitability for your use determines performance | An expensive but unsuitable fixing will fail | Optimized and efficient investment |
The 3-step method for a perfect fixing
Now that you understand the stakes, let's move on to practice. Restoring or replacing a fixing follows a simple logic: diagnosis, preparation, execution. It’s like treating a plant: first identify the problem, then prepare the treatment, finally apply it methodically. In a maximum of 2 hours, you will regain that peace of mind.
🎯 Method overview: Step 1 (diagnosis) = understand what failed, Step 2 (preparation) = choose and prepare the solution, Step 3 (installation) = install the new fixing like a pro. Each step brings you closer to decorative serenity.
🔍 Step 1: Accurate Diagnosis (the foundation of everything)
Starting with the diagnosis avoids 80% of repair errors. Like a doctor who examines before prescribing, you need to understand exactly what caused the failure to choose the right solution. This step will already give you a feeling of control and mastery.
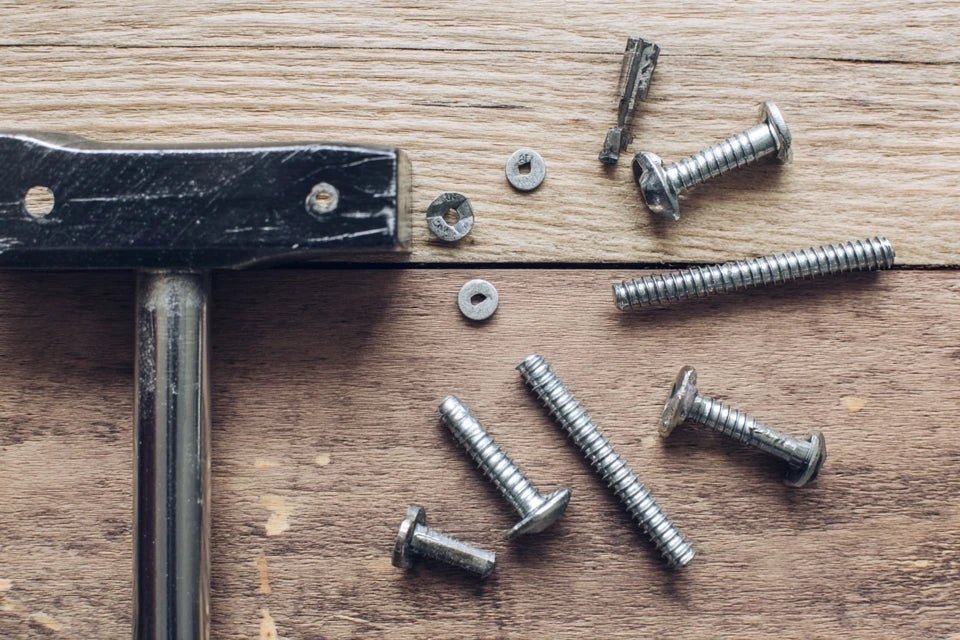
🧰 Tools needed for diagnosis
- A spirit level: Small yellow tool with a transparent vial, used to check perfect horizontality. Buy one at least 20cm long from a hardware store. Make sure the bubble is centered when at rest. Avoid smartphone apps, they are too inaccurate for this use.
- A powerful flashlight: Directed lighting to observe micro-cracks and wall condition. The principle: reveal details invisible to the naked eye. Take an LED model of at least 200 lumens. Lighting quality determines diagnostic accuracy.
- A measuring tape: Measure distances and alignments accurately. Choose a model at least 3m long with a magnetic tip. Make sure the tape retracts smoothly. The accuracy of measurements dictates the success of installation.
Let's move on to methodical inspection now
🔎 Complete inspection procedure
Examine the existing fixing: Carefully remove the artwork and observe the fixing system from all angles. Look for signs of corrosion, deformation or loosening. This inspection reveals the history of stresses endured and guides the choice of the new solution.
⏱️ Time: 10 minutes | ✅ Successful when: You precisely identify the failure point | ⚠️ Attention: Never force a seized fixing, you risk worsening damage to the wall
Test the solidity of the wall: Gently tap the wall around the fixing with your knuckles. A hollow sound indicates a plasterboard wall, a muffled sound reveals concrete or brick. This information determines the type of fixing to use to ensure perfect hold.
⏱️ Time: 5 minutes | ✅ Successful when: You clearly identify the material of the wall | ⚠️ Attention: A wall that resonates differently in different areas may hide metal structures
Measure and note dimensions: Record the height, width and weight of your artwork, as well as the dimensions of the rear fixing system. These measurements will determine the necessary load capacity and spacing of the fixing points.
⏱️ Time: 8 minutes | ✅ Successful when: All measurements are noted precisely | ⚠️ Attention: Underestimating the weight is the most common mistake, actually weigh the artwork if necessary
✅ Validation de l'étape 1 : You now know the type of wall, the exact cause of the failure, and the specifications needed for the new fixing. If you are still unsure about anything, take photos and ask for advice in store. This solid foundation guarantees the success of the following steps.
Now that you master the situation, place for intelligent preparation. This step transforms your DIY project into a professional intervention. Like a chef who prepares all his ingredients before cooking, you will gather everything needed for a smooth and successful installation.
Gather all tools: Drill with suitable drill bits, screwdriver, level, pencil, vacuum cleaner. Check that the drill bits exactly match the diameter of the anchors. This careful preparation avoids back and forth movements and interruptions that can compromise the quality of work.
⏱️ Time: 15 minutes | ✅ Successful when: All tools are within reach and functional | ⚠️ Attention: A poorly adjusted drill can create holes that are too large or too small
Protect the work area: Place a tarp on the floor and attach plastic film to nearby furniture. This protection prevents dust marks and accidental scratches. A clean site facilitates concentration and improves the precision of gestures.
⏱️ Time: 10 minutes | ✅ Successful when: The entire area is protected | ⚠️ Attention: Plaster powder embeds everywhere, even protection = easy cleaning
This is the moment of truth where your preparation pays off. This final step requires precision and patience, but it will give you immense satisfaction. Like an artisan placing the last stone of a building, every gesture counts to achieve a perfect and lasting result.
🎯 Step-by-step installation sequence
Mark the fixing points: Use the level and meter to accurately transfer measurements to the wall. Check twice, drill once: this golden rule avoids irreversible errors. Precise markings guarantee perfectly horizontal hanging.
⏱️ Time: 12 minutes | ✅ Success when: The marks are perfectly aligned and measured | ⚠️ Attention: A 2mm misalignment is visible with the naked eye on the finished artwork
Drill with precision: Drill slowly while keeping the drill perfectly perpendicular to the wall. Start at a low speed then gradually increase. This technique avoids chipping of the coating and guarantees a perfectly calibrated hole.
⏱️ Time: 8 minutes | ✅ Success when: The holes are clean and the correct diameter | ⚠️ Attention: Stop immediately if you feel abnormal resistance
Install the final fixings: Insert the wall plugs by tapping gently, then screw in the hooks tightening firmly without forcing. Optimal tightening produces a dull sound, no creaking. This professional installation ensures decades of holding power.
⏱️ Time: 15 minutes | ✅ Success when: The fixings are stable and aligned | ⚠️ Attention: Excessive tightening can damage the wall plug in the wall
The secure progression rule: Test each step before moving on to the next. Check alignment after each drilling, test stability after each installation. This methodical approach avoids cascading errors and guarantees a professional result.
You now master the basics of professional hanging. Here are some expert subtleties that will make the difference between a correct installation and a perfect installation. These details separate amateurs from connoisseurs.
🎯 Pro tip: Apply a drop of strong glue to the threads of the screws before screwing them in. This technique used by professionals avoids progressive loosening due to vibrations. Result: a fixing that remains perfectly stable for at least 15 years.
💭 "What if I make a mistake choosing the right fixing?"
"I'm afraid of choosing a fixing that is too weak or too strong for my artwork..."
This hesitation is perfectly normal and reveals your wisdom. It's better to slightly oversize than to take risks with a work that means a lot to you. A professional systematically applies a safety factor of 1.5: if your painting weighs 4kg, choose a fixing designed for 6kg. This margin gives you absolute peace of mind.
🔧 Practical tip: Test your fixing with an object heavier than your painting (shopping bag, pack of water) for 24 hours. If it holds perfectly, your installation is validated by the test of time.
Absolutely essential traps to avoid protecting your investment
Some mistakes can permanently compromise your installation or damage your artwork. I share these traps to avoid costly disappointments that I have observed too often. These errors are human and understandable, but perfectly avoidable.
- ⚠️ Drilling without checking for pipes: The temptation is great to drill directly, but a pipe or electrical cable may be hidden behind it. Consequence: water damage or electrocution. Use a basic metal detector or tap to identify hollow areas. This is the most dangerous and costly mistake. 🔧 Reusing old wall plugs: Saving €3 on new wall plugs may seem clever, but old fixings are weakened by previous use. Result: they let go under minimal stress. Always replace all wall plugs. Your safety is worth more than a few euros. 📏 Neglecting the measuring phase: Measuring "by eye" seems faster, but 2mm of difference is immediately visible on the finished painting. Your decoration will always look approximate. Invest 10 minutes in precise measurements for years of visual satisfaction. 🎯 Underestimating the actual weight: Many forget the weight of the frame and glass in their calculations. A "light" painting can weigh three times more than expected. Consequence: a fall is certain. Always weigh the complete set or increase your estimates. This precaution avoids dramatic accidents. ⚡ Drilling at maximum speed: Believing that drilling quickly saves time is an illusion. Excessive speed causes the cladding to burst and creates imprecise holes. Start slowly and gradually accelerate. Initial patience saves you hours of repair.
🛡️ Final safety checklist: Before hanging your painting, check that the fixings do not move by hand, that the alignment is perfect at level, that you hear no suspicious noises when shaking slightly, and that the area around the fixings shows no cracks. These 4 control points validate your installation.


