

Imagine this frustration: watching your artwork disappear every evening, when a simple lighting could transform it into a true luminous focal point. That feeling of waste when your guests walk past without even noticing it.
You've probably already tried floor lamps that create unsightly shadows, or wall sconces that require electrical work. These classic solutions fail because they don’t create that magical aura that seems to emanate from the artwork itself.
It's perfectly normal to hesitate: most tutorials offer complex installations with drilling, exposed wiring or expensive systems. But there is a much simpler and reversible method.
By the end of this article, you will know how to create professional LED lighting behind your artwork in less than 30 minutes, without any drilling or permanent traces. Your work will finally shine as it deserves.
Why does wall art lighting instantly transform your decor?
A wall art without lighting remains in the shadows 60% of the time. As soon as natural light decreases, your decorative investment loses all its impact. It's like owning a phantom artwork that only exists for a few hours each day. The longer you wait, the more you deprive yourself of this gallery-like atmosphere at home.
🏠 Customer testimonial: "I bought a Van Gogh reproduction for €200 that remained invisible in the evening. With a simple LED backlighting, it became the centerpiece of my living room. My guests now think it's an original!"
💬 Conversation with a decor expert
The golden rule of decorative lighting: A well-lit painting instantly becomes more valuable in the eyes of your guests. It's the psychological effect of highlighting - exactly like showcasing jewelry in a store window. Visible result from the first evening.
Why have your previous attempts failed?
Do you recognize these situations? Spots that create reflections on the frame's glass, cables trailing along the wall, or lighting that blinds more than it enhances. You are not responsible for these failures.
The problem comes from an incorrect approach: lighting the painting instead of creating a luminous aura around it. That's the difference between a theater spotlight and luxury store window lighting. One is aggressive, the other fascinates.
Imagine the difference between a bare bulb and a lampshade: same intensity, totally different effect. Your painting deserves the same attention to light diffusion.
The first mistake: believing that you need to shine directly
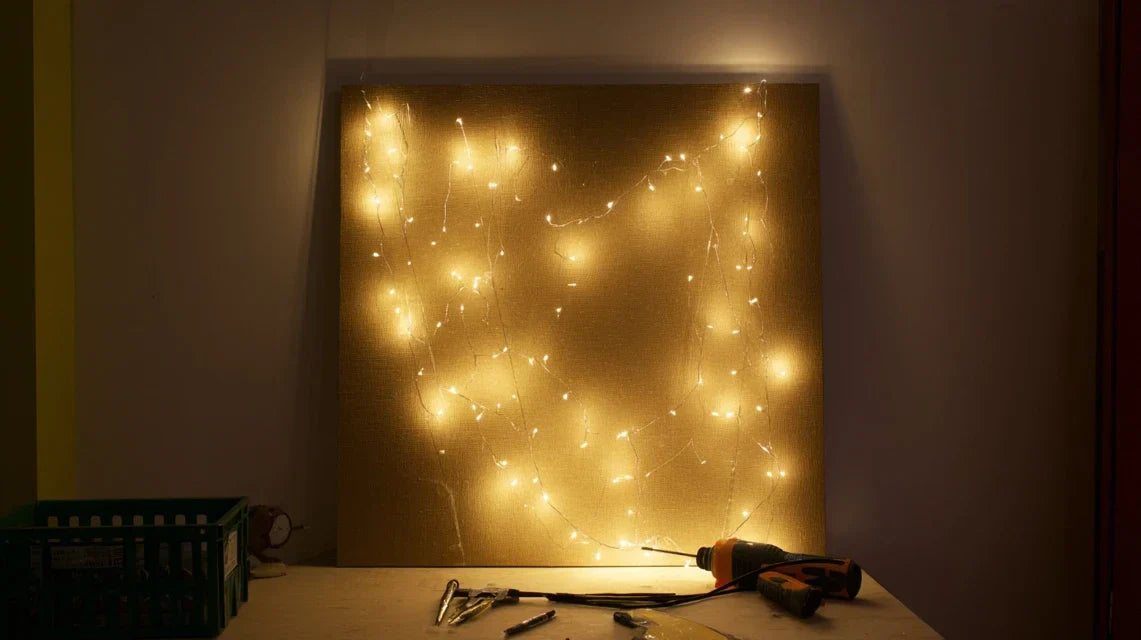
Contrary to popular belief, backlighting creates a much more sophisticated effect than front lighting. By projecting light behind the painting, you create a mysterious halo that gives the impression that the artwork generates its own luminosity.
It's like the difference between watching a television (which emits its light) and a paper poster (which receives it). The effect is dramatically different and much more captivating.
This technique transforms your wall into a luminous setting, creating depth and presence that front lighting cannot match. Your gaze is naturally drawn to this soft source of light.
💡 Immediate test: Place a flashlight behind your phone in the dark. Observe this magical halo effect? That's exactly what you're going to create with your painting, but in a professional version.
The second mistake: underestimating the importance of color temperature
Many install cold white LEDs that give a clinical appearance, like in an office. For art, warm light (2700K-3000K) reveals nuances and creates that cozy atmosphere of prestigious galleries.
It's the difference between lighting a underground parking lot and a gourmet restaurant. Same product, totally different perception depending on the chosen color temperature.
This nuance transforms your living room into an intimate exhibition space, where every color in your painting regains its natural richness. Your guests will immediately feel this refined atmosphere.
The third mistake: neglecting diffusion uniformity
A poorly positioned LED strip creates dark areas and hot spots, like car headlights that are not properly adjusted. The human eye immediately detects these irregularities which break the illusion.
You can check this by looking at your wall: if you distinguish individual bright spots or areas of shadow, the magical effect is broken. The goal is a diffusion as even as a sunset.
This uniformity makes the difference between an amateurish DIY project and an installation that looks like it was designed by a professional decorator.
🔍 3 signs of failed lighting:
- You see distinct bright spots: The diffusion is insufficient, like car headlights that blind instead of illuminate
- The artwork creates annoying reflections: The lighting angle is too direct, turning your work into a mirror
- The effect stops abruptly at the edges: The halo should fade gradually, not stop suddenly like a border
The trigger element: distance from the wall
Everything happens within these critical few centimeters between the LED strip and the wall. Too close, you create hard lines. Too far, the light dissipates. It's a domino effect of lighting: this distance controls the intensity, softness, and uniformity of the final rendering. Look for this optimal zone between 3 and 8 cm depending on the size of your artwork.
The 3C rule - Color, Comfort, Continuity: Warm light for natural color, soft diffusion for visual comfort, and uniform distribution for continuity. Test by turning it on and off: the effect should seem "natural".
| ❌ Traditional front lighting | ✅ LED backlighting | 💡 Why it works | 🎯 Visual benefit |
|---|---|---|---|
| Creates reflections on the glass | Eliminates reflections completely | The light comes from behind | Clear vision from all angles |
| Blinds within the field of vision | Soft and indirect diffusion | No visible light source | Optimal visual comfort |
| Lighting "glued" to the wall | Natural depth effect | Halo that "detaches" the artwork | Artwork that seems to float |
| Visible and technical installation | Totally invisible system | LEDs hidden behind the frame | Pure magic without apparent artifice |
The 3-step method for a professional result
Rest assured, this installation follows a simple and progressive logic. Think of the construction of a presentation box: first the fixing structure, then the lighting, finally the finishing adjustments. Each step brings you closer to that magical moment when you turn on your creation for the first time.
🎯 Overview of the transformation: Step 1 - Preparation and invisible fixing (5 min), Step 2 - LED system installation (15 min), Step 3 - Calibration and optimization (10 min). At each step, you will see your artwork gain presence and refinement.
Step 1: Create the invisible support structure
This invisible foundation determines everything else. Just as when building a house, the solidity of the base guarantees the beauty of the final result. Once this step is mastered, you will feel that satisfaction of knowing that your installation will hold perfectly, even years later.
🔧 Materials needed
- High-performance double-sided adhesive tape: Choose 3M VHB or equivalent, recognizable by its gray color and thickness of 1-2mm. It supports up to 20kg per linear meter. Avoid "economy" transparent versions that lose their adhesion with the heat from LEDs. This tape will be your invisible anchor that leaves no trace. Foam spacers: Small blocks of dense foam, 5-8mm thick, available at hardware stores in the insulation section. They create the perfect space for light diffusion. The firm density prevents sagging over time. These spacers determine the quality of your luminous halo. Ruler and spirit level: For a perfectly aligned installation that will reveal the professionalism of your achievement. Even a minimal misalignment is immediately visible in the final rendering.
Time to practice, step by step:
🎯 Setting up the structure
Perfectly clean the surface: Degrease the back of the frame and the wall with 70% alcohol. This step determines the hold of the entire installation. Fingerprints or dust reduce adhesion by 50%. A clean surface = a fixation that lasts for years.
⏱️ Time: 3 minutes | ✅ Successful when: The surface is perfectly dry and without traces | ⚠️ Attention: Never use greasy products (like Pliz) which prevent adhesion
Position the foam spacers: Glue 4 spacers to the rear corners of the frame, 2-3cm from the edges. These strategic points create a uniform space around the entire perimeter. The golden rule: same distance everywhere for a regular halo.
⏱️ Time: 2 minutes | ✅ Successful when: The painting is straight with a regularly visible space all around | ⚠️ Attention: Check that the spacers do not protrude from the frame once hung
✅ Control of step 1: Your painting must be perfectly stable, with a uniform space of 5-8mm all around. If you pass your finger behind, you should feel a regular tunnel. Perfect? This solid base guarantees the success of the following steps!
OUR RECOMMENDED PRODUCTS
Step 2: Installing the LED lighting system
You are now entering the heart of the transformation. This is where the magic happens: your simple painting will become an illuminated work of art. This step is more rewarding as you will immediately see the effect taking shape. The anticipation of the final result makes each gesture more precise.
💡 Lighting Material
- Flexible LED strip 2700K-3000K: Self-adhesive LED ribbon with 60-120 LEDs/meter, width 8-10mm, with built-in dimmer. Look for the mention "CRI>80" which guarantees faithful color rendering. Flexibility allows it to perfectly follow the contours. Calculate the perimeter of your frame + 20cm for invisible connections.
- Suitable 12V power supply: Calculate the total power of your LEDs and add a 20% margin. An under-dimensioned power supply reduces lifespan and intensity. Choose a model with built-in dimmer to adjust the ambiance according to the time of day.
- Corner connectors: Small plastic pieces that allow sharp turns without cutting the ribbon. Essential for a perfect perimeter without soldering or visible connection.
🔌 Simplified electrical installation
Measure and cut the LED strip: Precisely measure the inner perimeter of your frame. LED strips can only be cut at marked points (scissors symbol). Cutting in the wrong place permanently damages this section. Measure twice, cut once.
⏱️ Time: 5 minutes | ✅ Successful when: You have exactly the necessary length with the connectors | ⚠️ Attention: Keep 10cm of margin for connections
Fix the strip behind the frame: Gradually remove the protective film and apply the LED ribbon to the inner rear face of the frame, 1cm from the inner edge. This position creates the perfect halo without a shadow area. Press firmly on each centimeter for optimal adhesion.
⏱️ Time: 8 minutes | ✅ Successful when: The strip perfectly follows the contour without air bubbles | ⚠️ Attention: Do not pull on the ribbon, unroll gradually
Connect the power supply: Connect the power supply to the strip using the supplied connectors. Respect polarity (+ red, - black). Test before final fixing. Uniform lighting around the entire perimeter confirms correct connection.
⏱️ Time: 2 minutes | ✅ Successful when: All LEDs light up evenly | ⚠️ Attention: Check the solidity of the connections which may loosen
🎆 First magical test: Turn off the main light and turn on your creation. You should see this golden halo surrounding your painting! If you already like the effect, that's perfect. Step 3 will enhance it even further.
Step 3: Calibration and final optimization
This final step transforms your working installation into a lighting masterpiece. It's the difference between a musician who plays correctly and a virtuoso who makes it vibrate. Your mastery of these fine adjustments will make the difference noticed by even your most discerning guests.
🎨 Lighting Master Adjustments
Adjust light intensity: Set the power to a maximum of 60-70% during the day, and 40-50% in the evening. The goal is to enhance without dazzling. Too strong lighting kills the mysterious effect and fatigues the eye. Ideally: your painting naturally attracts attention without effort.
⏱️ Time: 3 minutes | ✅ Success when: Lighting perfectly complements the room's ambiance | ⚠️ Attention: The effect should remain subtle, not spectacular
Check halo uniformity: Observe the wall from different angles. The halo should fade gradually, without a demarcation line. If you see brighter areas, adjust the position of the strip or add a translucent diffuser.
⏱️ Time: 5 minutes | ✅ Success when: The light/shadow transition is as smooth as a gradient | ⚠️ Attention: Corners should not create luminous "spots"
Optimize according to the time: Test your installation at different times: day, sunset, dark night. Note the optimal settings for each ambiance. This versatility turns good lighting into excellent lighting.
⏱️ Time: 2 minutes | ✅ Success when: You have found your 2-3 favorite settings | ⚠️ Attention: Memorize these settings to easily reproduce them
🏆 Final validation test: Invite someone into the room. If their gaze naturally falls on your illuminated painting and they make an admiring comment, you've won! Your installation now rivals professional galleries.
The rule of natural progression: If the lighting attracts attention without the observer understanding why, you have achieved excellence. The art of invisible lighting lies in this inexplicable "wow" effect. Patience rewarded by perfection.
Congratulations! You now master the expert subtleties that transform an amateur installation into a professional achievement. These details make the difference between "it's pretty" and "how did you do it?" Your advantage: you can reproduce this magic on all your paintings.
🔥 Master Decorator Tip: Create a "cascading lighting" effect by slightly varying the intensity between several paintings on the same wall. The brightest at 100%, the others at 70-80%. This luminous hierarchy naturally guides the eye and creates a dynamic composition worthy of the most beautiful exhibitions.
❓ Question from passionate reader
"Will it be too 'bling-bling'? I'm afraid it will be too noticeable for my rather minimalist style..."
Your hesitation is legitimate and reveals your good taste in decor. Well-controlled LED lighting creates the opposite of a "bling-bling" effect: it adds discreet sophistication. Think of high-end jewelry store windows: the light reveals without being aggressive. Start with a very soft setting (30-40%) and gradually increase until you find your perfect balance. Elegance is knowing when to stop before excess.
🎯 Validation test:
Photograph your living room with and without the lighting, same device settings. If the illuminated version looks more like a "decor magazine" without losing its naturalness, you have found the right dosage!Absolutely essential pitfalls to avoid (to protect your investment)
After hundreds of installations, these errors constantly recur. I share these kind alerts to prevent you from frustration and rework. Prevention is better than cure, especially when the solution is so simple to apply from the start.
- 🚫 Choosing "budget" LEDs without checking quality: The €10 saving turns into permanent disappointment. Cheap LEDs yellow, flicker or burn out after a few months. Always look for CRI>80 and a minimum 2 year warranty. Your painting deserves lighting that lasts as long as it does. 🚫 Underestimating the importance of the dimmer: Lighting without variation is like a radio without volume control. You will quickly get tired of a fixed intensity. The dimmer transforms your installation into an adaptable ambiance system according to the time and mood. Minimal investment, maximum benefit. 🚫 Neglecting heat dissipation: Even though LEDs produce little heat, accumulation in a confined space reduces their lifespan. Always leave a small ventilation space (a few mm is enough) for air circulation. Common error on very thick frames. 🚫 Installing without testing beforehand: The temptation to fix everything permanently straight out of the box is strong. Resist! First test the lighting "loose" to check intensity, color and effects. This validation step avoids 90% of disappointments and tedious rework. 🚫 Forgetting the "less is more" rule: Initial enthusiasm often leads to exaggerating the intensity. Perfect lighting is noticeable by its effect, not by its presence. If your guests see the LEDs before the artwork, it's too visible. Elegance lies in discretion.
🛡️ Quick verification system:
30 second test - turn on your installation, close your eyes for 10 seconds, open them: if your gaze naturally goes to the painting (not the LEDs), it's perfect. Also monitor for absence of flickering, evenness of the halo, and pleasant color temperature. Warning signs: glare, sharp demarcation lines, electrical buzzing.🎁 Special offer for readers
Because you took the time to learn more, enjoy 10% discount on your first order:
⏰ Valid 72 hours after reading • Applicable to all our products
❓ Your most frequently asked questions (with expert answers)
Complete installation in 25-30 minutes maximum for a meticulous beginner. Quality LEDs consume 8-12W per meter (less than a classic bulb) and last at least 25,000 hours. Electricity cost: approximately 3€ per year for daily use of 4h. The investment pays off after the first successful evening!
Complete budget: 25-35€ for a standard painting (50x70cm). Economical version possible with basic LEDs (15-20€) but lifespan is divided by 3. Initial savings cost more in the long term. For a first attempt, choose a complete kit with dimmer : you avoid compatibility errors.


