Personalize a hallway or entryway with a themed row of artworks
By Alexandre MARY
⏱️ Reading time : 8 minutes
Every day, you walk past your entryway thinking it desperately lacks character. This sadly bare hallway constantly reminds you that your home hasn't yet found its decorative soul.
You look at these impersonal white walls that welcome your guests and feel that familiar discomfort: the impression that your interior doesn't really reflect who you are. The echo of your footsteps resonates in this cold space that should be the warm preamble to your home.
You’ve already tried a few solutions: a mirror here, a plant there, but nothing creates that visual coherence that you admire in decorating magazines. These isolated attempts float in space without creating a real decorative impact.
It's normal to feel lost when facing these transitional spaces. The real difficulty isn’t decorating, but creating a guiding line that transforms a simple hallway into a true personal gallery telling your story.
By the end of this article, you will know exactly how to create a line of themed artworks that will transform your entryway into a welcoming and personalized space that impresses your guests at first glance.
Why does your entryway deserve more attention than your living room?
Your entryway is the first impression you give of your world. In just 7 seconds, your guests form an opinion about your lifestyle. It's like the opening of a book: if it’s dull, no one wants to discover what follows.
Waiting to have "more time" or "more budget" means missing out on this daily opportunity to express your personality.
🏠 Customer testimonial: “Marie-Claire had always avoided hosting dinners at her home. After installing her collection of botanical artworks in her hallway, she now hosts every month. Her guests systematically spend 10 minutes admiring her personal gallery before even entering the living room.”
💬 Conversation with a decor expert
"I'm afraid it will look too cluttered in such a small space... I was told to avoid overloading hallways."
It’s like being afraid that a book is too rich in stories! A well-orchestrated hallway with a coherent theme visually expands the space instead of cluttering it. The eye naturally follows the guiding thread and creates a feeling of fluidity.
"I was always told that hallways are just for passing through, not for stopping to look at."
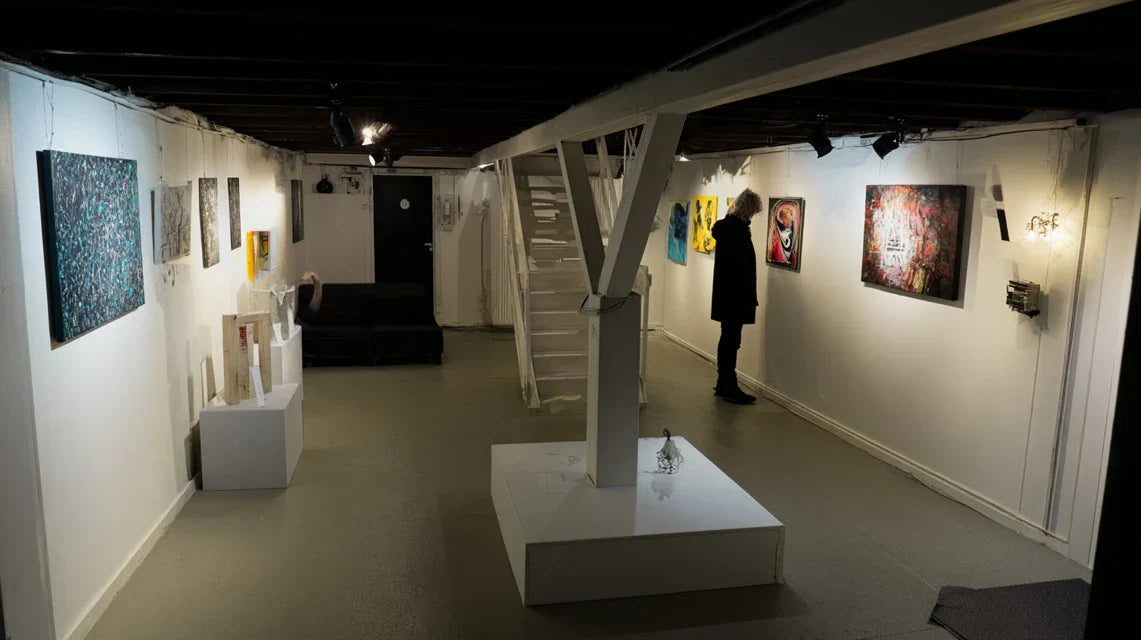
That vision belongs to the past! Today, every square meter of your home can become a space for expression. The most beautiful interiors transform their circulation spaces into true private galleries that tell a story.
The golden rule of successful entryways: A passageway becomes memorable when it tells a coherent story. In 3 weeks, your guests will spontaneously associate your home with this unique visual signature.
Understanding why your previous attempts haven't worked
Do you recognize yourself in these situations? A painting isolated and seeming lost on a large wall, mismatched frames bought over the years, or that feeling that something is off without being able to put your finger on it.
The problem isn't your taste or budget. It’s simply that no one has explained the difference between "hanging paintings" and "creating a decorative line". It's like wanting to cook a gourmet dish without knowing the order of the ingredients.
Imagine your entryway as a sentence: each painting is a word, and without syntax, even the most beautiful words are just visual gibberish. Thematic consistency is your decorative grammar.
First hidden cause: The absence of a visual connecting thread
Contrary to what many think, the main problem isn't the size or price of the paintings, but the lack of narrative connection between them. A successful hallway tells a story, like a museum exhibition.
It’s like a music playlist: even the most beautiful songs sound wrong if they have nothing to do with each other. Your paintings need a common tempo to create visual harmony.
This visual dispersion fatigues your guests' eyes and creates that “chic clutter” impression that embarrasses you. Once you master thematic consistency, you will immediately see the difference in impact.
🔍 Quick test: Look at your current entryway and ask yourself: "If I had to explain the theme in one sentence, what would I say?" If you hesitate for more than 5 seconds, it means the connecting thread isn't clear enough.
Second hidden cause: The fear of thematic commitment
Many people think that adopting a theme will box them into a rigid style. In reality, it’s exactly the opposite: a well-chosen theme frees you by giving you a clear creative framework.
It's like learning a language: at first, grammar seems restrictive, but then it allows you to express yourself with infinite richness. Your decorative theme works the same way.
This hesitation makes you accumulate decorative elements without direction, creating that visual clutter that frustrates you. Once you have chosen your thematic line, each new purchase will be obvious and consistent.
Third hidden cause: Ignorance of visual proportions
Few people notice that the spacing between paintings is as important as the paintings themselves. It’s this “visual silence” that allows each work to breathe and dialogue with others.
You can easily spot it: if your gaze "catches" on certain areas of your wall or if you feel a sense of visual suffocation, then the proportions are not respected.
This poorly mastered technical aspect can spoil even the most beautiful collection of paintings and give you the impression that "something is wrong" without identifying the precise problem.
🎯 The 3 signals of a poorly orchestrated entrance:
The butterfly gaze that doesn't stop: No element captures enough attention to create a focal point, like a conversation where everyone talks at the same time
The impersonal "déjà-vu" feeling: The space looks like a store showroom rather than your personal universe, revealing the absence of your decorative signature
Embarrassment during visits: You instinctively avoid making comments about your entrance decor, a sign that you are not completely satisfied
The trigger element: The power of creative repetition
What really makes the difference is understanding that the repetition of a visual element automatically creates a recognizable signature. It's the decorative domino effect: a well-chosen theme positively influences the perception of your entire interior.
You can identify it immediately by observing interiors that mark you: they all have an obvious common thread that connects their different spaces.
The universal rule of visual impact: Three identical or related elements create a recognizable series, five elements create a collection, seven elements create a memorable decorative signature. You can verify this by counting the similar elements in your favorite spaces.
❌ Dispersed approach
✅ Thematic approach
💡 Mechanism
🎯 Concrete result
I hang what I like at the moment
I develop a progressive visual consistency
Repetition creates recognition
A decorative signature immediately identifiable
I'm afraid of getting tired of one style
My theme evolves with creative variations
Constraint stimulates creativity
A collection that enriches intelligently
I often change my mind about my decor
I gradually refine my artistic direction
Clarity of intention guides choices
Quick and safe decorating decisions
My guests never comment on my decor
My personal gallery becomes a conversation topic
Organized originality marks the spirits
An enviable decorative reputation
The progressive method to create your entrance gallery
Rest assured, transforming your entryway doesn’t require any artistic skills or a pharaonic budget. It's like learning to garden: you start by preparing the ground, then plant according to a plan, and finally refine the details.
In 6 weeks, you will have an entryway that tells your personal story and impresses visitors lasting.
🗺️ Overview of your transformation: Step 1 - Define your signature theme (immediate satisfaction), Step 2 - Master harmonious hanging (visual impact), Step 3 - Perfect expert finishes (memorable result). Each step brings you closer to that entryway you will be proud of.
Step 1: Discover and affirm your personal theme
Starting by defining your theme is not a constraint, it's your creative compass. It’s like choosing the plot before writing your decorative story. Once this direction is clear, you will immediately feel that satisfaction of knowing where you are going.
🎨 What you need for this discovery
A decorative inspiration notebook: A simple notebook or a Pinterest board to collect your visual favorites. Use it as a recurrence detector - if the same style of image often comes back, that's your natural theme emerging. Avoid overly complex applications that will waste your time.
Your current collection of beloved objects: Gather all decorative elements in your home that you really like. They reveal your unconscious preferences and show you the underlying thread already present in your choices. Observing these objects reveals your natural decorative DNA.
An observation session in 3 inspiring places: Choose a cafe, a shop and a hotel that you like. Discreetly photograph what visually attracts you. This method reveals your authentic preferences beyond external influences.Now let's move on to concrete practice
🔍 How to identify your signature theme
Analyze your spontaneous decorative emotions: For a week, immediately note every decoration image that makes you say "I love it". Don't think about it, rely on your first emotional reaction. This spontaneity reveals your deep preferences without the filters of imposed “good taste”.
⏱️ Time: 15 minutes per day | ✅ Successful when: You have collected 20 images that really speak to you | ⚠️ Attention: Don't look for consistency at the beginning - it will emerge naturally from recurrences
Identify revealing recurrences: Spread out all your images and look for common points: dominant colors, atmospheres, subjects, styles. These involuntary repetitions reveal your authentic theme. It's your decorative DNA that is revealed without social filters.
⏱️ Time: 30 minutes | ✅ Successful when: You can name 3 recurring characteristics | ⚠️ Attention: If nothing comes to mind, it's because you are censoring yourself - start over by embracing your true tastes
Formulate your theme in one sentence: Transform your observations into a clear decorative mission: "I am creating a modern botanical gallery" or "I am expressing my love for black and white graphic art." This sentence will become your decision filter for all your future purchases.
⏱️ Time: 10 minutes | ✅ Successful when: Your sentence excites you and seems obvious to you | ⚠️ Attention: If it seems bland, it's not personal enough
✨ Validation of your theme: You know your theme is right when you are eager to start your first painting search. Your entourage should immediately associate you with this style when they encounter it elsewhere. If you still hesitate, take a week off - the right theme will impose itself naturally.
OUR RECOMMENDED PRODUCTS
Step 2: Mastering the art of harmonious hanging
You are now moving to the next level: transforming your vision into a visible reality. This step is more rewarding because the results are immediately visible. Each painting hung reinforces your confidence and your vision becomes tangible. The snowball effect begins: your first successes fuel your motivation.
🛠️ Your precision tools for a professional hanging
A professional spirit level: Invest in a model of at least 60cm, with central vial and graduations. It avoids you these slightly tilted paintings that annoy the eye without understanding why. Low-end levels lie by 2-3 degrees - enough to ruin the visual effect.
Kraft paper or newspaper: Cut templates to the exact dimensions of your paintings. This pro technique allows you to test different compositions before drilling into the wall. You save hours of guesswork and avoid unnecessary holes.
A measuring tape and a pencil: To respect harmonious distances between paintings. Millimetric precision makes the difference between an amateur and a professional hanging. Every millimeter counts in the final perception.
📐 The professional hanging technique
Create your composition on the floor first: Arrange all your paintings on the floor in the desired order. Adjust until you achieve perfect visual balance. This step saves you 90% of hanging mistakes and allows you to experiment without constraint.
⏱️ Time: 45 minutes | ✅ Successful when: The whole thing pleases you from every angle | ⚠️ Attention: Resist the temptation to hang directly - this preparatory step is crucial
Respect the 165cm rule: The center of your main artwork should be 165cm from the floor - universal height of human gaze. This measurement works for 95% of body types and automatically creates a visual harmony with your furniture.
⏱️ Time: 20 minutes | ✅ Successful when: Your artworks naturally fit within your field of vision | ⚠️ Attention: Adjust slightly according to your height if you are very tall or small
Maintain 15cm spacing between frames: This distance allows each work to breathe while maintaining the cohesion of the whole. It's the secret of professional galleries to create a visual dialogue between artworks.
⏱️ Time: 30 minutes | ✅ Successful when: The eye naturally moves from one artwork to another | ⚠️ Attention: Too much space disperses attention, not enough creates a feeling of suffocation
Step 3: Perfecting your gallery with expert finishes
You are now reaching the level of mastery that distinguishes a beautiful entrance from an exceptional one. The difference between amateur and connoisseur lies in these details that few consciously notice but that everyone feels. Your entrance becomes this decorative signature that your guests will remember months later.
✨ Finishing touches that make the difference
Accent lighting: Adjustable LED spotlights or wall lights that reveal the textures of your artworks. Lighting completely transforms the perception of colors and creates the cozy atmosphere of high-end galleries. Avoid aggressive frontal lighting that flattens reliefs.
Discreet labels: Small tags with title and year (even for your personal creations). This professional detail gives your collection a museum legitimacy and invites your guests to linger to read.
A floor-linking element: Narrow rug, slim console or bench that visually anchors your wall gallery. This horizontal element balances the verticality of the artworks and creates a complete decorative ensemble.
🎭 Finishing touches that create the "private gallery" effect
Calibrate your lighting to reveal the artworks: Test different light angles in the early evening to understand how each artwork reacts. The light should caress the surface without creating annoying reflections. This is what transforms reproductions into true works of art.
⏱️ Time: 1 hour | ✅ Successful when: Each artwork reveals its chromatic richness | ⚠️ Attention: Too intense lighting fatigues the eye - prioritize subtlety
Create a discovery journey: Organize your artworks to tell a logical progression - chronological, chromatic or thematic. Your guests should want to "read" your gallery from left to right like a visual story.
⏱️ Time: 30 minutes | ✅ Success when: The gaze naturally follows a progression | ⚠️ Attention: Avoid mixing too many eras or styles without logical transition
The expert progression rule: You are ready for the next step when you feel that deep satisfaction looking at your entrance and your guests spontaneously spend more time there. It's better to perfect 3 well-integrated artworks than to hang 6 approximately.
You now have the overall vision that sets you apart from amateurs. These expert subtleties give you this decorative confidence that your loved ones will quickly notice. You become the person people ask for decor advice.
🎯 Professional decorator's secret: Photograph your entrance under different lighting and times of day. Your smartphone reveals imbalances invisible to the naked eye and helps you refine your composition like a true pro. This technique used by interior architects immediately reveals possible improvements.
💭 "But what if I get tired of my theme in a few years?"
"I want to create something beautiful, but I'm afraid of getting locked into a style that won't suit me in 5 years..."
This concern is perfectly legitimate and reveals your decorative intelligence! A good theme is never a prison but an evolving framework. Think about your wardrobe: you have a recognizable style that evolves with the seasons and your age. Your gallery works the same way: it grows and refines with you. Start with 3 artworks that inspire you today - you will naturally adjust in 2-3 years while keeping the general spirit.
🔄 Anti-regret action: Choose a theme broad enough to evolve (e.g., "contemporary art" rather than "cat portraits"). Test your choice by imagining 3 possible variations - if you can easily find them, then your theme has potential.
The pitfalls to absolutely avoid (even decorators start that way)
I want to save you from these frustrating mistakes that I observe in 8 people out of 10. These pitfalls are normal when you're starting, but perfectly avoidable once you know them.
⚠️ Buying all your artworks the same day: Enthusiasm pushes you to do everything at once, but your eye needs time to get used to each addition. Result: an artificial ensemble. Allow 2-3 weeks between each purchase so that your gallery builds organically. This impatience is human but harms the final result.
⚠️ Copying exactly a Pinterest inspiration: You risk creating a decor that doesn't truly reflect you. Pinterest is excellent for understanding principles, but your gallery should reflect your unique personality. Get inspired by the techniques, not the final results.
⚠️ Neglecting the natural lighting in your hallway: A dark hallway requires different colors and contrasts than a bright space. Many choose their artworks without considering this reality. Observe your space at different times of day before finalizing your selection.
⚠️ Hanging too high for fear of getting dirty: Your artworks become ceiling decorative elements instead of being at eye level. This beginner's mistake makes your gallery cold and inaccessible. True collectors hang them at human height.
⚠️ Forgetting to test the solidity of your fixings: An artwork that falls damages the work and the wall, not to mention the risk of injury. Each fixing must support 3 times the expected weight. This technical negligence can destroy months of decorative work in seconds.
🔍 Your validation checklist in 4 points: Photograph your gallery and check that the whole tells a coherent story, that each artwork is perfectly horizontal, that the lighting reveals the details without creating reflections, and that you feel proud when looking at the result. If one point is wrong, take the time to adjust it.
Because you took the time to inform yourself, enjoy 10% discount on your first order:
ART10
⏰ Valid 72h after reading • Applicable on all our products
🤔 Your practical questions about creating your entrance gallery
💰 "What budget to plan to completely transform my entrance?"
Count between €150 and €400 for a gallery of 5 artworks depending on the quality chosen. Spread your purchases over 3-4 months to better digest the investment. Start with 2 master pieces at €40-€60 each, then gradually complete. This approach allows you to refine your tastes along the way and avoid impulsive purchases that you might regret.
⏰ "How long to see the final result?"
4 to 6 weeks spending 2 hours per weekend. The first week to define your theme, two weeks to select and receive your artworks, one week for hanging and adjustments. The maturation time between each step is essential - do not rush it.
🔧 "I'm not a handyman, will the hanging be complicated?"
With the right tools and our method, it's accessible to everyone. Modern fixings are designed for non-DIYers. Just allow 20 minutes per artwork to feel comfortable. If in doubt about a concrete or plasterboard wall, don't hesitate to ask for advice at a hardware store - they will guide you to the appropriate fixing.
🎨 "How do I know if my theme will work before buying?"
First, create a moodboard with free images similar to the desired style. Print them in A4 format and temporarily attach them with removable putty. Live with this simulation for 1 week - if you still like it, your theme is validated. This technique used by professional decorators saves you from costly mistakes.
✨ "Will my guests really notice the difference?"
Absolutely! A well-orchestrated entrance immediately makes an impression. Your guests will spontaneously spend more time in this space and ask you questions about your decorative choices. This is a sign of a successful transformation: when your decoration naturally becomes a topic of positive conversation.
🌟 Your new entrance: much more than just decoration
In 6 weeks, imagine yourself opening your door to your guests and seeing their faces light up at your personal gallery. This entrance that embarrassed you will have become your decorative pride, this visual signature that perfectly represents you.
You will feel the deep satisfaction of owning an interior that truly resembles you, and your loved ones will now associate your home with this mastered elegance.
Beyond the aesthetic aspect, you will have developed your decorating confidence and acquired the ability to transform any space into a reflection of your personality. These skills will naturally spill over into your other rooms and make you the person everyone consults for decor advice.
Now that you understand the mechanisms of a successful gallery, your first step is to define your theme this week. Start your inspiration notebook today - in 7 days, you will know exactly which direction to take to create the entrance you dream of.
🚀 Your transformation starts now: You have all the elements to succeed in this decorative metamorphosis. Your entrance is waiting for your decision to reveal its potential and become that private gallery which will permanently impress all your visitors.
📚 Deepen your decor knowledge
Now that you master the art of the entrance gallery, discover our other practical guides to transform each space in your home with the same professional method.


