


You just bought three beautiful paintings of different sizes and you're standing there, plastered in front of your white wall, not knowing how to arrange them. Your living room looks lika a disorganized art gallery where each work competes for attention.
You feel the frustration of seeing your beautiful paintings lose all their charm simply because the proportions don't fit. The large painting overwhelms the small ones, vertical formats seem to float without logic next to horizontal ones.
You probably tried following rigid rules found on the internet: "center everything at 1m65 from the floor" or "space 5cm between each frame". Result? A frozen ensemble that completely lacks personality and visual harmony.
It's normal that these methods don't work! They completely ignore the natural dynamics between different formats and the overall effect you are really looking for.
By the end of this article, you will master the art of creating balanced wall compositions that will transform your interior into a true personalized gallery, where each painting finds its ideal place and participates in an overall harmony.
Why your wall composition can transform your living space today?
A successful wall composition acts as the conductor of your decor. It instantly unifies the atmosphere of your room and creates that famous "WOW" effect you feel when visiting the most beautiful interiors. The opportunity is there now: with the right techniques, you can create in a few hours a focal point that will revolutionize your perception of space.
🏠 Customer testimonial : "I had five paintings lying in my garage for months. By applying the visual triangle technique I discovered, I created in one afternoon a composition that all my guests admire. My living room has totally changed atmosphere."
💬 Conversation with a decor expert
The golden rule of dynamic composition: Your eye naturally seeks balance, not geometric perfection. By creating strategic visual anchor points, you achieve natural harmony in a maximum of 2-3 hours.
What really happens when your wall composition doesn't work
You feel a diffuse discomfort upon entering your living room, without being able to identify what’s wrong. Your guests look at your artworks but their gaze does not linger. You have the impression that something "floats" on your walls without creating visual anchoring.
The feeling you experience has nothing to do with your artistic tastes or your aesthetic sense. The problem comes from applying classic decoration rules to an approach that requires a completely different logic.
It's like trying to drive a car using bicycle codes: both move, but the mechanisms are not at all the same.
First hidden cause: You think in "isolated paintings" instead of "visual ensemble"
Most people hang their paintings one by one, searching for the "perfect" place for each. But your brain doesn't work that way when it looks at a wall: it first captures the whole, then explores the details.
Imagine preparing a bouquet of flowers by choosing the location of each stem individually, without ever stepping back to see the overall effect. You would get a frozen arrangement where each flower seems isolated.
This fragmented approach explains why you have that unpleasant feeling that "something is wrong" without being able to put your finger on it. Your new approach will start from the global vision to descend into the details.
✨ Immediate test: Step back 3 meters in front of your wall and slightly squint. If you clearly distinguish each painting separately, they do not yet form an ensemble. If they blend into a harmonious global shape, you're there!
Second hidden cause: You are subjected to the "tyranny of the center"
You were probably told to center your paintings at eye level or align them on an imaginary horizontal axis. This rule works for a single painting, but becomes a trap with multiple different formats.
It's like wanting to fit all the instruments of an orchestra on the same line: technically possible, but you lose all the richness of the different sound levels that create musical depth.
By applying this logic, you involuntarily create a "row" of paintings which turns your wall into a store display rather than an artistic composition fluid and natural.
Third hidden cause: You ignore the "visual weights" of your paintings
A large dark painting "weighs" more visually than a small light painting, even if their dimensions are not so different. This notion of visual weight determines completely the balance of your composition.
You can observe it by looking at your current composition: your eye is probably always "falling" in the same place, creating an imbalance that unconsciously fatigues your perception.
This imbalance in weight explains why some areas of your wall seem "empty" even when they contain paintings, and why others appear "loaded" with fewer elements.
🎯 3 Signs of a Visual Imbalance:
- The "Black Hole" Effect: Your gaze is consistently drawn to the same painting, ignoring the others
- The Feeling of "Tilting": You feel like your composition leans to one side
- The "Drifting": Some paintings seem disconnected from the group, as if they have nothing to do there
The Trigger Element: The Invisible "Line of Force"
Every successful composition has an invisible guiding line that your eye follows naturally. This line of force acts like the backbone of your arrangement: it structures the whole while allowing each element to express itself. When this line exists, your composition "holds" naturally. Your eye travels from painting to painting in a fluid and pleasant movement, creating that feeling of harmony you seek.
Rule of Dynamic Triangles: Mentally connect your three main paintings with imaginary lines. If these lines form varied triangles (not all identical), your composition will be naturally balanced.
| ❌ Rigid Classic Approach | ✅ Dynamic Composition | 💡 Why This Changes Everything | 🎯 Visible Result |
|---|---|---|---|
| Align everything on a horizontal line | Create multiple levels of reading | The eye prefers movement to stillness | Feeling of life and depth |
| Identical spacing between all frames | Vary distances according to visual affinities | Creates natural groupings and breathing spaces | Composition that breathes and organizes itself |
| Place the largest painting in the center | Position the visual anchor according to overall weight | Balances forces rather than sizes | Natural harmony without effort |
| Treat each painting independently | Think in dialogue between artworks | Creates a coherent visual narrative | Unified and captivating ensemble |
The Progressive Method to Create Your Perfect Wall Composition
Don't panic! You don't need to be a visual arts expert. This method works like building a house: you first lay the solid foundations, then add the decorative elements. Each step will give you visible results that motivate you for the next one, and in 3 hours maximum, you will have a composition you can be proud of.
🗺️ Overview of Your Transformation: Step 1 - Create the visual architecture (anchor points), Step 2 - Establish dialogue between formats (connections), Step 3 - Refine the final harmony (subtle adjustments). Each level will give you immediate and visible satisfaction.
Step 1: Laying the Visual Foundation of Your Composition
Starting with the architecture is a guarantee of success. Like an architect who first draws the load-bearing walls before thinking about decoration, you will identify the strategic points on your wall that will naturally structure the whole. This first step will already give you the satisfaction of seeing your paintings "hold together" instead of floating individually.
🔧 What You Need to Succeed
- Craft paper or newspaper: To cut out patterns with the exact dimensions of your paintings and test the locations without damaging the wall. More practical than mental measurements, it avoids unnecessary holes in the wall. Available in any stationery store, choose a fairly thick paper that will hold well to the wall with repositionable tape.
- Flexible measuring tape: Essential for measuring distances and checking proportions. Rigid meters do not follow the natural curves of your gaze. Take a 3-meter model minimum so you can measure long distances in one go.
- Repositionable tape: To temporarily fix your patterns without leaving traces. Classic tape can tear off paint, double-sided adhesive sticks permanently. Repositionable tape gives you the freedom to adjust at will.
Now let's move on to concrete practice
🎯 The Gestures That Create Harmony
Identify your "zero point": Stand where you look at this wall most often (sofa, table, entrance to the room). Point spontaneously with your finger at the place where your eye naturally rests: this is your natural center of interest, not necessarily the geometric center of the wall.
⏱️ Time: 5 minutes | ✅ Successful when: You instinctively point to the same spot three times in a row | ⚠️ Attention: Don't think, trust your first impulse - that's what counts
Position your "anchor" painting: Place the pattern of your heaviest visual weight painting (usually the largest or darkest) so that its center coincides with your zero point. This painting will serve as a reference for all others - it gives the “A” note to your composition.
⏱️ Time: 10 minutes | ✅ Successful when: The painting seems to "live" naturally in this place | ⚠️ Attention: If it seems forced, shift slightly until it "clicks"
Create balance points: Arrange the patterns of your other paintings imagining an invisible scale: if your anchor weighs to the right, place visual weight to the left, but not necessarily at the same height. Vary levels to create movement.
⏱️ Time: 15 minutes | ✅ Successful when: The whole does not "lean" visually either way | ⚠️ Attention: Don't look for perfect symmetry, look for a sense of overall balance
✓ Step 1 Check: Step back 3 meters. Your eye should be able to "travel" naturally from one artwork to the next without effort, like following an invisible path. If a piece feels "lost" or "out of place", adjust its position by a few centimeters. No stress: it's normal to readjust!
OUR RECOMMENDED PRODUCTS
Step 2: Create a Dialogue Between Your Different Formats
Now that your artworks have found their overall balance, you will create the subtle connections that transform them from a simple collection to a true visual conversation. This is where the magic happens: your artworks begin to "talk" to each other and create that natural harmony you admire in interior design magazines.
🎨 Advanced Harmonization Techniques
Apply the "different breaths" rule: Consciously vary the spaces between your artworks according to their visual relationship. Bring closer artworks that share colors or themes (3-5cm), move away those that create a strong contrast (15-20cm). This breath naturally guides the eye.
⏱️ Time: 20 minutes | ✅ Successful when: Visual groupings are created spontaneously | ⚠️ Attention: Don't squeeze everything to the minimum - the air between artworks is part of the composition
Create invisible "vanishing lines": Subtly align certain edges of your artworks (for example, the left edge of the small artwork with the left edge of the large one) to create visual guidelines that the eye follows unconsciously. These alignments unify without stiffening.
⏱️ Time: 15 minutes | ✅ Successful when: You feel a "logic" in the arrangement | ⚠️ Attention: One or two alignments are enough - too many alignments kill the effect
Step 3: Fine-Tune the Final Harmony and Reveal Personality
You are now entering the expert phase where small details make all the difference. It is this level of finishing that distinguishes a novice composition from a professional arrangement. Your guests won't necessarily know why, but they will immediately feel that your wall "has something special".
🌟 Expert Finishes
Adjust micro-distances: Fine-tune the spacing to the nearest centimeter by relying on your feeling. Shift a piece slightly to the left or right until you get that "click" of visual satisfaction. These microscopic adjustments make the difference between "good" and "perfect".
⏱️ Time: 25 minutes | ✅ Successful when: You feel an immediate sense of satisfaction looking at the whole | ⚠️ Attention: Trust your instinct - if you like it, it's good
Final validation rule: Your composition is successful when you can walk past it without feeling the urge to "adjust something". Spontaneous visual comfort is the only criterion that really matters.
You now master the fundamentals of dynamic composition. Here are the expert subtleties that will make you a reference in wall decoration among your peers.
🎖️ Master decorator technique: The "descending cascade" effect - arrange your artworks so that the eye naturally descends from left to right (or vice versa according to your preference). This technique subtly guides the gaze and creates a soothing sensation, like a melody resolving harmoniously.
💭 Frequent question from our readers
"I'm afraid of making holes in the wall for nothing... How can I be sure before drilling?"
This hesitation is totally understandable! You invest time and energy, it’s normal to want to be certain of the result. The paper template technique we gave you solves exactly this problem: you can live with your "virtual" composition for several days before drilling. Look at it at different times of the day, with different lighting. If it satisfies you for 48 hours, go for it!
📋 Definitive validation test: Take a photo of your wall with the templates, then look at this photo 24 hours later. If you still feel the same satisfaction, your composition is right - our brain is very objective in photos!
The pitfalls to absolutely avoid to protect your work
Before taking action, here are the common mistakes that can ruin hours of reflection. These faux pas are so frequent that we prefer to tell you about them now to avoid disappointments.
- ⚠️ The "mathematical perfection" trap: Wanting spacings down to the millimeter or perfect alignments. Result: a cold composition that lacks life. Beauty comes from controlled small imperfections - keep spontaneity in your measurements. ⚠️ The "all small, all tight" error: Minimizing spaces for fear of emptiness. Your artworks end up suffocating each other and lose their individual impact. Empty space is an integral part of your composition - respect it. ⚠️ The temptation of "permanent change": Constantly readjusting because you are never quite satisfied. You risk losing a good composition by searching for absolute perfection. Set yourself a limit: a maximum of 3 adjustments per artwork. ⚠️ The influence of "outside advisors": Modifying your composition because someone close has expressed a reservation. Your personal taste always prevails - you are the one who lives with this decoration every day. ⚠️ The panic of the "first hanging": Being afraid to drill the first hole and postponing it again and again. The first hole is always the most stressful, but once done, the rest follows naturally.
🛡️ Safety checkpoints: Make sure your composition works from your main viewpoint, that no artwork seems to be "floating" in the void, that the whole creates a balanced overall shape, and that you feel pleasure (not stress) when looking at it.
🎁 Special offer for readers
Because you took the time to inform yourself, enjoy a 10% discount on your first order:
⏰ Valid 72h after reading • Applicable to all our products
🔍 Answers to essential practical questions
With the artworks you already have, the cost is limited to basic supplies (less than €15: paper, meter, tape). Allow 2-3 hours for a composition of 3-5 artworks, including tests and adjustments. To optimize: prepare all your templates at once, test several configurations before choosing.
The logic remains the same, only the proportions change. Small wall (less than 2m): limit yourself to a maximum of 3 artworks and reduce the spacing between them. Large wall (more than 4m): create 2-3 distinct groups linked by subtle alignments rather than a single composition spread out.
That's what can create the most interesting compositions! Bet on assumed contrasts: alternate formats, warm/cold colors, classic/modern styles. The unity will come from the geometric structure of your arrangement, not the works themselves.
Integrate these constraints from the planning stage by marking them on your templates. Often, these "obstacles" become natural anchoring points that advantageously structure your composition. A switch can serve as an alignment, a piece of furniture as a visual base.
A good composition naturally evolves! Provide for a few extra discreet fixing holes from the start so that you can add new artworks or seasonal rotations. The important thing is to keep the balance structure you have created.
🌟 Your decor transformation starts now
In a few weeks, you’ll look at your wall with that deep satisfaction of someone who has created something unique and personal. Your guests will immediately notice this particular harmony without necessarily understanding why - it's exactly the effect sought. Your living room will have gained character and sophistication, that "personal art gallery" atmosphere that you admire in others.
Beyond the aesthetic aspect, you will have developed your sense of visual harmony, a skill that you will naturally apply to other aspects of your decor. This new confidence in your decorating choices will transform your approach to interior design.
You now know that harmony doesn't come from rigid rules but from understanding visual balances. The hardest part - understanding the logic - is done. All you have left to do is get out your paper patterns and start identifying your zero point. In 3 hours, you will have your perfect composition!
🚀 Your first step towards success:
Your dream wall awaits your action. The theory is acquired, your artworks are ready, all that's missing is your decision to start. Trust yourself - you have everything you need to succeed!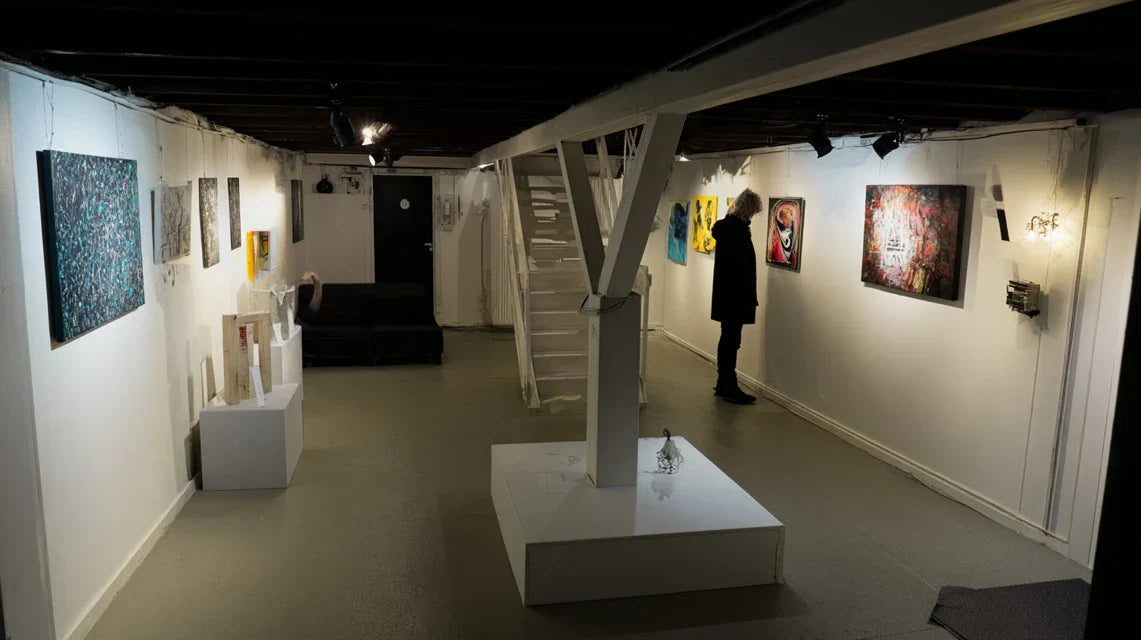


