⏱️ Reading time: 8 minutes
You come home after a busy day, you turn on your central ceiling light... and your beautiful wall art literally disappears into the shadows. These works that you have carefully chosen seem dull, without relief, as if all their magic vanished as soon as
natural light leaves your interior.
You observe this flat and cold atmosphere that turns your living room into a simple hospital corridor. Your guests pass by your wall art without even noticing, while you dreamed they would stop, admire, ask questions about these pieces that are dear to you.
You may have tried adding table lamps or designer pendants, but the result remains disappointing: either the lighting is too weak and does not reach your works, or it creates glare on the protective glass, turning your paintings into unusable mirrors.
It's not your fault if your attempts failed. The real reason? Classic decorative lighting is simply not designed to reveal wall art. A specific approach is needed, one that luxury hotels master to create that cozy and sophisticated atmosphere that fascinates you so much.
By the end of this article, you will know exactly how to transform your wall into a private art gallery thanks to hotel lighting techniques, and your paintings will finally become the stars of your decor, even in total darkness.
Why can lighting your artwork transform your everyday life starting tonight?
If you keep putting off this decision, you are missing magical moments every evening. Imagine coming home and seeing your artwork illuminated like in a presidential suite, instantly creating that feeling of being in an exceptional place. It's like the difference between a simple meal and a candlelit dinner: lighting changes everything.
🏨 Revelation in a Parisian palace: Sarah, interior designer, tells about the moment she realized the importance of lighting artwork. In the suite of the Meurice hotel, she observed a simple impressionistic landscape that seemed to come to life thanks to two discreet wall spots. "I realized that at home, my reproduced Monet paintings remained in the shadows when they had the potential to be just as captivating," she confides.
💬 Conversation with a decor expert
"I'm afraid that spotlights on my paintings will make it too 'museum' or 'gallery'... I just want a cozy atmosphere at home."
Don’t be fooled!
Hotel lighting is designed to create luxurious intimacy, not museum coldness. Think of the lobbies of luxury hotels: their works are highlighted with a
soft warmth that invites contemplation and relaxation. That's exactly the cozy atmosphere you can reproduce.
"I was always told to avoid shining light directly on paintings to prevent damage..."
This rule dates back to the era of very hot incandescent bulbs! Today, modern LEDs emit very little heat and their UV rays are almost non-existent. Luxury hotels use this technology constantly without any harm. The important thing is to choose an appropriate color temperature and avoid overly powerful lighting.
Let's discover together what lies behind your lighting frustrations
Do you recognize yourself in these situations? Your paintings that seem to lose their colors as evening approaches, the feeling that your decor lacks "punch" as soon as the sun goes down, or even the frustration of seeing your guests walk past your favorite works without even noticing them.
The real reason is not that your paintings lack quality or that your decoration is a failure. The problem comes from the fact that general lighting in our interiors is not designed to reveal wall art. It illuminates everything uniformly, creating a visual flatness that drowns out your works in the whole.
It's like trying to photograph a sunset with the flash of your phone: technically, everything is illuminated, but the magic and relief disappear completely.
The first cause: uniform lighting kills visual hierarchy
Contrary to what many think, good lighting should not illuminate everything in the same way. Prestigious hotels deliberately create contrasts to guide the eye to important elements. Your central ceiling light transforms your living room into an underground parking lot: functional, but soulless.
Imagine your gaze as a pedestrian in a city: it needs points of interest to stop and appreciate. Without these "illuminated monuments" that are your paintings, the eye glides without attaching itself to anything.
This uniformity explains why your guests don't notice your works and why you yourself no longer feel that aesthetic joy you expected when buying them. Your gaze gets used to this flatness and loses its ability to marvel.
🔍 Quick test: Tonight, turn off your main lighting and only light a table lamp near one of your paintings. Observe how the work suddenly seems to "breathe" and attract your attention. That's the power of targeted lighting!
The second cause: unsuitable lighting angle creates reflections
Most people place their light sources facing wall art, creating mirror reflections on the protective glass. It's like watching a television with a window behind it: impossible to see the content clearly.
Hospitality professionals use the 30-degree rule: lighting comes in at an angle, revealing colors and textures without creating annoying reflections. It’s like the lighting of a professional photographer who avoids frontal flash.
This angle error explains why your attempts at lighting have been disappointing and why you feel that your artwork loses its sharpness as soon as you light it up.
The third cause: inadequate color temperature distorts the artworks
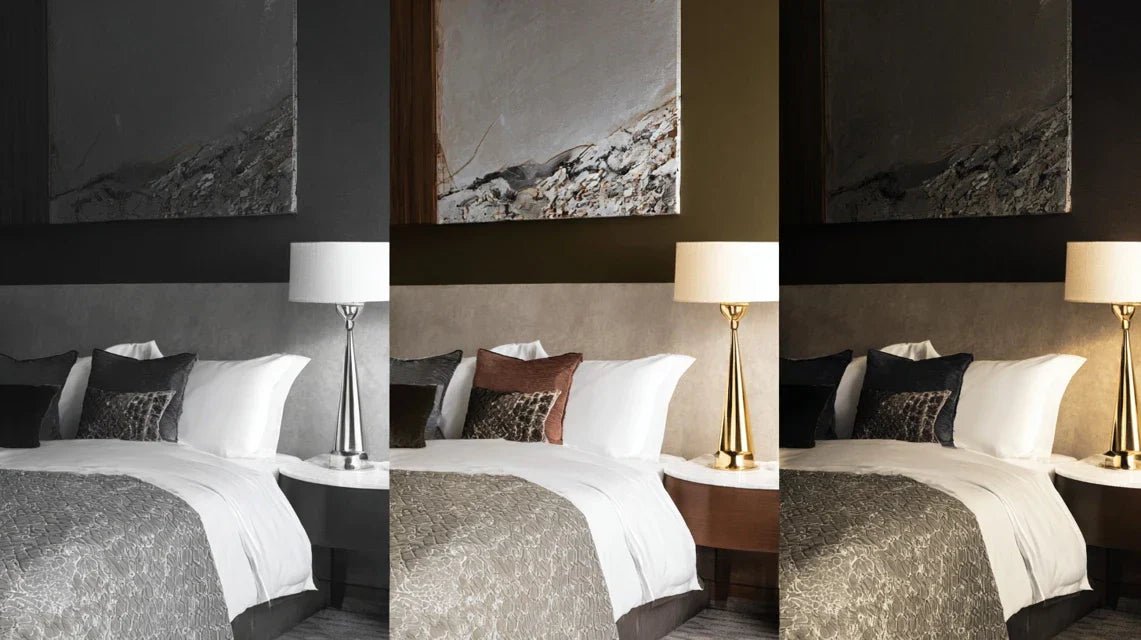
One detail few notice: the color of the light itself can radically transform the appearance of a painting. Too cool (white/blue) light emphasizes cool tones and dulls warm colors, while too warm (yellow/orange) light can alter the perception of subtle nuances.
You can check this by observing the same artwork under different lighting in your home. Under the light of your kitchen (often cool), then under that of your bedroom (generally warmer): it's no longer the same work!
This variation explains this diffuse frustration you feel: your paintings never do justice to what you imagined when choosing them.
The 3 signals that don't lie:
-
Your guests never comment on your artwork: this means your lighting doesn’t highlight it enough to naturally attract attention
-
You prefer the daytime ambiance to the evening one: this is a sign that your artificial lighting does not recreate the magic of natural light
-
Your Instagram photos of your decor are always taken during the day: unconsciously, you know that evening lighting doesn't do justice to your interior
The trigger element: the quality of lighting determines perceived value
What really makes the difference is that quality lighting acts as a revealer of value. It’s the perfect domino effect: good lighting reveals your artwork, which enhances your decor, which transforms the overall ambiance of your interior. You can easily identify it: in spaces where you immediately feel "good" and "impressed", observe how light guides your gaze to important decorative elements.
The golden rule of hoteliers: the human eye is naturally drawn to well-balanced contrasts in brightness. Create targeted lighting at 2700K-3000K with a 30-degree angle, and immediately check the effect by observing whether you spontaneously look at the artwork when entering the room.
| ❌ Classic uniform lighting | ✅ Targeted hotel lighting | 💡 Why it makes all the difference | 🎯 Immediate benefit |
Central ceiling light that illuminates everything equallyDirectional spotlights on each artworkCreates a natural visual hierarchyThe artworks become magnetic to the eyeCold and functional lightingWarm temperature 2700K-3000KReveals the richness of original colorsYour works regain their original brillianceFront lighting creating reflectionsAngle of 30 degrees without reflectionsAllows you to see all details clearlyNo more frustration with glass reflections"Underground parking" impressionCozy and luxurious atmosphereTransforms the overall atmosphereFeeling of being in an exceptional place
Your complete guide to artwork lighting worthy of the finest hotels
Rassurez-vous, creating this hotel ambiance at home is easier than you might think. We will proceed like a Michelin-starred chef preparing an exceptional dish: first the good ingredients, then the technique, and finally the finishing touches that make all the difference. In 2 weeks, your guests will ask you about the secret of this particular atmosphere that reigns in your home.
🏗️ Overview of our method: We will start by choosing the right equipment (like laying solid foundations), then we will learn the optimal placement (the structure), and finally we will refine the overall atmosphere (the final decoration). Each step will give you a visible result immediately, and the cumulative effect will create this hotel magic that you are looking for.
Step 1: Choose the right lighting (the foundations of your project)
Starting with the equipment is a guarantee of a durable and professional result. It's like building a house: with poor foundations, even the most beautiful decoration will not hold. Once this step is complete, you will already feel the satisfaction of having the right tools in your hands, and the desire to take action will be multiplied.
Essential elements for a professional result
Directional LED spotlights on rail or orientable wall spotlights: They look like miniature projectors that you can direct precisely. Their role is to create a concentrated beam on your artwork, like a theater spotlight. Favor specialized lighting stores or high-end decoration brands. Check that the diffusion angle is adjustable (15° to 40°). Avoid fixed recessed spotlights that do not allow adjustment.LEDs with color temperature 2700K-3000K: This range of colors reproduces the golden warmth of the beautiful hours of the day. It acts like a natural Instagram filter that enhances warm colors. Look for the "warm white" mention on the packaging and check the color rendering index (CRI) above 90. This quality reveals all the subtle nuances of your works.
Compatible LED dimmer switch: This element looks like a classic switch but with a knob or slider. It allows you to adjust the intensity according to the time and desired atmosphere, like a piano volume pedal. The impact on the ambiance is spectacular: you can create a cozy intimacy in the evening or more sustained lighting to admire the details.
Now let's move on to the actual installation
Installation and positioning (the technique that changes everything)
Positioning according to the 30 degree rule: Place your spotlight so that the light arrives diagonally on the artwork, never frontally. The reason? This avoids reflections and reveals reliefs and textures. Measure approximately 1 meter of horizontal distance from the painting for a perfect angle. It's simpler than it seems: imagine drawing an equilateral triangle between the spot, the painting and the floor.
⏱️ Time: 15 minutes per artwork | ✅ Success when: No visible reflections on the glass, vibrant colors, apparent relief | ⚠️ Attention: The common mistake is to place the spotlight too close or too frontally for aesthetic reasons of the equipment, which creates these mirror reflections so frustrating
Optimal intensity adjustment: Start by setting the intensity to maximum, then gradually decrease until you obtain a soft but present lighting. The painting should be brighter than its immediate surroundings without dazzling. The goal is to create a subtle contrast that naturally attracts the eye.
⏱️ Time: 5 minutes per adjustment | ✅ Success when: The artwork stands out naturally, warm atmosphere | ⚠️ Attention: Don't fall into excess: too strong, it looks like an interrogation; too weak, the effect is nonexistent
Overall ambiance test: Turn off all other lighting and only light your artwork spotlights. Observe the overall effect and adjust if necessary. This step reveals the magic: your living room transforms into an intimate private gallery.
⏱️ Time: 10 minutes of observation | ✅ Success when: Feeling of discreet luxury, desire to stay in this atmosphere | ⚠️ Attention: If the effect seems too theatrical, slightly reduce the intensity rather than changing the angle
✨ Validation of your first transformation: Your artwork lighting is successful when your guests spontaneously notice your works and when you yourself rediscover details that you had never seen. If either condition is not met, adjust the angle or intensity. The next step will double this effect by creating a overall harmony.
Step 2: Creating a lighting harmony throughout the room
Now that your artworks are perfectly highlighted, we move to the next level: orchestrating the lighting of the entire room so that your works fit into a consistent atmosphere. This is where the magic really happens, as the snowball effect transforms your living room into a true luxury hotel suite.
Creating complementary ambient lighting
Indirect lighting to balance the whole: Add soft and indirect light sources (table lamps, wall lights directed towards the ceiling, hidden LED garlands) to prevent your paintings from seeming to "float" in the dark. These accompanying lights create a smooth transition between lit and unlit areas. Place them away from the artworks so as not to compete with their main lighting.
⏱️ Time: 20 minutes per source | ✅ Success when: Balanced atmosphere, no overly contrasting zones | ⚠️ Attention: The mistake is to want to light everything up: keep some shadows to preserve the mystery
Synchronizing color temperatures: Check that all your light sources are in the same range of warm white (2700K-3000K). A cool lighting that creeps into the whole instantly destroys harmony. It's like having an out-of-tune instrument in an orchestra: the whole ensemble becomes discordant.
⏱️ Time: 10 minutes of verification | ✅ Success when: Perfect chromatic harmony, cozy feeling | ⚠️ Attention: Low-end LEDs can vary in temperature: invest in a recognized brand
Step 3: Mastering expert subtleties for exceptional results
You are now at the level of professional decorators. This final step transforms good lighting into a true sensory experience. The difference between an informed amateur and an expert lies in these details that only connoisseurs notice, but that everyone feels subconsciously.
Finishes that create emotion
Programming atmospheres according to the moments: Create different "light scenarios" thanks to your dimmers: a more sustained lighting to admire your artworks in detail, a reduced intensity for the cozy evening atmosphere, and minimal lighting for intimate evenings. It's your "playlist" of lighting moods.
⏱️ Time: 15 minutes of programming | ✅ Success when: Every moment has its perfect ambiance | ⚠️ Attention: Note your favorite settings so you can easily reproduce them
Subtle seasonal adjustments: In winter, slightly increase the intensity to compensate for the lack of natural light. In summer, favor a softer intensity that complements the beautiful daylight. These micro-adjustments make the difference between mechanical lighting and living lighting.
⏱️ Time: 5 minutes of adjustment | ✅ Successful when: The lighting still seems perfectly suited | ⚠️ Attention: Changes must be subtle: maximum 10-15% intensity
The progression rule of master lighting designers: You know you've mastered it when you can create three distinct atmospheres with the same equipment, when your guests consistently ask for your lighting advice, and when you feel an aesthetic satisfaction every time you enter your living room. Patience in fine adjustments is worth all material investments.
Congratulations! You have just acquired the secrets of the greatest hotels in artistic lighting. These expert subtleties give you a considerable advantage: you can now create atmospheres that even your most demanding decorating friends will not be able to reproduce.
💎 Hotel palace decorator tip: To create an even more sophisticated effect, illuminate a small format painting with slightly higher intensity than large formats. This reversed hierarchy creates an unexpected focal point that intrigues and reveals your mastery. Great decorators use this technique to create "visual surprises" that mark the spirits.
❓ "But am I not at risk of consuming much more electricity?"
"I'm afraid all this extra lighting will blow up my electricity bill..."
This concern is perfectly understandable, and it’s actually quite the opposite! Modern LEDs consume 10 times less than old bulbs. A quality LED spotlight consumes about 5-7 watts, which is less than a nightlight. In fact, illuminating 4 paintings with spotlights costs the same as using a single 40W bulb. Plus, you will use your general energy-consuming lighting less, which will save you real savings.
💡 Reassuring calculation: Use an online consumption calculator with the power of your LEDs to see that illuminating 3 paintings for 5 hours a day costs less than €2 per month. You will be surprised at how accessible it is!
The traps to absolutely avoid to protect your investment
Now that you have all the keys in hand, it is crucial to know these common mistakes that can undo all your efforts. I share these pitfalls not to worry you, but to avoid the frustrating disappointments that unfortunately many well-intentioned people experience.
-
⚠️ Choosing low-cost LED lights without checking the CRI : It's tempting to save on bulbs, but low-quality LEDs distort colors and give your artwork a washed-out appearance. The consequence? Your beautiful paintings lose their vibrancy and seem dull. Invest in quality LED lights with a CRI above 90: that’s the difference between seeing your artworks in high definition or blurry vision. This mistake is very common because you only see the difference once the LEDs are installed.
-
⚠️ Placing all spotlights at the same height for alignment's sake : The obsession with perfect alignment can destroy the effectiveness of lighting. If your paintings are different sizes, the optimal spotlight height varies. Always prioritize the optimal angle of illumination over hardware aesthetics. Effective but slightly asymmetrical lighting will be a thousand times more successful than perfect alignment that creates reflections.
-
⚠️ Neglecting ambient lighting while focusing only on paintings : Lighting artworks alone without general ambiance creates an unpleasant "prison spotlight" effect. Your works seem to float in the dark, the effect is theatrical in the wrong way. Always think about the overall balance: your paintings are the stars, but they need accompanying lighting to shine naturally.
-
⚠️ Wanting to illuminate all paintings with the same intensity : Each artwork has its own characteristics: a watercolor requires less intensity than an oil painting with dark colors. Treating all your paintings the same way creates boring uniformity. Adjust the intensity according to the natural brightness of each work. It's this subtle variation that creates visual richness.
-
⚠️ Installing lighting without first testing with a flashlight : Many people rush directly into permanent installation without testing the angle and intensity. Result: holes in the wall and poorly positioned lighting that needs to be redone. Always use a powerful flashlight to simulate lighting and validate the position before drilling. This test step avoids 90% of disappointments.
🛡️ Your safety checklist before installation : Check that your LED’s CRI is above 90, test each position with a flashlight, ensure that no reflections are visible from all viewing angles in the room, and provide complementary ambient lighting. Warning signs: if your eyes get tired quickly, if colors look different day and night, or if the effect seems too "artificial".
Your frequently asked questions about hotel-style artwork lighting
💰 What budget should you allocate to illuminate 3-4 paintings like in a luxury hotel?
Allow between €150 and €400 for quality lighting of 3-4 paintings, depending on whether you opt for rail spotlights (more economical) or design wall sconces (more high-end). To optimize your budget: start with one or two main paintings with quality hardware, then gradually expand. The investment is quickly amortized by daily satisfaction and the enhancement of your existing works.
🔧 Is it complicated to install if I am not a handyman?
Installation is accessible to everyone with rail systems or clamp spotlights, which require no drilling. For wall sconces, allow 2 hours of work and basic tools (drill, level, screwdriver). The electrical part often involves plugging into an existing outlet. If you are hesitant, start with mobile spotlights on tripods to test the effect before permanent installation.
🖼️ Can all types of paintings be illuminated this way?
Yes, but with adaptations depending on the support. Canvas and paper perfectly support this LED lighting. For fragile or antique works, simply check that your LEDs emit less heat than a conventional bulb (this is the case for all quality LEDs). Works under glass just require a more precise angle to avoid reflections. Even photos and reproductions gain enormously in presence with this type of lighting.
⏰ How long before you see a truly impressive result?
The effect is spectacular from the first evening! But to perfectly master the settings and create several atmospheres, allow 2-3 weeks of pleasant adjustments. This is the time needed to discover your preferences according to the time of day and refine your eye to the subtleties of lighting. Each adjustment brings you closer to that perfect hotel ambiance.
🏠 Will this work in all decorating styles?
Absolutely! Artwork lighting adapts to all styles because it reveals what already exists. In a modern interior, it accentuates the clean and sophisticated aspect. In an elegant classic setting, it reinforces traditional elegance. In an industrial style, it adds that gallery art touch so sought after. The secret: choose discreet spotlights whose design harmonizes with your existing decoration.
Your transformation into a hotel ambiance expert begins now
In a few weeks, when you walk into your home in the evening and your illuminated artworks welcome you as in the finest hotels in the world, you will feel that particular pride of having created something exceptional. Your guests will immediately notice this new sophistication, this atmosphere they won't be able to define but which will mark them deeply.
Beyond aesthetics, you will have developed an expert eye for lighting that will transform your approach to decoration in general. You will now know how to create atmospheres, play with contrasts, reveal the hidden beauty of your interior. This new skill will shine on all your future decorative choices.
Understanding was indeed the most difficult part, and you have just overcome it brilliantly. Now, your first concrete step can be as simple as testing the effect with a flashlight tonight. Observe how a simple beam of light instantly transforms one of your artworks, and let this magic motivate you for the future.
✨ Your moment of truth is coming: Tonight, looking at your paintings in their new setting of light, you will realize that you have not only improved your decoration, but you have created your own private gallery. This transformation is within your reach, and it begins as soon as you decide.
📚 Continue your interior transformation
Now that you master the lighting of your paintings, discover all our other secrets to create a luxury hotel atmosphere in each room of your home. You will love these professional techniques.
Confidentialité
Nous utilisons des cookies pour améliorer votre expérience et analyser le trafic de notre site.
Indispensables au fonctionnement du site.
Toujours activé
Mesure des performances du site.
Publicités ciblées et mesure d’efficacité.
Personnalisation de l’expérience.