Create a "hotel lobby" effect in your living room with a statement artwork
By Alexandre MARY
Create a "hotel lobby" effect in your living room with a statement artwork
⏱️ Reading time: 8 minutes
You walk into your living room and immediately feel that disappointing sensation: the space is sorely lacking in character.
Despite your efforts, your carefully chosen furniture and thoughtful decor, something feels off.
The atmosphere remains cold, impersonal, almost bland.
You look around and notice that the walls seem empty, even with a few scattered frames.
The lighting seems dull, the atmosphere lacks that natural elegance you so admire in grand hotels.
Your living room looks more like a waiting room than a truly warm and inviting living space.
You've probably already tried adding colorful cushions, changing the lighting, or even rearranging the furniture.
But the result never quite satisfies you.
Each attempt seems superficial, without creating that profound transformation you seek.
This is perfectly normal, and it's not your fault.
The real reason for this failure? You are trying to transform the atmosphere with small touches, while the elegance of grand spaces rests on a different principle: the presence of a strong architectural element that structures the entire space.
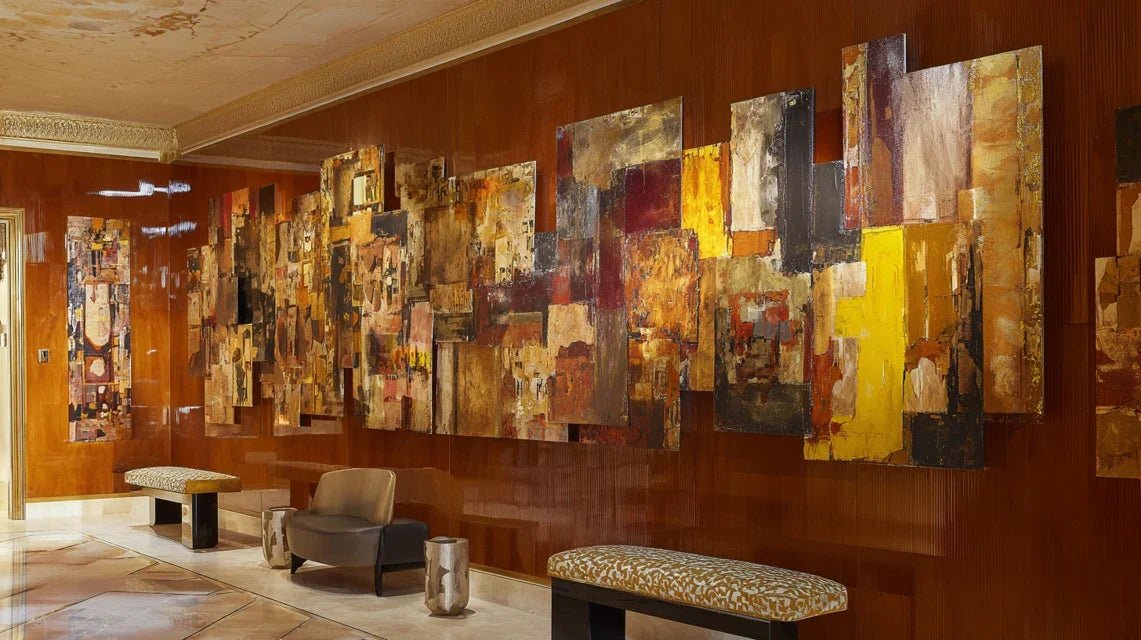
By the end of this article, you will know exactly how to choose and install a striking work of art that will instantly transform your living room into an exceptional space, worthy of the finest hotel lobbies.
Why a strong artwork can revolutionize the atmosphere of your living room?
The urgency to act now becomes evident when you understand the psychological impact of our environment.
Every day spent in a space that doesn't inspire us affects our well-being and creativity.
It’s like wearing clothes that don’t suit us: we end up getting used to it, but we lose confidence.
The opportunity? Your living room can become that inspiring sanctuary that energizes your daily life.
🏨 Customer testimonial: Marie, an interior architect, recently told us: "I spent months perfecting every detail of my living room. Designer lamps, noble textiles, custom furniture... But something was missing. The day I installed a large 120x80cm abstract painting above my sofa, my guests immediately noticed the difference. 'We feel like we're in a luxury hotel,' they said."
💬 Conversation with a decor expert
"I’m afraid that a large painting will dominate the room too much and overwhelm the rest of my decor..."
On the contrary, a strong artwork creates harmony by giving a focal point around which all other elements naturally find their place. It’s like a conductor who unifies the musicians: each element retains its personality while participating in a larger symphony.
"I've always been told that you have to start small with art, so as not to make mistakes."
This rule dates back to a time when art was less accessible. Today, starting with a statement piece makes more sense: it immediately defines the style and facilitates all subsequent decor choices. It's more effective and economical than accumulating several small works without coherence.
The principle of visual anchoring: A statement artwork acts as an emotional magnet that attracts the eye and structures the space. The result is immediate: your living room instantly gains character and sophistication, with a visible effect within the first 24 hours.
Understand why your living room lacks that magic of spaciousness
Do you recognize these situations? Your guests settle in but the atmosphere remains formal, as if they were on a medical visit.
Your living room photos on Instagram lack that "je ne sais quoi" that makes the difference.
You yourself don't feel that pride when you come home in the evening.
What’s really happening? Your living room suffers from "neutral space syndrome."
Everything is nice, but nothing asserts a strong personality.
The problem isn't your taste, but the absence of a structuring element that gives a clear aesthetic direction.
Imagine your living room as a novel: you have beautiful chapters (furniture, colors, lighting), but the main character is missing to give meaning to the story.
The dispersion of small decorative elements dilutes the impact
Contrary to popular belief, multiplying small decorative objects weakens the space rather than energizing it.
The reality? Luxury hotel designers always prefer a few statement pieces over an accumulation of accessories.
It's like trying to light a room with ten candles instead of a chandelier: the effect remains scattered and confusing.
The impact on your daily life? Your gaze never finds a resting point, creating unconscious visual fatigue.
Changing approach means choosing a dominant element that unifies and sublimates all the others.
🔍 Quick test: Take a photo of your living room from the entrance. If your eye hesitates on where to land first, it's a sign that it lacks this structuring focal point.
Lighting alone cannot create the atmosphere without visual support
Many think that good lighting is enough to create the ambiance. In reality, light reveals and magnifies, but it needs an object worthy of being illuminated.
It's like a theater spotlight: without an actor on stage, it illuminates only emptiness.
Why your expensive LED lighting doesn’t transform the atmosphere? Because it evenly lights disparate elements, without creating that visual hierarchy that characterizes exceptional spaces.
The size of modern walls requires adapted proportions
Neglected Factor : our living rooms today have higher ceilings and larger walls than before.
Decor proportions of yesteryear no longer work today.
How to spot it ? If your frames seem "floating" on the wall, or if the space above your sofa seems disproportionate, you have identified the problem.
The daily impact ? This imbalance subconsciously creates a feeling of incompleteness, as if your decor is temporary.
🎯 3 signs that your living room lacks visual structure :
Your guests' gaze "scans" the room without stopping : This means that no element captures enough attention to create a visual anchor point.
Your living room photos look "flat" despite nice lighting : The lack of visual relief prevents the creation of depth that makes the difference on social networks.
You regularly change the layout without being satisfied : This is a symptom of a space searching for its identity due to a lack of unifying element.
The trigger factor: artwork as emotional architecture
What really makes the difference ? A work of art doesn't just decorate, it structures space like an architectural element.
The domino effect : it instantly influences the perception of ceiling height, room depth, and even acoustics.
How to identify it ? Walk into a hotel lobby and observe: your gaze immediately rests on the main artwork, then discovers the rest of the space organized around it.
The hotel proportions rule : The main work should occupy between 60 and 75% of the available wall space above the main piece of furniture. Quick check : measure your wall and your sofa, the ideal artwork is about 2/3 the width of the sofa.
❌ Classic approach
✅ Hotel lobby approach
💡 Why it works
🎯 Immediate benefit
Several small scattered artworks
A central, striking artwork
Creates a unique focal point
Structured gaze and visual rest
Decoration "added" after layout
Artwork as an architectural element
Influences the entire composition
Instant space coherence
Choice based on personal tastes
Selection according to the proportions of the space
Respect for visual harmony
Guaranteed professional effect
Budget distributed across multiple items
Investment concentrated on a statement piece
Maximum impact for the budget
Visible transformation immediately
The 3-step method to create your hotel lobby effect
Rest assured: transforming your living room requires no particular technical skills.
The method follows a simple logic: like building a house, we start with the foundations (choosing the location), then the structure (defining the dimensions), and finally the finishing touches (installing and lighting).
Final result? A living room that immediately exudes the natural sophistication of large spaces, where each element finds its harmonious place.
🎯 Overview of the transformation:Step 1: Identify the strategic location (immediate satisfaction of seeing the space differently). Step 2: Choose the dimensions and style according to your architecture (confidence in your decision). Step 3: Install and create accent lighting (wonder at the final result).
Step 1: Identify the strategic location in your living room
Why start with the location? Because even the most beautiful artwork loses its impact if it is poorly positioned.
It's like planting a tree: the location determines its growth and radiance.
The immediate satisfaction? As soon as you have identified THE wall, you will see your living room with new eyes and already begin to visualize the transformation.
🔍 What you need for this analysis
A measuring tape of at least 3 meters:Essential for measuring accurately the width of the wall and ceiling height. Where to find it? Any hardware store or online. Quality criterion: prefer a meter with automatic locking rather than a flexible meter that falsifies measurements. Why not a ruler? The dimensions of a significant work always exceed 1 meter.
A camera (smartphone is sufficient):The goal? Capture different angles to analyze the space without being influenced by habit. How it works: our brain automatically "corrects" what we see daily, the photo reveals objective reality. Quality tip: take several shots from the entrance, the sofa, and diagonally to capture all perspectives.
A notebook to note down measurements:Crucial role: avoid memory errors that are costly when purchasing. Analogy: it's your logbook for this transformation, securing each decision.
Let's move on to concrete action now
🎯 Method for identifying the main wall
Position yourself at the entrance to your living room:Observe where your gaze naturally falls when entering. Why this position? It's the first impression that guests discover, it conditions their entire perception of the space. Important technical detail: the main wall is generally the one facing the entrance or perpendicular, never the one against which you have your back when entering.
⏱️ Time: 2 minutes | ✅ Successful when: You clearly identify THE wall that naturally attracts attention | ⚠️ Attention: Don't choose a wall for convenience (near an electrical outlet), prioritize visual impact even if installation requires more thought.
Check the minimum 3-meter rule:Measure the distance between the selected wall and the main viewing point (sofa or entrance). Reason for this rule? A striking work of art needs distance to be appreciated as a whole, like a painting in a museum. If it's shorter? The artwork risks "dominating" visually and creating an oppressive effect rather than elegance.
⏱️ Time: 3 minutes | ✅ Successful when: The measured distance is at least 3 meters | ⚠️ Attention: Measure in a straight line, not around furniture. If it's too short, look for another wall or consider rearranging the space.
Analyze existing lighting on this wall:Observe at different times: morning, afternoon, evening with artificial lighting. Objective? A work of art reveals its beauty only if it is properly lit. Crucial point: avoid walls that receive direct aggressive light (window facing) or remain in the shade all day.
⏱️ Time: One day of observation | ✅ Successful when: The wall benefits from soft and adjustable lighting | ⚠️ Attention: A permanent backlighting dulls the colors, prefer lateral or indirect lighting.
✅ Stage 1 Validation:Your ideal wall is visible from the entrance, located more than 3 meters from the viewing point, and benefits from favorable lighting. Checks: take a photo from the entrance (the wall must be immediately visible), measure the distance again (safety), test the lighting by turning lights on/off. If a check fails? Don't panic, resume analysis with the second most promising wall. Encouragement: this step is the most important, once mastered, the rest flows easily!
OUR RECOMMENDED PRODUCTS
Step 2: Define the perfect dimensions for your space
Taking it to the next level: now that the location is defined, you're going to determine the proportions that will create that "life-size" effect.
What changes? You no longer choose randomly, but according to precise rules used by interior architects.
Why this step is more rewarding? You feel your project taking concrete shape.
The snowball effect: correct proportions make the whole room appear larger and more harmonious.
📐 Dimension calculation tools
Calculator or mobile app:Usage: apply professional proportion ratios (rule of thirds, golden ratio). Why is it important? The brain subconsciously perceives harmonious mathematical relationships, often misleading "eyeball" proportions. Where to find? Smartphone "Calculator" application, or free online calculator.
Millimeter paper or plan app:Principle: visualize the artwork in space before purchase to avoid surprises. Simple operation: draw the wall to scale (e.g., 1 cm = 10 cm real), then trace the artwork according to calculated dimensions. Quality criterion: the representation must be proportional, even approximately.
Repositionable masking tape:Usefulness: delineate on the wall the exact dimensions of the future artwork for visual validation. Practical advantage: allows family or roommates to participate in the final decision, avoids post-purchase regrets.
📏 Calculation of optimal dimensions
Apply the rule of thirds of the furniture width:Measure the width of your sofa or main piece of furniture, multiply by 0.66. Concrete example: 180 cm sofa = approximately 120 cm wide artwork. Why this proportion? It creates a visual balance where the artwork structures the space without overwhelming it. Pro tip: if you are hesitating between two sizes, always choose the larger one in this range.
⏱️ Time: 5 minutes | ✅ Successful when: You obtain an artwork width between 60% and 75% of your furniture | ⚠️ Attention: If the result exceeds 150 cm, check that your wall can accommodate this dimension without appearing disproportionate.
Determine the height according to the rule of the golden ratio:Divide the obtained width by 1.618 for a harmonious proportion, or use standard formats (3:2 or 4:3). Logic? These proportions correspond to those naturally perceived as balanced by the human eye. Practical alternative: for a width of 120 cm, aim for 80 cm in height (3:2 ratio).
⏱️ Time: 3 minutes | ✅ Successful when: The calculated height respects harmonious proportions | ⚠️ Attention: Avoid overly stretched formats (panoramic) which are suitable for hallways but not living rooms.
Validate the optimal hanging height:Position the center of the artwork at 1.60 m from the floor (standard museum height). Simple calculation: if your artwork is 80 cm high, the top edge will be 2 meters from the floor (1.60 + 40 cm). Important verification: this height must allow comfortable viewing from your sofa.
⏱️ Time: 2 minutes | ✅ Successful when: The hanging height allows for a natural view without tilting your head up or down | ⚠️ Attention: Adjust if your ceiling is very low (less than 7.8 ft) by slightly lowering the center to 59 inches.
🎯 Visual validation test:Outline with masking tape the exact dimensions on your wall. Checks: Observe from the entrance (the artwork should naturally "live" in the space), from the sofa (comfortable view), take a photo (objective check of proportions). Possible adjustments: If it's too large, reduce by 4 inches in width and adjust the height proportionally. Goal: You must feel that "this is exactly it" when looking at the outlined area.
Step 3: Choose a style and install your statement piece
The final and most exciting step: Your living room will reveal its unique personality.
Level of mastery achieved? You now master the codes of professional decorators.
The amateur/connoisseur difference? The amateur chooses what they like, the connoisseur selects what reveals the space.
Final result visualizable: A living room that impresses at first glance, where your guests immediately feel the sophisticated elegance of grand hotels.
🎨 Style selection elements
Color palette of your existing colors:Simple method: Take photos of your textiles, walls, and main furniture, then consult these references when choosing. Goal? The artwork should dialogue with the existing without blending in. Quality rule: Prioritize a work that picks up 1 or 2 colors from your palette while bringing a new dominant hue.
Accent lighting (spots or wall lights):Fundamental principle: A work of art without dedicated lighting loses 70% of its impact. Optimal functioning: Warm light (2700K) directed at 30° from above, distance 1.5 times the width of the artwork. Where to find: Lighting stores or online, search for "picture spot" or "art lighting".
Secure hanging system:Crucial safety: A work of this size requires a professional fixing adapted to your wall type. Necessary elements: Special anchors (concrete, drywall or brick depending on your wall), double attachment metal hooks, spirit level. Impact on the result: Perfectly straight and stable installation reassures and enhances the artwork.
🎯 Professional selection and installation
Define the style according to your living room's architecture:Analyze the dominant style of your space (modern, classic, industrial, Scandinavian). Selection principle: choose a work that amplifies this style without exactly repeating it. Concrete example: modern living room → abstract work with clean lines; classic living room → contemporary landscape with sophisticated tones. Pro tip: the artwork can be bolder than the rest of the decor, its role is to create impact.
⏱️ Time: 15 minutes of reflection | ✅ Successful when: The chosen style complements your existing decoration harmoniously | ⚠️ Attention: Avoid opposing styles that create dissonance (e.g., a very rustic artwork in an ultra-modern living room).
Prepare the installation methodically:Check the type of wall (concrete, plasterboard, brick) by tapping - its hollow sound = plasterboard, its full sound = concrete. Mark the fixing points using the masking tape already in place. Safety rule: for a work weighing more than 5 kg, use 2 attachment points spaced at least 40 cm apart. Important detail: drill slightly diagonally upwards to prevent the artwork from slipping.
⏱️ Time: 20 minutes | ✅ Successful when: The fixings are solid and perfectly level | ⚠️ Attention: If you doubt the solidity of your wall, consult a professional rather than risking it falling.
Install accent lighting:Position the light source 1.5 times the width of the artwork from the wall, directed towards the center. Optimal setting: warm, non-glare light, test it from your sofa. Desired effect: the work should seem to "light up" naturally without the source being visible. Final tip: a dimmer switch allows you to adjust the intensity according to the time of day and desired atmosphere.
⏱️ Time: 30 minutes | ✅ Successful when: The artwork is highlighted without glare | ⚠️ Attention: Avoid LED lights that are too cold, which distort colors, prefer 2700K for a natural rendering.
🏆 Celebration of your success:Your living room now has this visual signature that immediately distinguishes it. Final tests: enter your living room with your eyes closed, open them (the impact should be striking), invite someone and observe their reaction (the spontaneous "wow"), take a photo for your personal satisfaction. Enjoy this transformation: you have just mastered a skill that few people possess. Next step? Savor this achievement and perhaps consider applying this principle to other spaces in your home!
The rule of personal progression:You know you’ve mastered the method when you can analyze any living room and immediately identify what's missing or what works. Objective criteria: your eye naturally rests on proportions, you instinctively spot strategic locations. Balance patience and ambition: allow yourself 2 weeks to fully appreciate your transformation before considering further changes.
Congratulations on the journey so far! You now master the subtleties that distinguish an amateur decoration from a professional arrangement.
The advantage you now have? You can transform any space by applying these same principles of focal point and harmonious proportions.
💎 Interior designer tip:To amplify the hotel lobby effect, add indirect lighting to the floor (totem lamp or recessed spotlights) that creates a cozy atmosphere in the evening. Why is it so effective? The alternation between direct lighting on the artwork and ambient lighting on the floor exactly reproduces the codes of the great Parisian lobbies. Example application: a column lamp 1.50 m high placed in the corner opposite the work creates this characteristic luminous depth.
🤔 Frequent question from our readers
"I love the concept, but I'm afraid of getting tired of a work so present in everyday life..."
I perfectly understand this apprehension - it’s fear #1 for our customers before their first art purchase.
The reassuring reality? A well-chosen artwork according to the correct proportions and location becomes like an architectural element: it is part of the DNA of your space.
Concrete example: our clients often tell us that after 6 months, they no longer “see” their work daily, but immediately feel its absence if it were removed.
The encouragement? Start with a neutral-toned artwork with a few touches of color - it will visually evolve according to your lighting and seasonal accessories.
💡 Reassuring advice:First choose the location and dimensions with our method, then look at several artworks in these proportions for a few days. Result obtained? You will instinctively know which one “lives” naturally in your space.
⚠️ Avoid these mistakes that ruin the hotel lobby effect
Kind attention: these mistakes are normal and committed by 90% of beginners.
Our goal? To avoid disappointments and regretted purchases by protecting you from the most common pitfalls.
🚫 Choosing the artwork before defining the location:Why is it tempting? We fall for a piece and then look for where to put it. Concrete consequence? The perfect artwork in the wrong place loses all its impact and can even unbalance the space. How to do otherwise? Follow our method meticulously: location first, dimensions next, style last. Rest assured: It's the most common mistake, even novice decorators make it.
🚫 Underestimating the dimensions for fear that "it will be too big":Tempting because? We are afraid of the "too much" effect or the judgment of others. Observed result: The artwork looks ridiculous on the wall, like a stamp on an envelope, and the desired effect is completely missed. Corrective approach? Trust proportion calculations rather than your first impression. Very common mistake: 80% of our customers initially wanted 60x40 cm and are delighted to have chosen 120x80 cm.
🚫 Neglecting dedicated lighting for the artwork:Why we forget it? We think that the general lighting in the living room is enough. Disastrous impact? The artwork becomes dull, its colors fade, and it goes unnoticed - the investment is wasted. Simple solution? Always provide accent lighting, even basic. Reassuring normality: Even museums took years to understand the crucial importance of specialized lighting.
🚫 Hanging too high "to protect from children":Apparent logic? We want to avoid children touching or damaging the artwork. Guaranteed failed effect: The artwork floats on the ceiling, disconnected from the furniture, and loses all its visual anchoring force. Intelligent alternative? Respect the height of 1.60 m in the center and choose a frame or support that is protected (plexiglass, professional framing). Understandable mistake: All parents think about it, it's human!
🚫 Multiplying small artworks "to create a gallery":Appeal of this approach? We tell ourselves we will have more choice and less commitment. Visual result? The effect is scattered, confusing, and we completely lose the impact of the unique focal point that characterizes hotel lobbies. Preferred method? One main striking artwork, possibly complemented by very small discreet elements elsewhere. Banality of the error: It's the natural reflex of 95% of people, you are not alone!
🛡️ Error-proofing system:Quick checks before installation: Does the artwork take up at least 60% of the width of your sofa? (if not, too small); is it positioned 1.60 m from the floor in the center? (if not, adjust height); have you planned dedicated lighting? (if not, add a spotlight); is the location visible from the entrance? (if not, change wall). Warning signs: if someone says "it's big", that's a good sign; if they say "we can’t see it”, it means the lighting or location is off.
Because you took the time to learn, enjoy 10% discount on your first order:
ART10
⏰ Valid 72h after reading • Applicable to all our products
❓ Frequently asked questions about the hotel lobby effect
💰 What budget should you allocate to create this effect in a 25m² living room?
Realistic range: between €200 and €800 depending on your choices.
Optimized breakdown: 60% for the artwork (€120-€480), 25% for accent lighting (€50-€200), 15% for professional installation if needed (€30-€120).
How to optimize? Start with a high-quality art print rather than an original artwork, you can always evolve.
Concrete example: our customers get excellent results with a 120x80 cm canvas print (€180) + adjustable LED spotlight (€45) + DIY installation.
🕐 How long does it take to see a real difference in the atmosphere?
Immediate impact: as soon as the installation is finished, you feel the change.
Complete integration: 2-3 weeks for your brain to integrate the new visual organization and fully measure the transformation.
Social recognition: your guests notice the difference from their first visit.
Typical testimonial: "Coming home the same evening as the installation, I felt like I was discovering a new living room - it was striking!"
🛠️ Can you create this effect without drilling holes in the walls (rental, fragile walls)?
Alternative solutions: rail system with repositionable hooks, frames placed on a deep wall shelf, or artworks on a designer easel for very large formats.
Effectiveness? The visual effect remains identical, only the fixing method changes.
Bonus advantage: you can easily change the artwork according to your tastes or when moving.
Practical tip: modern picture rail systems support up to 20 kg and are simply fixed to the ceiling with suitable anchors.
🎨 How can you be sure that the style of the artwork matches your existing decor?
Fail-safe method: take 3 photos of your living room under different lighting conditions, then compare with the artwork you're considering.
Color rule: the artwork should repeat 30% of your existing colors and bring in 70% new ones to create harmony without monotony.
Practical test: if the artwork makes you visualize new matching cushions or accessories, that’s a good sign - it energizes without shocking.
Reassuring guarantee: most online art sellers offer free returns within 14-30 days, take advantage of this to try at home.
🔍 How to adapt this method if our living room has an atypical architecture (mezzanine, skylight, etc.)?
Universal principle: look for THE wall that will be visible from the maximum number of viewpoints in your space, even if it is not facing the entrance.
Adaptation for mezzanine: choose a wall visible both from the bottom and top, even if you slightly enlarge the dimensions to compensate for the variable distance.
Skylight case: prioritize the wall perpendicular to the skylight to avoid reflections, and adjust the lighting according to natural light.
Golden rule: atypical architecture is an asset - it makes your lobby effect even more spectacular and unique!
🌟 Your living room transformed into a true exceptional space
Visualize your reality in 3 weeks: you come home every evening and feel that deep satisfaction discovering your living room.
Your new concrete reality? The space naturally exudes the sophistication you admired in grand hotels, your guests immediately notice the difference and ask for your decor advice.
Pride and confidence gained? You now master the aesthetic codes of professionals, this skill will accompany you in all your future projects.
Recognition from your entourage? "Wow, it's like we’re in a magazine!" becomes the phrase you hear regularly.
This transformation goes far beyond decoration: you have developed an expert eye that instantly analyzes spaces and their potential.
Transferable skills acquired? Mastery of proportions, understanding the impact of lighting, ability to create focal points - valuable know-how for your entire home.
Impact on your general confidence? Having created this transformation yourself develops that creative assurance that radiates into other areas of your life.
Encouraging reminder: understanding the principles was the most difficult part, you did it!
First concrete step? Measure your main wall today and note the dimensions - it's the first step towards your transformation.
Final encouragement? In 3 weeks, you will look at these tips with a smile, proud of having dared to take the step towards decorative excellence.
✨ Your success awaits you: You now have all the keys to create an exceptional living room - all that remains is to take action to reveal the hidden potential of your space. It’s within your reach, thousands of people have already succeeded in this transformation with this method. Positive vision of success? In a few weeks, your living room will have become that daily source of pride and inspiration you deserve!
🏨 Discover more secrets of hotel elegance
Enhance your expertise with our other guides on the art of creating a luxury hotel atmosphere: ambient lighting, material choices, creation of relaxation spaces...
Natural transition? Now that you master the art of focal point, discover how to harmonize all details for an even more accomplished result.