

You’ve just spent your first night in your long-awaited vacation home, and yet... a feeling of emptiness washes over you. The white walls send back a cold, almost impersonal echo that contrasts with the warm atmosphere you had imagined.
You look around: the furniture is there, so are the curtains, but it lacks that decorative soul that transforms a space into a true cocoon. Each bare wall seems to remind you that your summer refuge still looks more like a rental apartment than your personal sanctuary.
You may have already tried hanging some standard paintings from your main residence, but the result disappointed you. Either they seemed too formal for the vacation spirit, or they quickly showed signs of deterioration due to humidity and temperature variations.
Rest assured, this disappointment is not due to a lack of taste on your part. The problem lies in the fact that decorating a vacation home
By the end of this article, you will know exactly how to choose and install perfect paintings for your summer house, creating a unique atmosphere that will last for years while reflecting the relaxed spirit of your vacation.
Why does your vacation home deserve specific wall decor?
Unlike your main residence, your vacation home undergoes unique constraints that can quickly turn your decorative investment into a disaster. The alternation between periods of occupancy and abandonment, humidity variations, prolonged exposure to the sun... all challenges that your usual paintings are not ready to face. It's like planting living room flowers in a seaside garden: without adaptation, failure is guaranteed.
🏖️ Customer testimonial: "After three summers, my framed glass paintings all showed signs of mold between the glass and canvas. I had to throw everything away and start over by choosing supports adapted to the coastal climate. Now, my works cross the seasons without any problems!"
💬 Conversation with a decor expert
The summer decorating golden rule: A durable artwork well chosen instantly transforms the atmosphere of a room, creating that feeling of "home" at first glance. You will feel this difference from your next arrival, as if your house welcomed you personally.
Understanding the specific challenges of your vacation home
Do you recognize these situations? Faded traces on your old frames after a particularly sunny summer, mysterious warps on your favorite canvases, or that feeling that your artwork seems "dull" in your vacation home when they shone in your main living room.
The observations you make are not the result of chance, but a direct consequence of an environment with particular constraints. Your vacation home is not faulty: it simply obeys different physical laws than traditional decoration ignores.
Imagine your summer house as a high-level athlete: it needs equipment specifically designed for its performance, not standard material.
Intense solar exposure: the silent enemy of your paintings
Contrary to popular belief, it is not the heat that destroys your wall art, but the UV rays that pass through your windows even when closed. Most owners think that by closing the shutters, they protect their works, while in reality, they create a greenhouse effect that accelerates degradation.
It's exactly like leaving a family photo on your car's dashboard: even in the shade, it will eventually fade and warp due to concentrated temperature and humidity.
This continuous exposure explains why your colors lose intensity and why some materials crack. Fortunately, understanding this mechanism allows you to choose durable supports that will transform this constraint into a decorative asset.
🔍 Quick test: Place a piece of colored paper on your most exposed windowsill for a week. Then compare it with a part that remained in the shade: you will concretely visualize the UV impact on your future paintings.
Many imagine that closing their house hermetically protects it, but is actually creating an environment where humidity stagnates and varies abruptly. When you reopen after several weeks, the dry air meets the accumulated moisture, creating a hygrometric shock.
Think about the effect of opening a bottle of wine kept in a cellar: contact with outside air causes an immediate reaction on the contents.
This variation explains why your frames warp and why halos appear on your canvases. Anticipating this phenomenon allows you to select suitable materials that even improve with time.
Intermittent use: when absence does more harm than presence
Here's a paradox few notice: your vacation artworks suffer more during your absences than during your stays. Without air circulation or temperature regulation, they undergo extreme variations in a closed environment.
You can easily identify this phenomenon by observing whether your works seem different each time you return from vacation, or if you notice changes in texture or color after each closing period.
This alternating pattern creates permanent material stress which explains why your decorations "age" prematurely in your second home.
The 3 warning signs to watch for:
- Progressive fading: Your colors gradually fade, a sign of uncontrolled UV exposure.
- Support deformation: Warping or cracks revealing excessive hygrometric variations.
- Halo appearance: Circular traces indicating recurring condensation that has not been treated.
The trigger factor: the cumulative effect of time
What really makes a difference is that all these factors add up season after season, creating an invisible but relentless domino effect. Like a drop of water that eventually pierces stone, each opening-closing cycle weakens your works a little more until they reach the breaking point. You can recognize this cumulative effect when several problems appear simultaneously on different artworks after a few years of use.
The decorative survival rule: The longer your second home remains closed, the more resistant your materials must be. Count in terms of opening-closing cycles rather than years of use to assess the necessary durability.
| ❌ Common belief | ✅ Reality | 💡 Explanation | 🎯 Practical benefit |
|---|---|---|---|
| Sealing hermetically protects my artworks | Controlled ventilation preserves better | Stagnant air concentrates humidity | Works stable over time |
| The same materials work everywhere | Each climate requires its own adaptation | Constraints vary depending on the environment | Sustainable and profitable investment |
| More expensive means better protected | Specificity is more important than price | Technical adaptation vs prestige | Real effectiveness guaranteed |
| I can use any artwork | Only certain supports resist | Each material has its limits | Peace of mind assured |
The 3-step method for durable and elegant artworks
Now that you understand the specific challenges of your vacation home, here’s a step-by-step approach that will guide you from diagnosis to perfect execution. Like an architect building on solid foundations, we'll first secure the technical basics before focusing on aesthetics. At each stage, you will gain confidence and expertise, until you master the art of summer wall decor.
🗺️ Method overview: Step 1 - Audit and material selection (solid foundations), Step 2 - Artistic selection and harmonization (building style), Step 3 - Installation and protection (expert finishes). Each level brings you increasing satisfaction and visible results immediately.
Step 1: Technical audit and selection of suitable supports
Starting with this technical step avoids 90% of future pitfalls. It's like checking the solidity of the ground before building a house: this initial precaution guarantees the success of the entire project. Once this base is mastered, you will feel the satisfaction of a professional who knows that their work will last.
Essential resistant supports
- Canvas on aluminum frame: Recognizable by its lightness and perfect rigidity, it advantageously replaces traditional wood which works with humidity. Find them from specialized contemporary art suppliers. Check the quality by testing pressure resistance: a good aluminum canvas does not flex under moderate pressure. Avoid wood even treated because it remains sensitive to hygrometric variations.
- Prints on dibond (aluminum composite): This sandwich material offers the rigidity of aluminum with the insulation of the central polyethylene. Its principle: two sheets of aluminum frame a core insulator, creating an indeformable support. Recognize the quality by the minimum thickness of 3mm and the finish of the perfectly straight edges. The impact on your decor: colors that remain vibrant for decades.
- High resistance UV plexiglass: Transparent like glass but unbreakable, it protects your works while enhancing them. Its anti-reflective peculiarity creates a striking depth effect. Check for the “anti-UV” mention engraved on one side: this is your guarantee of protection. The visible benefit: your colors retain their original intensity even in front of the most exposed windows.
Now, let's move on to concrete implementation
How to proceed without risk of error
Measure the exposure of each wall: Use a mobile UV measurement application (like free "UV Index") to quantify the actual exposure of each planned location. This step avoids approximations: one wall can receive 3 times more UV than another in the same room. Record measurements at different times of the day and note peak exposures. Do not rely on your impressions: the human eye does not perceive UV.
⏱️ Time: 15 minutes per room | ✅ Successful when: You have a measured record for each wall | ⚠️ Attention: Do not measure on a cloudy day - UV rays pass through clouds but not evenly
Test ambient humidity: Place a hygrometer in each room for a full week, noting daily/nightly variations. The goal is to identify discrepancies: beyond 20% variation, your standard materials will warp. This measurement precisely indicates which supports to choose according to the actual constraints of each space. A digital hygrometer with memory costs less than €20 and saves you hundreds of euros in avoided errors.
⏱️ Time: 5 minutes installation, 1 week measurement | ✅ Successful when: You know the hygrometric amplitude of each room | ⚠️ Attention: Measure windows closed AND open to have both extremes
Calculate admissible wall load: Test the solidity of your walls by pushing a pin in: if it goes in easily, prefer fixings distributed over several points. For plasterboard walls, limit yourself to 15kg per square meter without reinforcement. This prior check avoids falling artworks and costly repairs. Photograph your tests to memorize solid areas.
⏱️ Time: 10 minutes per wall | ✅ Successful when: You know the load capacity of each location | ⚠️ Attention: Do not confuse punctual resistance and weight distribution - a nail can hold 5kg, but not necessarily distributed over a large area
🎯 Step 1 Validation: You now have a "technical passport" for your house: UV exposure, humidity variations, and load capacity of each wall. If some measurements surprise you, that's normal - you are discovering the technical personality of your space. In case of doubt about a measurement, repeat it at another time: the accuracy of this step conditions the success of the entire project.
OUR RECOMMENDED PRODUCTS
Step 2: Artistic Selection and Decorative Harmonization
Now that your technical constraints are no longer a secret to you, you can focus on creative pleasure with complete serenity. This step is even more rewarding because you know that your aesthetic choices will be based on solid foundations. The snowball effect begins here: each selected artwork inspires and enhances the following ones, creating a natural decorative coherence.
Artistic selection criteria adapted
- Summer color palette: Favor tones that intensify with natural light - deep blues, emerald greens, warm ochres. These colors are more resistant to UV fading and create a soothing atmosphere even in high heat. Check the color stability by requesting "lightfast" certification: this is your anti-fading guarantee. The pastel alternative ages poorly under intense sun exposure.
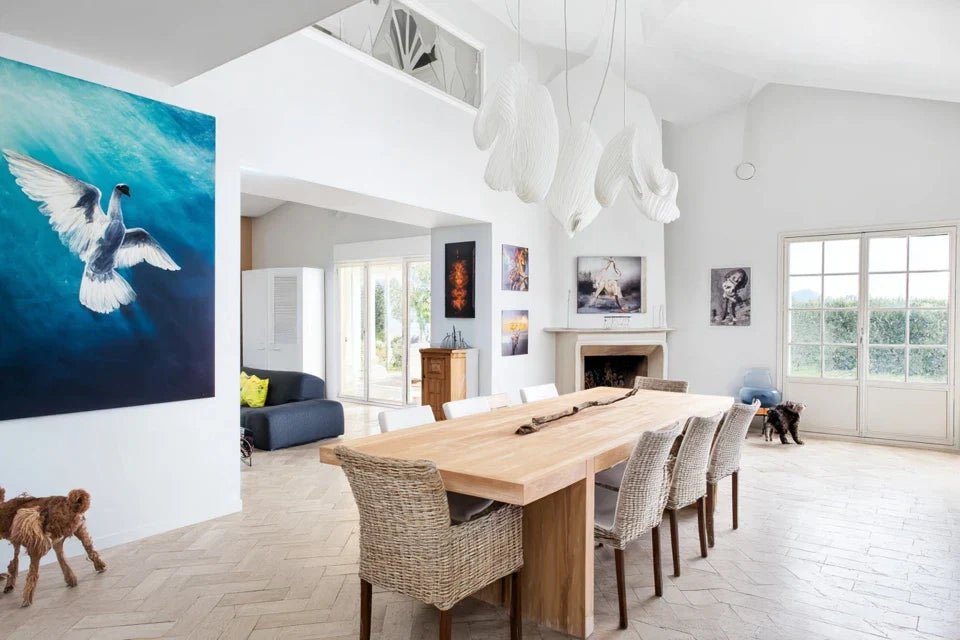
- Evocative themes without clichés: Opt for subjects that evoke relaxation without falling into seaside caricatures. Abstract landscapes, natural textures, soothing geometric compositions create a sophisticated ambiance. Recognize a good composition by its ability to suggest rather than explicitly show. The decorative impact: timeless elegance that transcends trends. Formats adapted to vacation spaces: Large formats (minimum 80x60cm) structure the space and compensate for the "dilution" effect of the often generous volumes of vacation homes. They create powerful focal points that unify the decoration. The quality criterion: a large format must remain legible and impactful even when viewed from afar, from the entrance to the room.
- Distributed fixing system: Discreet rails with adjustable hooks that distribute the weight across the entire width of the wall. Identifiable by their thin metal profile and high load capacity (up to 30kg per meter). Find them at museum exhibition hardware suppliers. Quality criterion: corrosion resistance certified for humid environments. Avoid point fixings which concentrate stresses.
- LED lighting dedicated to artworks: Adjustable color temperature spotlights (3000-4000K) with integrated UV filters. Their principle: reveal colors without altering them, even in continuous exposure. Recognize professional quality by the color rendering index greater than 90 (CRI>90). Decorative impact: your works keep their natural brightness even in the evening or on cloudy days.
- Invisible anti-UV protection: Transparent film applied to the windows that filters 99% of harmful rays without altering brightness. Discreet installation and maximum effectiveness for a minimum of 10 years. Check for "museum grade conservation" certification: this is the reference used by major museums. Concrete benefit: equivalent protection to closed shutters with the brightness of open shutters.
- 🚫 Underestimating actual UV exposure: Many choose their materials based on apparent exposure rather than measured. A "shaded" wall can receive reflected UV from a pool or a bright terrace. Consequence: rapid discoloration and premature replacement. Solution: always use a UV meter to quantify the actual exposure. This error affects 70% of beginners, but it is easily avoidable with the right tools. 💸 Saving on fixings: The temptation to reuse standard nails or dowels to support quality artworks. Result: falling works and wall damage. Investing €30 in a professional fixing system protects hundreds of euros worth of artwork. It's the cheapest economy in the end! 🌡️ Ignoring thermal variations: Installing artworks during temperate periods without anticipating summer extremes. Materials expand and contract, creating irreversible deformations. Carry out your installations in high heat to anticipate maximum movements. This precaution avoids 90% of deformation problems. 🎨 Copying a decoration you like elsewhere: Reproducing an atmosphere seen in a magazine or at friends' houses exactly, without adapting it to the specifics of your space. Each vacation home has its own unique personality. Get inspired but always personalize according to your technical constraints and tastes. Perfect imitation often leads to disappointment.
- ⏰ Rushing final choices: Buying impulsively on a whim without testing the integration into the space. A magnificent work in a gallery may be unsuitable for your ambiance. Always use the recommended 48h test period in the method. Initial patience avoids lasting regrets and additional expenses.
Infallible selection method
Create a physical mood board: Gather color samples, ambiance photos and existing decorative elements on a large panel. This tangible visualization reveals harmonies invisible on screen and avoids proportion errors. Work in natural light to anticipate the real effect in your space. The goal: create a chromatic consistency that unifies your entire wall decor.
⏱️ Time: 45 minutes | ✅ Successful when: Your eye immediately identifies the overall harmony | ⚠️ Attention: Do not rely on colors on screen - they vary depending on your monitor settings
Test emotional impact: Display a test print of your selection for 48 hours in the intended space, then note your feelings at different times of the day. A successful work maintains its emotional impact even after several days of exposure. This step naturally filters fleeting crushes from lasting choices. Photograph the result under different lighting to memorize variations in atmosphere.
⏱️ Time: 2 days observation | ✅ Successful when: The artwork continues to move you after 48 hours | ⚠️ Attention: Distinguish fatigue (normal) from emotional rejection (eliminatory)
Validate proportions in situ: Delimit the exact dimensions of each painting on the floor with masking tape, then step back to judge the visual balance. This step reveals imbalances invisible on plan and optimizes the decorative impact. Adjust sizes if necessary: it is better for a painting to be slightly larger than an ensemble that lacks presence. Take photos to memorize the effect of each tested configuration.
⏱️ Time: 20 minutes per setup | ✅ Successful when: The visual balance satisfies you from all viewing angles | ⚠️ Attention: Test the effect from the entrance of the room, not just facing the wall
✨ Validation of step 2: Your selection now forms a coherent ensemble that dialogues with your space and emotions. Each work has its reason for being and contributes to the overall atmosphere. If a piece leaves you indifferent after testing, replace it: indifference is the enemy of successful decoration. You are ready for technical finalization.
Step 3: Professional installation and optimal protection
This final step transforms your technical expertise and aesthetic sense into a concrete and lasting achievement. You reach here the level of mastery that makes the difference between an enlightened amateur and a true connoisseur. The final result will exceed your initial expectations: not only will your tableaux resist perfectly to the constraints of your second home, but they will create that unique atmosphere you will be proud of for years.
Professional installation material
Optimized installation sequence
Install the fixing system: Trace the exact location of the rail using a laser level, then fix it with dowels suitable for your wall type (plasterboard, concrete, stone). This initial precision guarantees perfect alignment of your works. Check horizontality at each fixing point: a 2mm deviation is immediately visible on a large format. Test the solidity by suspending an equivalent weight before final installation.
⏱️ Time: 30 minutes per rail | ✅ Successful when: The rail supports the test weight without flexing | ⚠️ Caution: Mark electrical cable locations before drilling - a severed cable is expensive to repair
Adjust dedicated lighting: Position each spotlight at 30° from the normal of the artwork to avoid reflections, then adjust the intensity to reveal details without creating cast shadows. Successful lighting is that which seems natural: you notice the work, not the light source. Test different color temperatures to find the one that best enhances your color palette. Photograph each setting to memorize the optimal configurations.
⏱️ Time: 15 minutes per spotlight | ✅ Successful when: The artwork is evenly illuminated without shadow areas | ⚠️ Caution: Avoid direct lighting on shiny surfaces - this creates dazzling reflections
Optimize climate protection: Apply the anti-UV film to the most exposed windows, starting with the corners to avoid air bubbles. This invisible protection multiplies the lifespan of your colors by 10. Complement this with strategic placement: never a painting directly facing a window, but slightly offset to capture light without direct exposure. Create gentle airflow with ceiling fans set to minimum.
⏱️ Time: 20 minutes per window + 10 minutes per artwork | ✅ Successful when: No artwork receives direct sunlight at any time of day | ⚠️ Caution: Test for indirect light reflections - they can be as harmful as direct exposure
🏆 Final validation: Your installation now combines sophisticated aesthetics and optimal technical protection. Each artwork is perfectly highlighted and secured for years of visual enjoyment. Document your achievement with detailed photos: this will serve as a reference to reproduce the same level of quality in other spaces. Your guests will immediately notice the professional difference in your wall decor.
Expert progression rule: Master one step perfectly before moving on to the next. Objective criteria: technical measurements validated for step 1, emotionally stable selection for step 2, technically flawless installation for step 3. Initial patience guarantees final excellence.
Congratulations! You now master the subtleties that only professional decorators know. This expertise gives you a decisive advantage: creating vacation interiors that impress with their sophistication and durability, while perfectly reflecting your personality.
🎨 Professional decorator's tip: Create a "technical file" of your home with photos, measurements and specifications for each installation. This documentation will allow you to easily reproduce the same level of quality in other rooms and effectively advise your loved ones. It is your "secret recipe" for repeatable successes.
💭 Frequent question from our readers
Your concern is perfectly legitimate and even reassuring: it shows that you have high quality requirements! The truth is that the artistic eye develops with practice, and our structured method guides you precisely to avoid beginner mistakes. Start with works that personally move you rather than what should please according to trends: your personal sensitivity is your best guide. The technical expertise you have acquired already gives you a head start on 90% of art buyers.
🔍 Immediate practical advice: Test your instinct by visiting a gallery or art fair: mentally note the works that spontaneously mark you, then analyze their common points. You will discover your natural "artistic signature", much more reliable than all theoretical advice.
The 5 costly mistakes to absolutely avoid
After supporting hundreds of homeowners in their summer decoration projects, I have identified the recurring pitfalls that turn a decorative dream into a budgetary nightmare. These errors are so common that they seem inevitable, but knowing them allows you to easily avoid them.
🛡️ Your safety checklist before purchase: Verify certified UV resistance, test chromatic harmony in situ, confirm the load-bearing capacity of the intended wall, and validate the emotional impact after 48h exposure. Warning signs: abnormally low price (beware of quality), pushy seller (give yourself time to think), absence of material warranty (prioritize certifications), and unverifiable technical promises (ask for proof).
🎁 Special readers offer
Because you took the time to inform yourself, enjoy 10% discount on your first order:
⏰ Valid for 72h after reading • Applicable to all our products
Frequently asked questions about summer wall decoration
Allow between €800 and €2000 depending on the desired level of finish: €200-300 per room for quality decoration with resistant works and professional fixing system. Optimize by starting with the main rooms (living room, master bedroom) then gradually extending. Concrete example: a 25m² living room requires 2-3 medium/large format artworks, or €400-600 all included with installation.
Complete installation takes 2-3 days spread over several weeks: 1 day for technical audit and measurements, 1 week of reflection for artistic selection, then 1-2 days for proper installation. Don't rush the steps: each maturation phase improves the final result. Initial patience saves you years of satisfaction.
90% of installations can be done by a confident DIYer with the right tools. Hire a professional only for old stone walls, electrical lighting installations, or artworks of very high value (>€2000). Our method guides you precisely to avoid common technical errors. Professional budget if needed: €150-300 depending on complexity.
Each environment has its specificities: seaside (attention to salt and extreme humidity - prioritize anti-corrosion treated supports), mountains (significant temperature variations - use materials with compensated expansion), countryside (intense UV rays and pollen - opt for smooth surfaces that are easy to clean). Adapt the measurements of our technical audit according to your specific context.
Minimal but essential maintenance: gentle cleaning twice a year with a slightly damp microfiber cloth, annual inspection of fixings (tighten if necessary), and visual check of UV protection. Maintenance budget: less than €50/year for a complete installation. This preventive regularity avoids costly repairs and preserves the value of your artistic investments.
Your decorative transformation: from frustration to pride
In a few weeks, when you push the door of your vacation home, you will feel that magical sensation that comes with a perfectly harmonious space. Your walls, once bare and cold, will now tell your personal story through carefully chosen artworks and perfectly preserved. Your guests will immediately notice this discreet sophistication that transforms a simple vacation home into a true artistic refuge.
This transformation goes far beyond the mere decorative aspect: you have developed technical expertise that will serve you for all your future development projects. Your ability to analyze a space, anticipate its constraints and adapt sustainable solutions gives you new confidence in all your decoration choices. This skill is transferable and will accompany you in each of your future creative projects.
The best thing about this success is that you built it step by step, with method and patience. Now, your first move will be to identify the wall that inspires you most, then apply our technical audit method. Start today: every day of delay deprives you of a day of visual pleasure in your summer sanctuary.
🌟 Your new expertise awaits you: You now have all the tools to create the summer wall decoration of your dreams, one that will last for years while inspiring you every day. Your vacation home can become as early as this weekend the perfect reflection of your artistic personality.


