Composez votre galerie d'art

Des tableaux qui racontent votre histoire
Code d'initiation
ART10
10% offerts sur votre première acquisition
Découvrir la collection

How to integrate a wall art into a high-end interior architecture project?

Comment intégrer un tableau mural dans un projet d’architecture intérieure haut de gamme ?
⏱️ Reading time: 8 minutes

You've just finished renovating your living room, everything is perfect: the designer lighting, the noble materials, the impeccable layout... Yet, something feels off. This sensation that your interior lacks soul, this impression that it still resembles a store display rather than a true home.

You stand there, facing that empty wall mocking you, knowing that something exceptional should be there, something that reveals your personality and enhances the entire space. The frustration of seeing an ambitious decor project remain unfinished, like a symphony without its final note.

You've probably already tried hanging some frames or reproductions. But the result disappoints: either too discreet and lost in the decor, or too loud and out of place in your refined world. Advisors talk to you about "harmonization rules" that stifled your creativity.

That's normal! The problem isn't your artistic taste. The real difficulty is that no one has explained to you how to integrate wall art as a true architectural element, not just as a finishing touch decor accessory.

By the end of this article, you will know exactly how to transform your wall into an exceptional architectural focal point, with a proven method that makes your painting the heart of your high-end interior.

Why will your decor project remain unfinished without this revelation?

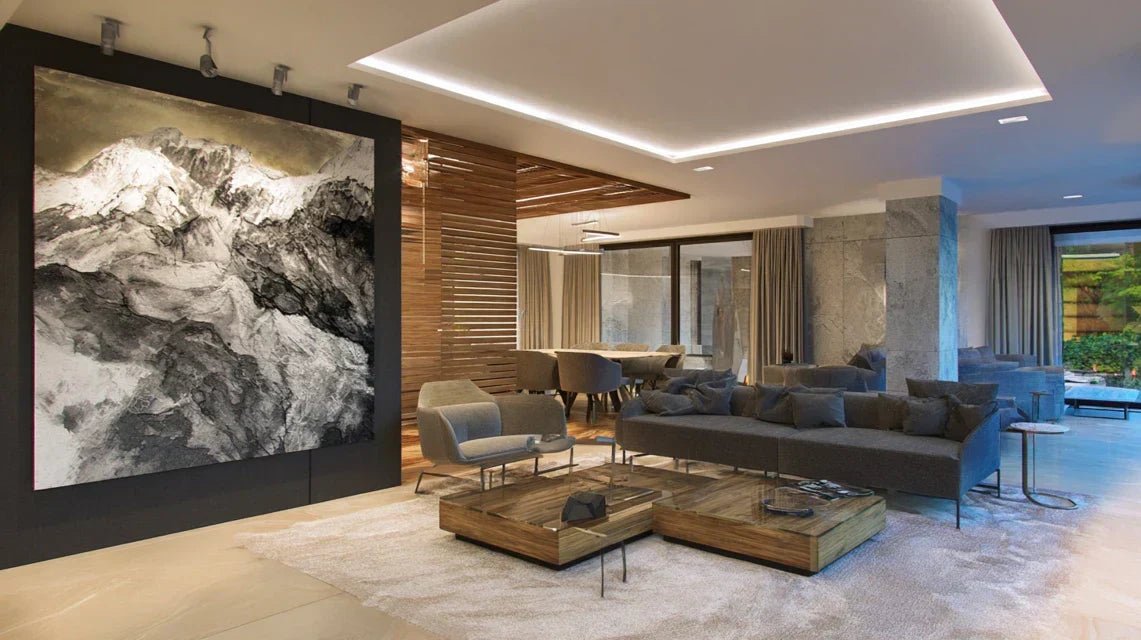
Wall art is not a decorative addition; it's the revealer of all your interior architecture. Imagine a Michelin-starred chef preparing a refined dish but forgetting the final seasoning: impeccable technique, but magic absent. Without this mastered artistic dimension, your interior remains an empty shell, however luxurious it may be.

🏠 Interior architect's testimony: "Caroline, a Parisian architect, had invested €80,000 in renovating her duplex. Exceptional materials, designer furniture... Yet, during her receptions, she noticed that guests never lingered in the main living room. They naturally migrated to the kitchen, which was more convivial. There was a lack of a strong work that would give soul to the space. After installing a custom-made contemporary triptych, the atmosphere transformed: her living room became the heart of her evenings."

💬 Conversation with a decor expert

"I'm afraid my new painting won't match if I change my wall color..."
Relax! It’s exactly the opposite. A true artistic crush adapts and even reveals itself with new colors. It's like a diamond that shines differently depending on the lighting!
"But I was told you always had to match colors..."
Who told you that? Modern decor plays with subtle contrasts. A painting in warm tones on a cool wall is like a fireplace in a blue room: magical!

Fundamental principle: wall art precedes decoration, it doesn’t follow: When you artistically integrate from the design stage, your artwork becomes the unifying element that brings together colors, textures and volumes. The result? A coherent and personal interior visible within the first 30 seconds.

What really happens when your decor "rings false"

Do you recognize yourself? Your gaze avoids certain areas of your living room, you feel a discomfort without knowing why, or worse: your guests politely compliment your decoration but remain strangely distant in the space.

It's not a matter of taste or budget. Your brain instinctively detects an architectural imbalance: too many neutral surfaces without a focal point, or conversely, too many elements competing for attention. It’s like listening to an orchestra where each musician plays their part without a conductor.

Imagine your gaze as a visitor entering your living room: it naturally seeks where to rest, where to find meaning and emotion. Without a strong visual guide, it flits around and leaves disappointed.

First hidden cause: you decorate instead of architecting

Contrary to what one might think, a successful interior is not built by accumulating beautiful elements, but by creating an architectural dialogue. What’s the difference? Accumulation juxtaposes, architecture composes.

It's like the difference between collecting beautiful words and writing a poem: words can be magnificent individually, but without poetic structure, there is no emotion.

This fragmented approach explains why your living room may seem like a “store catalog” despite quality pieces. Your next reflection will no longer be "what object to add?" but "what emotion to create?"

🔍 Revealing test: Photograph your living room with your phone. Where does your eye settle first? If it hesitates or disperses, you confirm the diagnosis: a strong artistic focal point is missing.

Second hidden cause: you are subjected to the tyranny of "decor rules"

You’ve been told that you need to “harmonize colors” and “respect classic proportions”. Result: you stifle your artistic instinct for fear of "doing it wrong". It's exactly like learning to dance by counting each step instead of feeling the music.

The truth? The most beautiful interiors are born from mastered creative tensions, not from the mechanical application of decorative codes. A bold contemporary artwork in a classic living room can create extraordinary visual electricity.

This self-censorship explains why your spaces lack personality. By seeking aesthetic security, you obtain decorative blandness. Your new approach will prioritize authentic emotion over reassuring conformity.

Third hidden cause: you neglect the multiplier effect of lighting

Meven the most beautiful painting in the world can go unnoticed with inadequate lighting. It's the invisible factor that transforms an ordinary work into a revelation or sabotages a masterpiece. Like a diamond that appears dull under neon but explodes under adapted light.

Observe your space at different times: morning, afternoon, evening. Does your current lighting reveal or mask the nuances of your decor? Most standard lighting "flattens" art instead of sublimating it.

This neglect explains why your living room changes dramatically depending on the time of day. Lighting designed for art transforms your daily life by creating a constantly inspiring atmosphere.

3 signs that your interior is waiting for its artistic revealer:

  • The avoiding gaze syndrome: Your eyes naturally avoid certain areas of your living room, a sign of an architectural void that your brain perceives as uncomfortable
  • The cold showcase effect: Your guests admire but don't settle in for long, revealing a lack of humanity and emotional warmth in the space
  • Premature boredom: You are already bored with your recent decor, proof that it does not sufficiently nourish your imagination on a daily basis

The trigger element: the rule of emotional proportions

Your painting should occupy between 15 and 25% of your main wall to create the desired architectural impact. Below, it becomes an accessory; above, it overwhelms. It's the visual domino effect: this proportion triggers a natural hierarchy that guides the eye and structures the space. You can immediately check by outlining this area with your hands: it should seem "right" instinctively.

Golden rule of artistic integration: Your painting does not decorate your space, it reveals it. Choose it for the emotion it evokes in you, not for its perfect match with what already exists - harmony will follow naturally.

❌ Classic decorative approach ✅ Architectural integration 💡 Why it changes everything 🎯 Immediate benefit
I choose according to my existing colors I choose according to my emotional favorite Emotion naturally guides towards harmony Living interior that resembles you
I respect all the rules of proportion I create controlled visual tensions Personality is born from character, not conformity Memorable and unique space
I finalize with art last I design around the artistic focal point Art structures the space instead of being subjected to it Natural architectural coherence
I illuminate the entire room evenly I sculpt light to reveal art Lighting becomes an atmosphere creator Professional and inspiring atmosphere

The 3-step method to transform your wall into an architectural focal point

Rest assured, this transformation requires neither heavy work nor advanced technical skills. It's like learning a new language: daunting at first, natural once the basics are understood. We will proceed as an architect: first the structure, then the details, and finally the finishing touches. At the end, you will master the art of making space and emotion dialogue.

🗺️ Your transformation journey: Step 1 - Architectural reading of your space (you understand the lines of force), Step 2 - Artistic selection and positioning (you create the focal point), Step 3 - Lighting orchestration and finishing touches (you reveal the magic). Each step brings you closer to that feeling of "home" that you are looking for.

Step 1: Decipher the architectural DNA of your space

Before choosing your artwork, you must understand the secret language of your room. It's like learning to read a musical score before playing a piece. This "spatial diagnosis" phase avoids costly mistakes and gives you the keys to making the right choices. Once completed, you will see your living room with new eyes, those of a true connoisseur.

🔧 Your spatial diagnostic tools

  • A quality measuring tape (minimum 5m): Don't underestimate this tool! An accurate meter avoids proportion errors that kill harmony. Choose a model with legible markings and secure locking - invest in quality rather than a budget option that will distort your measurements. A 5cm error can ruin the entire visual balance.
  • A photo framing app on smartphone: Your eye gets used to your decor and loses objectivity. The camera reveals invisible imbalances in everyday life. Use square mode to isolate areas, black and white to analyze volumes. This artificial distance highlights the strengths and weaknesses of your current composition.
  • A notebook dedicated to your project: Note your observations, sketches, emotions felt according to the hours. This creative journal becomes your personal GPS to navigate towards the perfect solution. It captures the details that will make the difference between a correct result and an exceptional result.

Now, let's get started with method and precision

🎯 The diagnostic sequence in 3 movements

Map the lines of force: Stand in the center of your room and slowly turn around. Identify the elements that naturally "draw" your gaze: windows, fireplace, imposing furniture. These magnetic points reveal the emotional geometry of your space. Your future artwork should dialogue with them, not compete with them.

⏱️ Time: 15 minutes | ✅ Successful when: You clearly identify 2-3 dominant elements | ⚠️ Attention: Don't confuse "big" and "strong" - a small object well placed can dominate visually over a poorly positioned large piece of furniture

Analyze light flow: Observe the natural light in your room at 3 key times: 10am (active light), 3pm (zenithal light), and 7pm (transition to artificial). Note areas of shadow and brightness. Your artwork will benefit from being positioned where the light is stable and flattering, avoiding backlighting that creates reflections.

⏱️ Time: 1 day of observation | ✅ Success when: You identify THE ideally lit area | ⚠️ Attention: Morning light can be misleading - prioritize afternoon and evening lighting for your analyses

Measure critical proportions: Record ceiling height, width of the main wall, distances between fixed elements. Calculate the optimal impact area for your artwork (15-25% of the wall surface). These technical data guarantee visual balance. A proportion error is the first cause of failure in artistic integration.

⏱️ Time: 30 minutes | ✅ Success when: You have a precisely measured sketch | ⚠️ Attention: Don't forget to measure taking into account baseboards and moldings which alter visual proportions

✓ Validate your diagnosis: You must be able to explain in 3 sentences why this wall is THE right choice, at what exact height to position your artwork and what type of lighting will be necessary. If you are still hesitating, repeat the observation - it's better to lose 1 hour now than to regret it for years. You are ready to choose your work with full knowledge.

OUR RECOMMENDED PRODUCTS

Step 2: Select and position your artistic focal point

Armed with your spatial diagnosis, you are now moving to the heart of the creative process. This is where the magic happens: transforming your technical discoveries into inspired artistic choices. This step is the most rewarding because you feel your vision taking shape. The snowball effect begins: each decision illuminates the next.

🎨 Your criteria for artistic selection

  • Personal emotion above all else: Your artwork must provoke a visceral positive reaction with every glance. Test it: when facing the work, do you feel that slight acceleration of your heart, that desire to get closer? It's this shiver that will transform your daily life. Ignore external advice on "what is done" - your authentic emotion guides you to the right choice.
  • Scale consistency with your diagnosis: Scrupulously respect your proportion calculations (15-25% of the wall). A painting too small gets lost, too large overwhelms. This mathematical rule guarantees the desired visual impact. Visualize by cutting out a cardboard to the correct dimensions and positioning it - the effect should seem "obvious".
  • The quality of materials and finishes: In a high-end interior, every detail counts. Prioritize noble supports (canvas, metal, wood), durable pigments, discreet but solid frames or hanging systems. Quality is immediately felt and enhances your entire decor.

🎪 The art of optimal positioning

Determine the ideal height: The center of your artwork should be between 1.45m and 1.60m from the floor (eye level according to your height). This universal rule guarantees visual comfort. Adjust according to your furniture: above a sofa, leave 15-20cm of space to avoid an "overwhelmed" effect. Mark with pencil before drilling.

⏱️ Time: 10 minutes | ✅ Successful when: The height seems natural even without thinking | ⚠️ Attention: High ceilings tempt you to raise the artwork - resist, always prioritize human eye comfort

Create horizontal balance: Center your artwork on the wall OR deliberately create an asymmetrical balanced offset with another element (lamp, plant, sculpture). Mastered asymmetry is more dynamic than perfect symmetry. Use the photographic rule of thirds: position your work on a line of force, not necessarily in the geometric center.

⏱️ Time: 20 minutes of tests | ✅ Successful when: The whole seems visually "stable" | ⚠️ Attention: Asymmetry only works if it appears intentional, not accidental

Test interaction with existing lighting: Turn on all your lights and observe the reflections, shadows, color variations on your artwork. Adjust the angle if necessary to avoid annoying reflections. A poorly lit painting loses 70% of its impact. This step determines whether you will need to supplement it with dedicated lighting.

⏱️ Time: 15 minutes at different times | ✅ Successful when: The artwork remains legible and attractive in all circumstances | ⚠️ Attention: Cool white LEDs can distort the warm colors of some artworks

Validation of your positioning: Your artwork should create a "visual magnet effect": impossible to enter the room without noticing it, but without attacking or tiring the eye. Test by inviting someone: their gaze should naturally be directed towards your work within the first 5 seconds. Mission accomplished, you move on to the final revelation.

Step 3: Orchestrate luminous revelation and finishes

You are touching the peak of decorative art: making your painting the luminous orchestra conductor of your space. This step distinguishes the enlightened amateur from the true connoisseur. Here, every detail contributes to overall excellence. The final result will give you that deep pride in mastering a subtle art that few people truly understand.

💡 Your arsenal of luminous revelation

  • High-quality adjustable LED spotlights: Prioritize models with adjustable color temperature (2700K-4000K) and variable intensity. Investing in high-end LEDs literally transforms your artwork. Avoid harsh frontal lighting - prefer a 30° angle to create relief and avoid reflections. The difference with standard lighting is immediately noticeable.
  • Connected dimmers: The ability to modulate the lighting according to the time of day and mood multiplies the impact of your installation. Your painting becomes alive, subtly changing expression. Choose models compatible with your LEDs to avoid flickering. This technology transforms your living room into a private, adaptable gallery.
  • Discreet finishing accessories: Cable concealers, invisible supports, museum-quality hanging systems. These invisible details guarantee a clean and durable installation. In a high-end interior, no compromises are acceptable on the finish - every element must appear naturally integrated from the beginning.

    ✨ The final reveal sequence

    Install dedicated lighting: Position your spotlights 1-1.5m away from the painting, with a downward angle of 30°. This geometry creates optimal museum lighting: revealing textures without dazzling the viewer. Test the intensity until you achieve this "window of light" effect where your artwork seems to illuminate from within. It's the signature of exceptional interiors.

    ⏱️ Time: 2-3 hours installation | ✅ Successful when: The lighting appears natural, never artificial | ⚠️ Attention: Lighting that is too powerful fatigues the eye and creates harsh contrasts - subtlety is more important than intensity

    Program light ambiances: Create 3 scenarios: "day" (discreet complementary lighting), "evening" (artistic enhancement), "reception" (spectacular lighting). This programming makes your living room an evolving space that adapts to your uses. Your painting becomes the lighting director of all your social activities.

    ⏱️ Time: 1 hour settings | ✅ Successful when: Each ambiance transforms the atmosphere remarkably | ⚠️ Attention: Transitions must be gradual - avoid abrupt changes that break harmony

    Perfect architectural integration: Hide all technical elements (wires, transformers, fixings). Adjust the last details: perfect inclination of the painting, alignment with surrounding elements, final cleaning of fingerprints or dust. This impeccable finish signifies the excellence of your achievement - your installation must appear "to have always been there".

    ⏱️ Time: 45 minutes finishing | ✅ Successful when: No technical details are visible or unsightly | ⚠️ Attention: Cheap adhesive cable concealers yellow and peel off - invest in permanent solutions

    ✓ Final mastery check: Turn off all lighting and then gradually turn it back on. Your artwork should reveal itself naturally, creating that controlled "theater" effect. If the result gives you a little feeling of pride each time, congratulations: you have mastered the art of high-end artistic integration.

    Law of progression for master decorators: You can move on to a more ambitious project when your current installation still gives you pleasure after 3 months of daily use and spontaneously elicits admiring questions from your guests. The constancy of emotion signifies lasting success.

You have just crossed the threshold that separates the amateur from the expert in interior architecture. These subtleties of lighting and finishing immediately distinguish exceptional interiors from simple "beautiful decorations". Your mastery now gives you a considerable advantage for all your future artistic projects.

🎭 Secret of an experienced decorator: Create a signature lighting scheme unique to your style by playing with color temperature. 2700K for a prestigious, cozy atmosphere, 3000K for contemporary dynamism, 3500K for museum sophistication. This luminous signature becomes your recognizable artistic touch - your guests will feel your universe without being able to explain it rationally.

💭 "What if my artwork doesn't please everyone?"

"I'm afraid of making a choice that is too personal and will displease my guests or future buyers..."

This concern reveals a natural generosity but can lead you to decorative blandness. A memorable interior embraces its personality: it may not universally please, but it marks the minds. Think of the most beautiful places you have visited - they all had an affirmed character, not a consensual neutrality. Your artistic courage will be rewarded by this profound satisfaction of living in a space that truly resembles you.

🎯 Social validation technique: Present your project (photo of the artwork + description of the location) to 3 trusted people with good taste. If 2 out of 3 understand your vision even without fully approving it, your choice is validated. True art divides by nature - that's its strength.

The 5 mistakes that sabotage even the most beautiful projects

Attention, these traps lie in wait for even experienced decorators. Identifying them now saves you costly disappointments and lasting regrets. These errors are tempting because they seem logical, but they systematically ruin the sought-after harmony.

  • ⚡ Giving in to the immediacy of "pretty": You come across a painting that you like and buy it without spatial reflection. It's human! But an artistic crush without architectural analysis often becomes a disappointment installed. Isolated beauty does not guarantee successful integration. Always keep your measurements and photos with you before any impulsive purchase.
  • 📏 Underestimating the impact of proportions: "It looked bigger in the store!" This betrays mistake number 1 for amateurs. A painting that is too small gets lost, too large overwhelms. Always visualize at home with a cardboard cutout of the correct dimensions before investing. Your eyes will adapt to the actual size, not the other way around.
  • 💡 Neglecting lighting until the end: Installing the painting first and then "seeing about lighting" often leads to unsightly technical compromises. Lighting should be designed at the same time as positioning, not after. This simultaneous planning avoids exposed cables and optimizes visual impact from installation.
  • 🎨 Wanting to harmonize at all costs: Matching colors and styles in a "decor catalog" logic produces predictable and flat interiors. True art creates stimulating creative tensions. A painting with complementary colors (opposite on the color wheel) can reveal your decor better than a safe tone-on-tone.
  • ⏰ Rushing the final installation: The excitement of the project pushes you to rush the finishing touches. Visible cables, approximate fixings, neglected cleaning... These details spoil months of reflection. Allow an extra 20% of time to perfect each detail - excellence lies in these ultimate attentions.

🛡️ Your anti-error checklist before installation: Check that your painting still evokes a positive emotion after 48 hours of reflection, that its dimensions respect the 15-25% rule, that lighting is planned and that you have complete finishing hardware. Watch out for these warning signs: haste, "temporary" technical compromises, or rationalizations of an emotionally lukewarm choice.

🎨 Discover all our wall art collections

🎁 Special reader offer

Because you took the time to inform yourself, enjoy 10% discount on your first order:

ART10

⏰ Valid 72h after reading • Applicable to all our products

🤔 Your expert questions in interior architecture

💰 "What budget should I allocate for a truly professional result?"

Allow 15-25% of your total decoration budget for wall art and its dedicated lighting. Specifically: €800-€2000 for an exceptional artwork + €300-€600 for quality lighting in a high-end living room. Optimize by prioritizing the quality of the work over quantity - one strong painting always surpasses three average pieces. The example of Emma, a Lyon architect: €1500 invested in a contemporary artwork transformed her 40m² living room into a spectacular showcase.

⏱️ "How long before I see the real difference in my daily life?"

The visual impact is immediate, but emotional appropriation takes 2-3 weeks. Your brain gradually integrates this new "visual anchor" until it becomes essential to your spatial well-being. Be patient with your initial reactions - even a perfect choice can be surprising in the first few days as it changes your visual habits.

🔧 "Can I install it without professional help?"
Absolutely! 80% of the work involves reflection and positioning, not pure technique. Only electrical lighting may require an electrician depending on your existing installation. For hanging, prioritize chemical anchors for heavy supports - a safe investment of €15 that avoids disasters. Modern museum-style mounting systems greatly simplify installation.

🎨 "How do I know if my artistic choice will withstand trends?"
Trust the "test of lasting emotion": your painting should give you that little heart flutter even after 10 viewings. Authentic art transcends eras because it touches the universal human, not fleeting trends. Avoid works too closely linked to a specific decorative fashion - prioritize sincere artistic expression over temporary decorative effect. Your emotional instinct guides you better than trend magazines.

🏠 "Does this method work in all interior styles?"
Yes, because it is based on universal architectural principles: proportion, lighting, focal point. A loft industrial as a classic apartment benefits from the same logic of artistic integration. Only the aesthetic codes change (contemporary metal artwork for the loft, framed classical painting for the Haussmannian style), but the method remains identical. Emotional architecture transcends decorative styles.

🏆 Your transformation into an architect of emotion

In a few weeks, you enter your home and immediately feel that sense of accomplishment. Your gaze naturally rests on your artwork, a daily source of inspiration and pride. Your guests immediately notice this "particular atmosphere" without being able to explain it - it's your decorative signature at work. This mastery of wall art definitively sets you apart from amateurs.

Beyond decoration, you have developed an architectural eye that will transform all your future projects. This ability to "read" space, anticipate visual effects and orchestrate emotions becomes your creative superpower. You now look at every interior with this newly acquired expertise, instantly spotting the successes and weaknesses of the arrangements.

Understanding was indeed the biggest challenge - now that you have mastered the principles, action becomes natural. Start today by photographing your space from different angles, then measure your main wall. This first step makes your project concrete and triggers creative momentum. Your future exceptional interior awaits!

🌟 Your new expert status: You now have the keys to transform any space into a habitable work of art. This rare skill will stay with you for life and inspire those around you. Decorative excellence is no longer a mystery to you - it becomes your new normal.

Read more

Travailler avec un architecte d’intérieur : quand et comment choisir les tableaux