

You're looking at your wall art with that pit in your stomach telling you, "What if I damage them during the move?" This fear paralyzes you to the point of postponing installation in your new temporary home.
You already visualize the chipped corners, torn canvases, or worse, that wall artwork that means so much to you shattering into a thousand pieces on the stairs. The smell of damp cardboard, the sound of objects clashing in poorly protected boxes.
You may have already tried wrapping your artworks in old newspapers or plastic bags, but this makeshift protection leaves you with a bitter taste. You know that it's not enough for your art pieces which deserve better.
It’s normal to have these apprehensions! Most of the protection techniques found online are designed for permanent moves, not for the reality of short-term rentals where every gesture counts and storage space is limited.
By the end of this article, you will know exactly how to protect your paintings like a professional, even on a student budget, and you can visualize your artworks proudly adorning the walls of your new shared accommodation from day one.
Why are your paintings more fragile than you think?
Now is the crucial time to act before your next move. Imagine the disappointment of discovering your favorite canvas permanently damaged, when appropriate protection would have saved it. It's like protecting a smartphone without a case: one shock and everything collapses. The longer you wait, the more likely you are to fall into the trap of makeshift protection which causes more damage than it prevents.
📖 Real testimonial: Sarah, 24, architecture student, lost her vintage flea market painting during an express move between two rentals. She had "protected" it with a blanket and tape. Result: the canvas came off the frame and the paint peeled off at the tape level. Six months of searching in flea markets, reduced to nothing in one afternoon.
💬 Conversation with a decor expert
The golden rule of artistic protection: It's better to overprotect for 2 hours than to cry for 2 years. A properly packaged painting will withstand shocks, humidity and temperature variations throughout the duration of transport.
The real reasons your paintings deteriorate during a move
You might think it's just bad luck, but in reality, 90% of damage to artworks during a move follows a precise pattern: poor preparation, unsuitable materials, and lack of knowledge of the weak points of each type of support.
The real problem isn't your lack of experience, but using protection techniques designed for ordinary objects. Your wall art has specific needs that general methods don't understand.
It's like trying to transport a birthday cake in a gym bag: even with all the good will in the world, the result will be catastrophic.
🎯 The first hidden cause: the "dead sandwich" effect
Contrary to what is believed, stacking paintings directly against each other, even with bubble wrap, creates pressure points that gradually deform the canvases. The reality: every vibration of the truck turns your pile into a miniature hydraulic press.
Imagine two slices of sandwich bread in a backpack during a hike: at arrival, you have crumbs. That's exactly what happens to your canvases without rigid protection.
This lack of knowledge explains why you find permanent ripples on your canvases even after hanging them. Now you will understand why rigid separation is non-negotiable.
🔍 Quick test: Place two sheets of paper against each other, apply gentle pressure for 30 seconds while moving them slightly. You will notice permanent creases: this is exactly what happens to your stacked canvases.
We often think that only rain is dangerous, but condensation humidity in closed cartons does more damage than bad weather. The mechanism: the hot air from your apartment cools down in the truck and releases its humidity directly onto your artworks.
It's the same phenomenon as fogging on your car windows: invisible but formidable. This humidity causes paper to swell, relaxes canvases and promotes the appearance of mold.
That’s why your framed canvas seem "soft" after a move, and why you sometimes discover suspicious stains in the corners. Controlled ventilation then becomes your best ally.
⚡ The third cause: resonance shocks
Few people realize that transport vibrations spread through packaging like waves in water. A poorly secured painting becomes a metronome beating against the inside of the carton throughout the journey.
You can easily check this: tap the wall near a framed artwork, and you'll see it vibrates. Now imagine that for 2 hours of driving with potholes.
This constant vibration weakens assemblies, loosens canvases, and can even pop staples from the frame. That’s why complete immobilization is key to successful transport.
🔴 The 3 alarm signals to watch out for:
- Your artwork "sounds hollow" when you tap it: The canvas has loosened due to humidity or repeated shocks
- Small bumps appear on the surface: Pressure points caused by direct contact with other objects
- The colors seem duller: Micro-scratches from friction during transport
🎨 The trigger factor: differential expansion
The factor that almost no one suspects: each material in your artwork (canvas, paint, varnish, wooden frame) reacts differently to temperature variations. It's like an accordion where each fold would move independently of the others. This "breathing" creates internal tensions that can cause cracks, even without visible impact. Recognize this phenomenon by the fine lines that appear "out of nowhere" after a move.
The rule of 3 stabilities: Stable temperature, stable position, stable humidity. Respect these three points and your artworks will survive all your moves without a scratch.
| ❌ Common belief | ✅ Technical reality | 💡 Simple explanation | 🎯 Practical benefit |
|---|---|---|---|
| Bubble wrap is enough to protect | You need rigid + flexible protection | Bubble wrap absorbs small shocks but not pressures | Guaranteed protection against deformation |
| The tighter it is, the better protected it is | Air must be able to circulate | Condensation = enemy number 1 of canvases | Avoids mold and warping |
| All artworks are transported the same way | Each support has its own specificities | Canvas, wood, metal react differently | Custom protection = zero breakage |
| Protection costs too much | It's a worthwhile investment | The material can be reused for all your moves | Long-term savings assured |
The 3-step method for stress-free transport
Rest assured, you don't need to be a logistics expert to succeed. This method follows the natural logic of building a protective cocoon: first the foundations (preparation), then the walls (packaging), and finally the roof (secure transport). At each step, you will see your wall artworks gain security, and you will gain confidence. The final result: the pride of unpacking perfectly preserved works in your new shared accommodation.
🗺️ Your journey overview: Step 1 = Diagnosis and preparation (immediate satisfaction of mastering the situation), Step 2 = Multi-layered protection (enjoy seeing your works perfectly secured), Step 3 = Successful transport and installation (pride in a job well done).
🎯 Step 1: Smart diagnosis and preparation
Starting with this step is like making a plan before building a house: it avoids 90% of the problems. This preparation gives you a clear vision of what you need and eliminates the stress of improvisation. Once this step is complete, you will feel that deep satisfaction of someone who perfectly masters their situation.
🛠️ Your essential protection kit
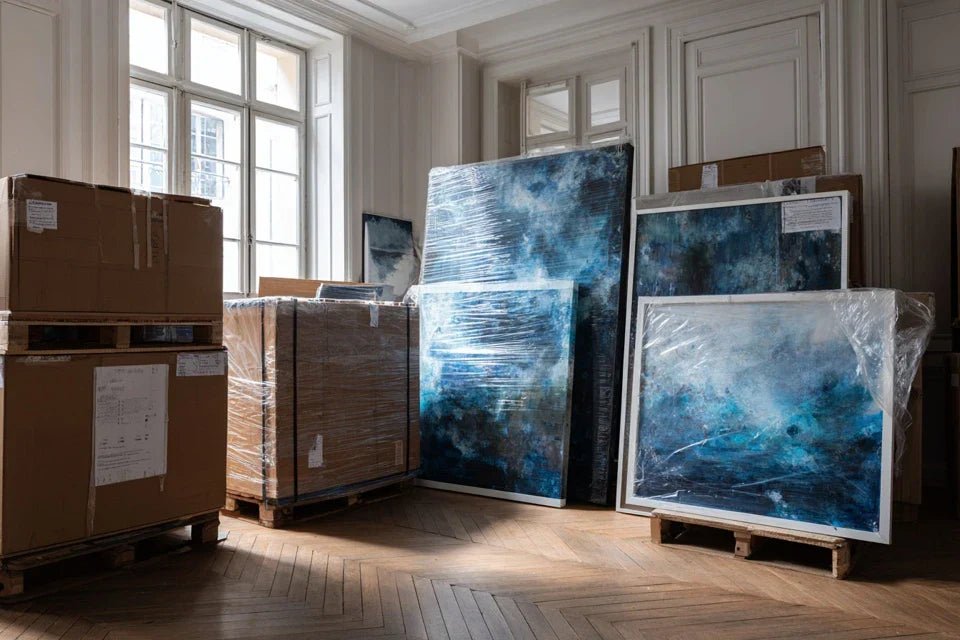
- Reinforced cardboard box or flat board: Resembles a giant pocket with double corrugation. Serves as a rigid bunker against shocks. Found at packaging suppliers or hardware stores. Check the strength by pressing on it: it should not deform. Never use ordinary cardboard that buckles under weight. Micro-perforated plastic film or tissue paper: Thin, transparent film that allows air to breathe. Creates a barrier against humidity without a greenhouse effect. Recognize good quality by its flexibility and visible micro-holes when held up to the light. Visible impact: perfect protection without condensation. Polyethylene foam or large bubble wrap: Thick and resistant cushioning foam. Absorbs shocks and vibrations like an air mattress. Choose the thickness: the heavier the painting, the thicker the foam should be. Noticeable benefit: your paintings will not move more than a millimeter.
🔍 Your personalized diagnosis
Inventory and classification of your works: Take out all your paintings and sort them by size, material and sentimental value. This step allows you to prioritize your efforts and adapt your protection. Note the exact dimensions as 2 cm difference changes the type of packaging needed.
⏱️ Time: 15 minutes | ✅ Successful when: Each painting has its record (size, type, priority) | ⚠️ Attention: Don't forget small formats, they are often the most fragile
Vulnerability test: For each painting, check the tension of the canvas (tap gently), the condition of the frame (look for play or cracks), and the stability of the hanging. This diagnosis reveals weaknesses to reinforce before transport.
⏱️ Time: 5 minutes per painting | ✅ Successful when: You know the exact condition of each piece | ⚠️ Attention: A loose canvas requires reinforced protection
Calculation of your material needs: Measure the available space in your vehicle and calculate the amount of packaging needed. Add a 20% margin for unforeseen circumstances. This anticipation avoids last-minute runs.
⏱️ Time: 10 minutes | ✅ Successful when: Your shopping list is complete and priced | ⚠️ Warning: Underestimating the necessary space is mistake #1
✅ Validation of step 1: You have a complete vision of your paintings, you know their weaknesses, and your material list is finalized. If something seems unclear, review the diagnosis of this specific painting. Bravo, you've laid a solid foundation!
OUR RECOMMENDED PRODUCTS
📦 Step 2: Multi-layer protective packaging
You are now moving to the next level: creating a custom cocoon for each of your artworks. This step is more rewarding because you can see your wall art decor co-living transform into indestructible packages. The snowball effect begins: each packaged painting reinforces your confidence for the next.
🎨 Specialized materials for this step
- Corner protection cardboard or foam: Small triangles that protect the corners. Essential because 80% of damage affects the corners. Place before main packaging. Sign of quality: they stay in place when you handle the painting.
- Textile straps or stretchable plastic film: Retention system that replaces aggressive tape. Allows even tightening without sticking to the artwork. The right tension: firm but you can still slip a finger underneath.
- "Fragile" labels and shipping direction: Visual communication for all stakeholders. Multiplies attention to your packages by 3. Place on all visible sides for maximum effectiveness.
🔧 Professional packaging technique
Surface and corner protection: Gently wrap each painting in tissue paper, then position the corner protectors. This first layer prevents any direct contact and distributes point pressures. Secure with masking tape that does not leave residue.
⏱️ Time: 5 minutes per painting | ✅ Successful when: No part of the artwork is exposed | ⚠️ Warning: Never tighten directly on the canvas
Cushioning layer: Add a thickness of foam or bubble wrap, emphasizing the fragile areas identified in step 1. This layer absorbs shocks and creates a buffer zone. Check that no air bubbles form hard points against the artwork.
⏱️ Time: 3 minutes per painting | ✅ Successful when: The protection is 2-3 cm thick and uniform | ⚠️ Warning: Avoid excessive thicknesses that create imbalances
Final packaging and labeling: Slide everything into the picture box, fill in the empty spaces, then seal. Attach handling labels and note the contents. This final step protects and facilitates organized unloading.
⏱️ Time: 8 minutes per artwork | ✅ Success when: The package doesn't move when you shake it | ⚠️ Attention: An artwork that moves in its packaging will be damaged
🎯 Quality control step 2: Each artwork is in its personalized cocoon, perfectly immobilized and clearly identified. Final test: lift the package and gently tilt it in all directions - nothing should move inside. Excellent work, your artworks are now invulnerable!
You have now reached the level of mastery that makes the difference between a stressed amateur and a serene connoisseur. This final step transforms your move into a precision operation, where every gesture is calculated to preserve your wall artworks. The final result you can already visualize: opening your cartons in your new shared accommodation and discovering your works in perfect condition, ready to brighten up your new living space.
🎯 Expert transport equipment
- Adjustable tie-down straps: Systems that hold your packages against the vehicle walls. Prevent slippage during braking and turns. Correct tension: packages don't move but straps do not deform the packaging. Moving blankets or non-slip mat: Mats that prevent direct contact with the truck floor. Absorb vibrations and micro-shocks from the road. Choose a minimum thickness of 5mm for optimal effectiveness. Thermometer and moisture absorber sachets: Tools to control the environment during transport. Prevent thermal shocks and excessive humidity. Place one sachet per carton for active protection.
🏁 Professional transport execution
Strategic vehicle loading: Place artworks upright against the side walls, never flat. This natural position avoids pressure on the canvases and facilitates ventilation. Separate each package with a blanket to prevent friction.
⏱️ Time: 20 minutes of loading | ✅ Success when: All packages are stable and accessible | ⚠️ Attention: Never stack artworks horizontally
Adapted driving and monitoring: Adopt a smooth driving style, anticipate braking, avoid defective roads whenever possible. Check the lashing at each stop. This vigilance guarantees that your works arrive in the condition they left your old home.
⏱️ Time: Duration of the journey + 5 min per break | ✅ Success when: No movement of packages is observed | ⚠️ Attention: A loosening lashing compromises all protection
Unloading and acclimatization: Unload your artworks first to avoid clutter. Let them in their packaging for 2-3 hours to adapt to the temperature of your new home before unpacking. This patience avoids thermal shocks.
⏱️ Time: 15 minutes unloading + 3h waiting | ✅ Successful when: Package temperature = room temperature | ⚠️ Attention: Immediate unpacking can cause condensation
🏆 Final validation: Your artworks have arrived at their destination, have been handled with the care they deserve, and are patiently waiting to be unpacked under optimal conditions. The long-awaited moment is approaching: you will be able to admire the result of your meticulous work!
Rule of expert progression: Move on to the next step when the previous one seems natural to you and you no longer hesitate about the gestures to make. Mastery comes from repetition, not haste.
You now master techniques that even some professionals neglect. These expert subtleties make the difference between a successful move and a perfect move, one that you will be proud to recount in detail to your friends.
🔥 Little-known pro tip: Photograph your artworks before packaging and note the time and weather. In case of insurance problems, this evidence is invaluable. Even smarter: film your packaging technique, you can reuse it and improve it for your next moves.
🤔 Frequent question from our readers
"Can I really do this alone without experience?"
I perfectly understand this apprehension, it's exactly what any conscientious person feels about their precious objects. The truth is that you already have the essentials: the desire to do well and attention to detail. Start with your least fragile artwork to get the hang of it. You will see that after the first, your confidence will grow naturally. Experience is built one work at a time.
💪 Confidence action: First wrap an ordinary photo frame using this method, then transport it in your car for a few kilometers. You will see the effectiveness of the protection and gain the confidence necessary for your important pieces.
⚠️ Costly mistakes to absolutely avoid
I'm going to reveal the traps into which 8 out of 10 movers fall, even with the best intentions. These errors are normal when you start, but now that you know them, you can completely avoid them.
- 🚫 Using tape directly on the frame: It's tempting to go fast, but tape leaves sticky residues that are impossible to remove and can tear off the finish. Consequence: your beautiful frame becomes sticky and dull. Alternative: always use masking tape or plastic film as a barrier. Rest assured, even professionals made this mistake at first!
- 🚫 Packing in humid weather or in a cold room: Moisture gets trapped in the packaging and causes mold and warping. Result: you discover green stains in the corners of your canvases. Solution: wait for a dry day or heat the room for 30 minutes before packing. This mistake mainly affects emergency moves.
- 🚫 Transporting paintings in the car trunk: The vibrations of the engine and the heat from the exhaust create a destructive environment. Consequence: gradual deformation of the frames and softening of the varnishes. Good practice: always in the passenger compartment, well wedged between the seats. This is the classic mistake of express moves.
- 🚫 Unpacking immediately upon arrival: Excitement pushes you to discover your treasures right away, but thermal shock can crack the varnishes and relax the canvases. Consequence: micro-cracks that appear in the following weeks. Patience: 2-3 hours of acclimatization avoid months of regret. Even experts are sometimes impatient!
- 🚫 Underestimating the weight of large formats: A painting measuring 80x60 cm can weigh 3-4 kg, but unevenly distributed, it exerts enormous pressure on its support points. Result: deformation of the frame and tearing of the canvas. Technique: always carry with two hands supporting the sides, never just by the frame. This is mistake #1 for hurried students.
🛡️ Your anti-error verification system: Before transport, check that nothing is sticking directly to the artwork, that the packaging is dry to the touch, that the painting does not move in its carton, and that you can carry it easily. Warning signs: smell of glue, feeling of humidity, noises of friction, or difficulty carrying.
🎁 Special reader offer
Because you took the time to inform yourself, enjoy 10% discount on your first order:
❓ Your most frequently asked questions about painting transport
Allow 15 minutes per painting the first time, then 8-10 minutes when you master the technique. For a collection of 6 paintings, allow a quiet morning. The secret: prepare all your materials before starting, like a cook who takes out all their ingredients. You will save valuable time and avoid omissions.
Two effective solutions: either you make a custom packaging with flat cardboard and plastic film (sandwich technique), or you use two boxes that you assemble. Important: never bend the cardboard around the painting, it creates pressure points. For very large formats (over 100 cm), consider specialized professional transport.


