

You’ve just received your magnificent tempered glass artwork or work on Dibond support, and suddenly anxiety sets in: how to handle it without damaging it? How to transport it safely? How to hang it without risking disaster?
You can already imagine the nightmare: irreparable scratches on your brushed aluminum artwork, indelible fingerprints on the glass, or worse, a work that comes loose and falls...
You may have already tried wrapping it in newspaper or carrying it with your arms outstretched, but you feel like that’s not the right method. This feeling of not being in control is frustrating.
Rest assured, it's not your fault! Each artwork support has its own technical specifics and requires special precautions. What works for a traditional canvas can be disastrous for a modern support.
By the end of this article, you will perfectly master the protection techniques adapted to each support and you will be able to handle your artworks with the confidence of a professional.
Why does each support require a different approach?
Imagine treating a glass artwork like a simple canvas on frame: it's like using a sponge to clean a computer screen! Each material has its own personality, its strengths and weaknesses.
Tempered glass resists impacts but is afraid of micro-scratches, Dibond supports humidity but fears point pressures, and brushed aluminum tolerates handling but mercilessly reveals fingerprints.
🎨 Customer experience feedback: "I transported my 120x80cm Dibond artwork in my car, leaning against the back seat. When I got home, I discovered a mark shaped like a belt buckle engraved on the support. Irreparable!"
💬 Conversation with a decor expert
The golden rule of artwork protection: Each material dictates its method of protection. Respect this logic and you will avoid 95% of accidents in less than 10 minutes of learning.
Decoding: truly understanding your art supports
Do you recognize yourself in these situations? Do you hesitate before each manipulation, improvise protections with what you have on hand, or simply avoid moving your favorite works of art?
What's really happening is that you lack specific technical knowledge. This isn't a flaw on your part, but simply because no one has explained the particular properties of each support to you.
It’s like learning to cook without knowing the difference between a cast iron pan and a non-stick pan: you can have the best intentions in the world, the result will be random.
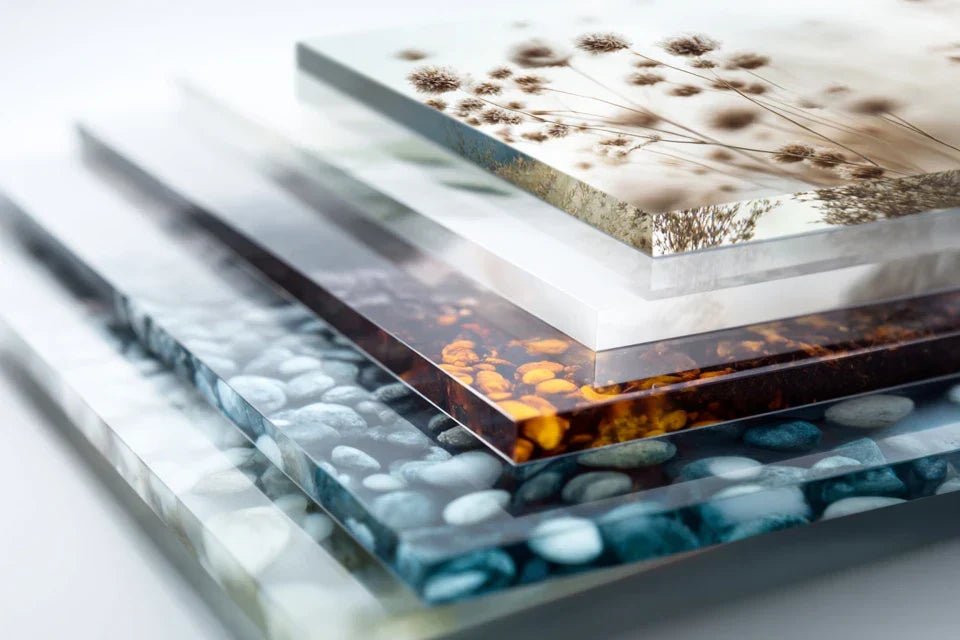
The mystery of tempered glass: why it is so special
Contrary to what many think, tempered glass is not fragile like ordinary glass. It's actually 5 times stronger! Its particularity? It handles frontal impacts very well but hates superficial scratches.
Imagine a knight’s armor: it resists sword blows but a simple pin can pierce the leather at the joints.
This property completely changes your approach: you must protect the surface rather than reinforce the structure. No more stress from manipulations, hello serenity!
🔍 Quick test: Look at your glass artwork under a flat lighting. Do you see those micro-traces that you’ve never noticed before? That's exactly what to avoid in the future!
The Dibond support is often presented as "unbreakable". Technically true, but beware of the trap! Its surface can be marked by point pressures, even slight ones.
It’s like a memory foam mattress: it returns to its shape after uniform pressure, but retains the imprint of a pointed object.
Result? You must distribute pressure during transport and avoid contact with hard objects. Once you know this, transporting Dibond artwork becomes child's play.
Brushed aluminum and its particular character
Brushed aluminum has a directional texture invisible to the naked eye but very present to the touch. This technical specificity directly influences its protection.
Every fingerprint or friction against the grain becomes visible. It’s like stroking a cat backwards: it's immediately noticeable!
This peculiarity requires you to handle with gloves and movements in the direction of the texture. Simple but crucial to preserve the original appearance.
🎯 The 3 signals that don't lie:
- Irregular reflections on your artwork: Sign of micro-scratches on glass or aluminum - like hairs under a microscope
- Visible concave marks from the side: Point pressure on Dibond - like a pillow that retains the shape of your head
- Matte traces on a shiny surface: Handling without protection - like fingerprints on clean glass
The trigger factor: temperature and humidity
What really makes the difference is understanding that each support reacts differently to climatic variations. The domino effect is immediate: humidity + poor protection = accelerated deterioration. The glass condenses, the Dibond expands slightly, the aluminum reveals its imperfections. Anticipate these reactions and you will perfectly control the situation.
Universal rule of protection: First identify the material, then adapt the protection to the 3 main enemies: scratches, pressures and humidity. Check by observing your artwork under different lighting angles.
| ❌ Common belief | ✅ Technical reality | 💡 Explanation | 🎯 Practical benefit |
|---|---|---|---|
| "Glass is fragile, it must be packaged like porcelain" | Tempered glass resists impacts but is afraid of scratches | Thermal treatment that changes the structure | Surface protection rather than reinforced packaging |
| "Dibond is unbreakable, no precautions needed" | Resistant to shocks but sensitive to point pressures | Aluminum composite that deforms locally | Flat transport with even support distribution |
| "Brushed aluminum is cleaned like any other metal surface" | The directional texture requires specific cleaning | Micro-grooves created by the brushing process | Handling with gloves and oriented movements |
| "A plastic packaging protects from humidity" | Plastic can create destructive condensation | Temperature difference between inside and outside | Breathable protection and humidity control |
Your infallible protection method by support
Now that you understand the specifics of each material, here is your progressive action plan. We will build your expertise step by step, like an architect who first lays the foundations before raising the walls. At each stage, you will gain confidence and precision. The final result? Complete mastery that will allow you to protect any artwork in less than 5 minutes.
🎯 Overview of your progress: Step 1 - Identification and preparation (material + environment), Step 2 - Adapted protection by support (specific technique), Step 3 - Expert transport and handling (maximum security). Logic: first understand, then protect, finally master.
Step 1: Master identification and preparation
Starting with identification is like checking the nature of the fabric before washing it: essential to avoid irreparable mistakes. This solid foundation will give you immediate and visible confidence in your actions.
🛠️ Your professional protection kit
- Micro-perforated plastic film: Resembles cling film but with invisible tiny holes - allows breathability while protecting from dust - available in art stores or online - check for "conservation" mention on the packaging - avoid ordinary plastic film which creates condensation
- Neutral polyethylene foam: Dense white foam that does not crumble - protects by absorbing shocks without chemical reaction - recognizable by its firm texture and uniform color - prefer 10mm thickness for optimal protection/practicality balance
- Non-fluffy cotton gloves: Thin white gloves that fit perfectly on the fingers - avoid grease marks and micro-scratches - the difference is immediately visible on shiny surfaces
Now, let's move on to practice with precise gestures
🎯 Your support’s infallible identification
Examine the surface under raking light: Tilt your artwork 45° under a light source - observe reflections to identify texture and any defects - this technique instantly reveals the nature of the support - as simple as looking in a mirror to see traces
⏱️ Time: 30 seconds | ✅ Successful when: You clearly distinguish reflections (glass), matte texture (Dibond) or directional lines (brushed aluminum) | ⚠️ Attention: Do not judge with the naked eye - raking light reveals what normal vision hides
Test surface temperature: Bring the back of your hand 2cm from the surface - glass remains cool, Dibond follows ambient temperature, aluminum reflects your body heat - this thermal difference confirms identification - more reliable than direct tactile testing
⏱️ Time: 15 seconds | ✅ Successful when: Clear and consistent thermal sensation across the entire surface | ⚠️ Attention: Do not touch directly - even gloves can leave marks
Check thickness and rigidity: Observe the profile of the artwork - glass is 4-6mm with polished edges, Dibond is 3-4mm perfectly flat, brushed aluminum varies depending on the support thickness - this information determines fragility and carrying method
⏱️ Time: 20 seconds | ✅ Successful when: Thickness estimated and rigidity visually assessed | ⚠️ Attention: Do not bend to test - even slight flexing can damage
✅ Step 1 validation: You identify the support in less than 1 minute, you have prepared your protective equipment and your workspace is clear. If you are still unsure, repeat identification from a different lighting angle. Bravo, you are ready for specific protection!
OUR RECOMMENDED PRODUCTS
Step 2: Specific Protection According to Your Support
You are now moving on to the next level: targeted protection. Here, your theoretical knowledge turns into mastered gestures. This step is more rewarding because you immediately see the effectiveness of your actions - the domino effect begins!
🎨 Specialized Material by Support
- For Tempered Glass - Professional Microfiber Cloth: Ultra-fine fibers that clean without scratching - recognizable by its exceptional softness - available in camera or optics stores - check for the absence of visible seams - avoid ordinary cloths which contain hard fibers
- For Dibond - Rigid Distribution Plates: Thin but rigid boards that distribute pressures - reinforced corrugated cardboard or expanded PVC - like an air mattress that distributes body weight - transforms a punctual pressure into uniform pressure
- For Brushed Aluminum - Soft Anti-Static Brush: Natural bristles oriented in the same direction - removes dust without creating static electricity - resembles a very soft hairbrush - anti-static prevents attracting more dust after cleaning
🔒 Tempered Glass Protection
Application of Protective Film: Unroll the micro-perforated film starting from a corner - smooth progressively to chase air bubbles - the film must adhere without excessive pressure - like applying a bandage without creating creases
⏱️ Time: 2 minutes | ✅ Successful when: Uniform surface without bubbles or creases | ⚠️ Attention: Do not pull the film - it may tear and leave sticky residue
Reinforcement of Corners: Add a double layer of foam to the 4 corners - the corners concentrate shocks during handling - this protection absorbs 80% of accidental impacts - technique used by all art carriers
⏱️ Time: 1 minute | ✅ Successful when: Corners completely covered and stable protection | ⚠️ Attention: Fix the foam without adhesive on the artwork - use tape on the edges of the frame only
🛡️ Dibond Protection
Placement of Distribution Plates: Place a rigid plate against the face of the artwork - it should protrude slightly on all sides - this plate transforms any punctual pressure into distributed pressure - like an airbag that distributes impact
⏱️ Time: 1 minute | ✅ Successful when: Plate stable and protruding by at least 2cm | ⚠️ Attention: Check that the plate does not flex - it must remain perfectly flat
Secure Sandwich Packaging: Create a sandwich with a plate on each side of the artwork - hold the whole thing together with plastic film only on the edges - the artwork "floats" between the two protections without direct contact - technique of professional carriers
⏱️ Time: 3 minutes | ✅ Successful when: The panel is rigid and the artwork doesn't move inside | ⚠️ Caution: The film must never touch the surface of the artwork - only the edges of the panels
✨ Protection of Brushed Aluminum
Preventive directional cleaning: Gently brush in the direction of the visible grain - long, regular movements without pressure - this step removes particles that could scratch during transport - like stroking an animal in the direction of its fur
⏱️ Time: 2 minutes | ✅ Successful when: Uniform surface with no visible particles | ⚠️ Caution: Never circular movements - they create spiral scratches impossible to fix
Protection by oriented film: Apply the protective film following the direction of the grain - this technique avoids creating tension in the metal - the film naturally follows the directional texture - invisible but crucial result for preservation
⏱️ Time: 3 minutes | ✅ Successful when: Film applied without creating new scratches | ⚠️ Caution: Observe the direction of the grain before starting - it is not always horizontal
🎯 Validation of step 2: Your artwork is protected according to its material specificity, the protection is invisible but effective, and you feel a total confidence for handling. Test: gently lift a corner - the protection must remain secure. Perfect, you now master specialized protection!
Step 3: Master Transport and Hanging
You are now reaching expert level: handling and installation. Here, you combine technique and intuition for complete mastery. The final result? A perfectly preserved and showcased artwork that you will be proud of for a long time.
🚗 Secure Transport on Multiple Supports
Optimal positioning in the vehicle: Place the artwork upright against the rear seat - 85° angle to prevent slippage - protect the base with thick foam - this position distributes weight and absorbs vibrations - technique of art movers
⏱️ Time: 3 minutes | ✅ Successful when: Artwork is stable and protected from lateral movements | ⚠️ Caution: Never flat on the seats - risk of punctual pressure at contact points
Anti-vibration fixation: Use textile straps to hold without tightening - vibrations are more destructive than point impacts - this flexible fixing absorbs movements while maintaining position - like a hammock that moves with the wind without breaking
⏱️ Time: 2 minutes | ✅ Successful when: Artwork is held with possibility of micro-movements | ⚠️ Caution: Straps too tight = mechanical constraints and risk of deformation
🔧 Specialized Hanging by Support
Load calculation and fixing: Multiply the weight by 3 to determine the necessary strength - modern supports are heavier than traditional canvases - choose specialized fixings according to the wall (drywall, concrete, brick) - this safety avoids 99% of detachment accidents
⏱️ Time: 5 minutes | ✅ Successful when: Fixing tested at 1.5 times the weight of the artwork | ⚠️ Attention: Never test directly with the artwork - use an equivalent weight first
Adjustment and final balancing: Position the artwork with a spirit level - even 2° of inclination is visible to the naked eye - adjust gradually until perfect balance - this final precision reveals your expertise and enhances the work
⏱️ Time: 3 minutes | ✅ Successful when: Artwork perfectly horizontal and at the right height | ⚠️ Attention: Avoid multiple readjustments - they wear out the fixings and weaken the hanging
Rule of expertise progression: Only move on to the next step when you succeed in the previous one without thinking about the gestures. Objective criteria: fluid movements, impeccable result, total confidence. Patience in learning, ambition in results.
Congratulations! You now master the subtleties that even some professionals neglect. These advanced techniques give you a considerable advantage for preserving your works over time.
🏆 Museum curator tip: Photograph your artworks under flat lighting before and after each manipulation. This documentation reveals invisible micro-deteriorations and allows you to refine your technique continuously. Professionals call this "conservation traceability".
💭 Frequent question from our readers
"I'm not very handy, can I really do it?"
I perfectly understand this apprehension! Many of our readers had the same fear at first. The beauty of this method is that it relies on understanding rather than manual dexterity. Once you know WHY to do something, the HOW becomes natural. For example, knowing that tempered glass is afraid of scratches but not impacts automatically leads you to adopt the right gestures.
💡 Confidence test: Start with a small artwork of lesser value to get your hand in. After this first success, you will approach your favorite works with natural confidence and mastered gestures.
The traps to absolutely avoid (even the pros make mistakes!)
After years of experience, here are the errors I still see too often. I prefer to tell you about them now to avoid lasting regrets. These errors seem logical at the time, but their consequences only appear later.
- ❌ Cleaning the acrylic glass with standard window cleaner: It's tempting because it works on windows, but these products contain microscopic abrasive agents that gradually tarnish the tempered glass - use only distilled water and a microfiber cloth - a mistake made by 8 out of 10 people at first
- ⚠️ Transporting Dibond in a vertical position without back protection: A position that seems natural to save space, but the back of the support can scratch against contact surfaces - always insert a protective layer even if it looks clean - even professionals sometimes forget this precaution
- 🚫 Touching brushed aluminum even with latex gloves: These gloves leave invisible greasy residues that attract dust and tarnish the surface - only cotton gloves are neutral - a technical trap discovered even by experienced framers
- 💨 Using a hairdryer to speed up drying time: A logical reflex to save time, but direct heat can create thermal stresses and invisible micro-cracks - always let it dry naturally - an expensive and irreversible mistake
- 📦 Reusing the original packaging for a second transport: Seems economical and ecological, but the protections weaken and lose their absorption properties - systematically renew the protections for each transport - negligence that causes 30% of repeated damage
🔍 Anti-error verification system: Before each handling, ask yourself these 4 questions: Is my equipment suitable for the support? Have I checked for the absence of hard particles? Does my technique respect the direction of the material? Is my environment stable (temperature, humidity)? Warning signs: hesitation in gestures, improvisation of materials, haste due to lack of time.
🎁 Special readers offer
Because you took the time to inform yourself, enjoy 10% discount on your first order:
⏰ Valid for 72h after reading • Applicable to all our products
🤔 Questions you are likely to ask
A complete kit costs between 25 and 40€ depending on the size of your artworks and effectively protects 15 to 20 paintings. The foam and films are renewed, the gloves and tools last for years. Economical tip: group your purchases with other art lovers to reduce costs. Investment amortized from the second use compared to the cost of a restoration.
Expect to perform the basic movements 2-3 times to gain familiarity, then about ten times to achieve professional fluency. The progression is exponential: difficult at first, then increasingly natural. A concrete example: my first Dibond packaging took me 20 minutes; now I do it in 5 minutes with my eyes closed.


