

You've just acquired this magnificent artwork that excites you, perfect for your second home. But here's the thing: between prolonged absences, variable humidity, and that nagging worry that your favorite piece of art is slowly deteriorating...
You can already imagine the colors fading, the frame warping, or worse: that burglar spotting your absence thanks to this masterpiece visible from the window. The frustration mounts as you realize that your city apartment and your country retreat don't have the same constraints.
You may have already tried applying the same wall decor rules as in the city. Result? Guaranteed disappointment and wasted artistic investment.
It's perfectly normal! Second homes have unique specificities that no one explains clearly. Between temperature variations, prolonged absences, and security challenges, your art collection deserves a custom approach.
By the end of this article, you will master professional techniques to protect and enhance your paintings in your second home, transforming each return into a true moment of artistic emotion.
Why does your second home deserve a specific decorative approach?
Contrary to popular belief, a second home is not simply an extension of your main decor. It's a unique environment that requires an adapted artistic strategy. Neglecting this reality risks turning your decorative investment into a permanent source of stress.
💡 Customer testimonial: "I installed my favorite artwork in my Normandy home exactly as I did in my Paris apartment. After six months, I discovered moisture halos on the edges. This €3000 piece had become unsaleable due to a simple placement error."
💬 Conversation with a decor expert
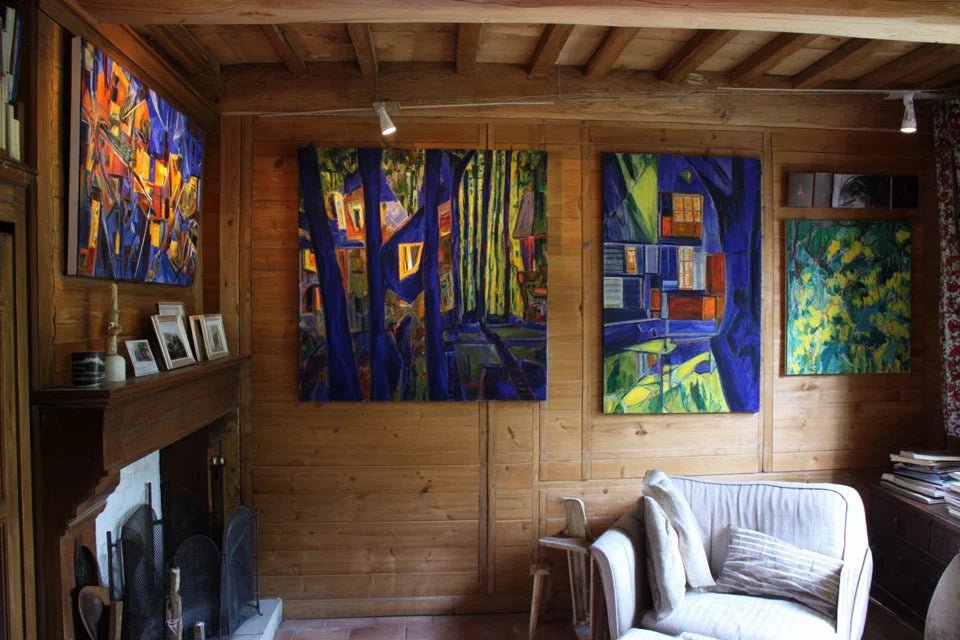
The golden rule of second home decoration: A well-chosen and properly installed artwork instantly transforms the atmosphere of your retreat, creating that feeling of “home” from the moment you arrive, in less than 30 seconds.
What's really behind your decorating hesitations
Are you hesitant between several locations, do you change your mind about the hanging height, do you wonder if this artwork might risk attracting attention... These doubts reveal three legitimate concerns that every second home owner encounters.
What is the real cause of this indecision? You are unconsciously applying the codes of your urban decor to an environment that works differently. It's like trying to garden in the mountains with seaside techniques.
Imagine a chef using the same recipes in Paris and at 2000 meters altitude: the results would be disastrous! Your second home requires the same intelligent adaptation.
First obstacle: Fear of humidity and climatic variations
Contrary to what one might imagine, humidity is not the main enemy of your wall art. The real problem is the sudden temperature changes that create destructive thermal shocks.
It's exactly like a glass shattering when you pour boiling water into it: the material cannot withstand the sudden change, not the temperature itself.
This understanding will revolutionize your approach to secure hanging and allow you to choose locations that you had never considered, while perfectly protecting your artistic investments.
🧪 Immediate test: Place your hand against the wall near a window, then against the opposite wall. The temperature difference instantly reveals the areas to avoid for your sensitive artworks.
Second trap: Obsession with security discretion
Many believe that they must hide their valuable artworks to avoid burglaries. In reality, it is the decorative inconsistency that attracts attention: a bare house with a single expensive painting screams "I'm not often here".
Think of a luxury store: it doesn't try to hide its products, it showcases them in a coherent setting that naturally discourages break-in attempts.
This revelation will transform your secure decoration strategy: instead of hiding, you will create an atmosphere of permanent occupancy that naturally protects your artistic heritage.
Third mistake: Underestimating the psychological impact of art
Most owners see their paintings as simple decorative elements. They ignore the considerable emotional power of a well-placed artwork in a relaxation space.
Recognize these signals in your daily life: you enter your second home and something seems "faded", you have difficulty really relaxing, the atmosphere lacks that warmth that makes the difference between a house and a simple dwelling.
This awareness will double your motivation to create a true artistic cocoon that transforms every weekend into an enchanted parenthesis.
🎯 The 3 signs of a poorly adapted decoration:
- You photograph your interior less: Unconsciously, you feel that the harmony is not there, like a musician who avoids playing a poorly tuned piece
- Your guests stay outside longer: The interior space lacks that magnetic force of an truly inspiring place
- You keep putting off your decor purchases: This hesitation reveals a flawed strategy, like hesitating in front of a menu because none of the dishes really appeal to us
The trigger factor: The notion of "artistic presence"
What really makes the difference is this ability to create an "artistic presence" that instantly gives soul to your space. It's the perfect domino effect: a well-chosen and properly showcased work transforms the perception of the entire room. You can easily identify it: enter your room, close your eyes for 10 seconds, then open them. If your gaze is immediately drawn to a specific point that gives you a positive emotion, you have found your "artistic presence" zone.
The rule of emotional impact: A properly positioned work should give you a positive emotion within the first 3 seconds. If you have to "search" for the artwork with your eyes, then the location is not optimal.
| ❌ Classic urban approach | ✅ Second home strategy | 💡 Why it changes everything | 🎯 Immediate benefit |
|---|---|---|---|
| I hang as I would in my city home | I adapt to specific constraints | Every environment has its own physical rules | Optimal protection of your investment |
| I hide my artworks for safety | I create a deterrent consistency | Inconsistency attracts more attention than beauty | Natural security and visual pleasure |
| I prioritize discretion | I focus on emotional impact | Art transforms the atmosphere instantly | Feeling of well-being upon arrival |
| I choose according to my tastes alone | I harmonize with the spirit of the place | A second home has its own personality | Perfect consistency and added value |
The professional method in 3 steps to transform your space
Rassurez-vous : installing perfectly a painting in your second home follows a simple and progressive logic. It's like building a house: solid foundations, adapted structure, careful finishes. Each step will bring you visible satisfaction and get you closer to the final result: that magical feeling of discovering your artwork perfectly showcased on each return.
🏗️ Overview of the transformation: First, we secure the environment (diagnosis and preparation), then we optimize the location (calculations and professional hanging), finally we perfect the integration (lighting and harmonization). At each step, you will see your space gain character and value.
Step 1: Securing the Environment of Your Artwork
Before touching a single nail, this diagnostic phase avoids 90% of future problems. It's like checking the foundations before building: invisible but absolutely crucial. Once this step is complete, you will feel that serene confidence of someone who masters their environment.
🛠️ Your Professional Diagnostic Kit
- Digital Hygrometer: This smartphone-sized device precisely measures humidity and temperature. Choose a model with memory of variations (15-30€ at hardware stores). Avoid inaccurate analog hygrometers that give a false sense of security. The impact: you will know exactly the safe zones in your home.
- Wall Stud Detector: This magnetic tool reveals the hidden structure of your walls, like an X-ray. Prefer models with sound signal (20-40€). The difference from a "guesswork" installation: your artwork will stay put for decades without moving a millimeter.
- Professional Spirit Level: A minimum 60cm level guarantees perfectly horizontal hanging. Quality is recognized by the weight and precision of the bubbles. It's the difference between a "homemade" result and a professional decorator finish.
Now, let's move on to the active phase that will reveal the secrets of your home
🔍 Complete Audit of Your Space
Map Climate Zones: Place your hygrometer in each room for 48 hours, noting the variations. This "indoor weather" reveals the microclimates of your home. Stable zones (variations < 10%) are perfect for your valuable artworks.
⏱️ Time: 15 minutes per day over 3 days | ✅ Successful when: You have identified 2-3 ultra-stable zones | ⚠️ Attention: Do not test during extreme weather conditions - you would have skewed data
Test Wall Solidity: Tap the wall with your closed fist. A hollow sound reveals a partition, a dull sound indicates a load-bearing wall. Then use the stud detector to precisely locate the structure. This step determines the type of fixing required.
⏱️ Time: 30 minutes per room | ✅ Successful when: You know the exact location of the studs | ⚠️ Attention: Detectors can be disrupted by pipes - always cross-reference with acoustic testing
Analyze Light Exposure: Observe the sun's path in your room at different times. Mark with pencil the areas of constant shadow and direct sunlight. This solar mapping will protect your colors from premature fading.
⏱️ Time: 20 minutes every 3 hours over a day | ✅ Successful when: You have identified optimal indirect light zones | ⚠️ Attention: The sun's path changes with the seasons - repeat this test at seasonal changes
✅ Step 1 Validation: Your diagnosis is complete when you can point to 2-3 locations and explain why they are perfect (stable climate + solid structure + indirect light). If you're still hesitating, take another week of observation - it’s an investment that will save you thousands of euros in future repairs.
OUR RECOMMENDED PRODUCTS
Step 2: Mastering Professional Hanging
This step transforms your analysis into a concrete realization. This is when your decorative vision takes physical form. The satisfaction is immediate: you move from uncertainty to technical mastery, like an artisan who sees their work come to life under their hands.
🔧 Your Professional Fixing Toolkit
- Fixings adapted to the support: Molly wall plugs for hollow walls (25kg load), wood screws for studs (40kg load), chemical anchors for concrete (50kg+ load). Each support has its optimal solution - it’s like choosing the right key for each lock.
- Secure hanging system: Opt for steel picture hooks with an anti-slip system. Double-point attachment models distribute the weight and prevent tilting. Investment: €15-25 for lifetime security.
- Transparent safety cable: This reinforced fishing line (invisible from 2 meters) discreetly connects your painting to the wall. In case of accidental fall from the main hook, it prevents total disaster. It’s the life insurance for your precious works.
🎯 The Technique of Professional Hanging
Calculate optimal height: Place the center of your painting at 1.60m from the floor (standard museum height). For a sofa, go down to 1.40m. This universal rule works for 95% of situations and guarantees optimal visual comfort for everyone.
⏱️ Time: 10 minutes of calculation and marking | ✅ Successful when: Your measurement is verified 3 times | ⚠️ Attention: Measure from the finished floor, not from a rug that could be moved
Drill with precision: Start with a fine drill (2mm) to mark the location, then widen to the size of your wall plug. This technique prevents the wall from cracking and guarantees a perfectly clean hole. The secret: advance slowly and vacuum up dust in real time.
⏱️ Time: 5 minutes per fixing point | ✅ Successful when: The hole is clean and at the right depth | ⚠️ Attention: Wear safety glasses and check for pipes with your detector
🔒 Quality control: Your hanging is successful when the artwork remains perfectly stable after a slight manual pressure of 5 seconds. The ultimate test: it must withstand a simulated small earthquake (gently shake the wall). If everything holds, you have reached professional level.
Step 3: Perfecting decorative integration
This final step elevates your technical installation into a true artistic experience. It's the difference between "having a painting hung" and "owning a perfectly integrated artwork". The result will give you that deep pride in contemplating a harmonious space that perfectly reflects your artistic personality.
💫 The tools for perfect finishing
- Accent lighting: Adjustable LED spotlights 3000K (warm light) or directional wall sconces. The ideal power: 10W per square meter of artwork. This lighting reveals the color nuances invisible in general lighting.
- Anti-glare system: Transparent UV protection film or anti-reflective glass for valuable artworks. Invisible protection that preserves original colors for decades. Think of it as sunglasses for your art.
- Harmonization accessories: Cushions, throws or decorative objects that pick up a color from the artwork. These "color echoes" create a visual coherence that multiplies the impact of your work by three.
✨ The finishing touches that make the difference
Adjust perfect lighting: Direct your spotlight at 30° from above to avoid reflections. The ideal intensity creates a soft contrast with ambient lighting without dazzling. This museum technique transforms any artwork into a masterpiece.
⏱️ Time: 20 minutes of fine adjustments | ✅ Successful when: No visible reflections from the sofa | ⚠️ Attention: LED lighting is less hot but check the minimum recommended distance by the manufacturer
Create color harmony: Identify the dominant color of your artwork and subtly integrate it into 2-3 elements in the room (cushion, vase, book...). This visual repetition anchors the work in its environment and creates a sophistication worthy of the finest interiors.
⏱️ Time: 1 hour of research and placement | ✅ Successful when: The harmony is obvious but not garish | ⚠️ Attention: A maximum of three color reminders - beyond that, the effect becomes artificial
🎨 Artistic validation: Your integration is perfect when your guests immediately notice the harmony of the room without being able to explain why. This is a sign of total success: art and decoration are now one in a coherent and inspiring ensemble.
The principle of intelligent progression: Move to the next step only when you are completely satisfied with the current result. Patience at this stage avoids tedious retouching and guarantees a lasting result that you will be proud of for years.
Congratulations! You now master the professional techniques that few homeowners know. These expert subtleties give you a considerable advantage: the ability to transform any space into a sophisticated personal gallery.
🏆 Professional decorator's secret: Photograph your final installation with your smartphone, then look at the photo. The objective instantly reveals invisible micro-defects (slight tilt, misalignment...). This technique allows for ultra-precise adjustments worthy of the greatest museums.
🤔 "What if I'm wrong with my height calculations?"
"I'm afraid of drilling in the wrong place and having to fill it..."
This concern is perfectly legitimate! Even professionals use a validation technique before drilling. Cut a piece of cardboard to the size of your artwork and temporarily attach it with masking tape. Live with it for 48 hours: sit down, watch TV, receive friends. Your eye gets used to it and naturally reveals whether the location is optimal. This "zero risk" method gives you absolute confidence before final installation.
💡 Full-size test: Ask a person of a different height to visually validate the location. If they spontaneously approve, you have found the universally comfortable height.
The traps to absolutely avoid (to protect your investment)
After supporting hundreds of homeowners, I know the recurring mistakes that can turn your artistic project into a nightmare. These errors are totally avoidable with the right information, and I prefer to warn you now rather than you discover them at your expense.
- ⚠️ Hanging near a heat source: Radiator, fireplace, halogen spotlight... The temptation is strong to take advantage of these "privileged" locations. Result: frame deformation and paint cracking in 6 months. Alternative: move at least 1.50m away and use cold LED lighting. This error costs an average of €2000 for restoration. 🚫 Neglecting thermal expansion: Many fix directly against the wall. Mistake! Materials move with temperature. Always leave a 5mm space between the artwork and the wall with discreet spacers. This micro-ventilation avoids destructive condensation. ⛔ Underestimating the actual weight: "My painting weighs 2 kg, a simple screw will suffice..." The apparent weight does not count the lever forces and vibrations. Absolute rule: multiply by 3 to calculate your fixing. A 3kg artwork requires a minimum fixing for 9kg. 🔥 Installing in extreme humidity : Absolutely avoid installations in very humid or very dry weather. Wood and canvas "move" and distort your measurements. Wait for a period of stable weather lasting at least 3 days. A few days of patience = years of stability.
- 💸 Saving on fixings : "These €2 wall plugs will do the trick..." On a valuable artwork, it's like putting low-end tires on a sports car. Invest €15-€20 in professional fixings: they protect a much more precious asset.
🛡️ Your safety checklist : Before finalizing, check these 4 points: stable climate for 48 hours ✓ / fixing tested to 150% of the weight ✓ / lighting without reflection ✓ / expansion space respected ✓. One "no" = postpone installation.
🎁 Special offer for readers
Because you took the time to inform yourself, enjoy 10% discount on your first order:
⏰ Valid 72 hours after reading • Applicable to all our products
❓ Your most frequently asked questions about installation
Installation by a professional costs between €80 and €200 depending on complexity. It's justified for artworks worth more than €1500 or technical installations (very heavy, complex walls). To optimize: master the simple steps yourself and only call in the pro for the final fixing on difficult walls. Concrete example: DIY installation of a €500 painting = saving €150 labor costs.
Each material has its optimal technique. Stone: chemical anchors are essential, slow drilling with a concrete drill bit. Old wood: direct screwing into the beam after precise location. Plasterboard: Molly wall plugs are imperative, weight distribution over several points. The principle: adapt your fixing to the support, never the other way around. Quick test: if your fingernail scratches the wall, it's plasterboard. If it sounds hollow, it’s a partition wall. If it's hard and cold, it's stone.
With correct installation and a stable climate, your artworks can withstand 6 months of absence without problems. Beyond that, provide for a monthly visit or a connected climate monitoring system (€50-€80). Canvas works are more sensitive than wood or metal ones. Practical tip: leave a min/max thermometer to indicate you the extreme variations on your return.
The best security is decorative consistency that doesn't scream "empty house." Pro techniques: vary the sizes of artworks (not just the precious ones), install timed automatic lighting, add a few quality reproductions that create the illusion. For high-value pieces: discreet anti-theft fixing systems (€50-80) and specific art insurance. The golden rule: visible and secure rather than hidden and vulnerable.
Decorator's solution: discreet rail systems or modern cleats (€120-200 depending on length). These systems allow you to move your artworks without new drilling. Economical alternative: extra-strong magnetic hooks for lightweight works on metal surfaces, or gallery-style taut wire system. Higher initial investment, but huge savings in the long term and total flexibility.
🌟 Your artistic transformation starts now
Imagine your next arrival at your vacation home. You open the door and immediately, that feeling of warmth washes over you. Your gaze naturally falls on this perfectly showcased artwork, bathed in soft light that reveals every nuance. In seconds, the stress of the road dissipates, replaced by a deep pride in contemplating a space that truly resembles you.
This transformation goes far beyond simple wall decor. You have acquired valuable technical skills, developed your artistic eye, and above all, gained the confidence to make bold decorative choices. Your friends will immediately notice this new sophistication and naturally ask for your advice.
The hardest part is behind you: understanding the specific issues of your second home. Now, all that remains is to take action with your first installation. Start with a room, apply the method, and savor the unique satisfaction of seeing your vision come to life before your eyes.
🚀 Your first step towards excellence: Choose today the artwork that will transform your main space, and apply the diagnostic method this week. In 15 days, you will contemplate your first professional artistic achievement!


