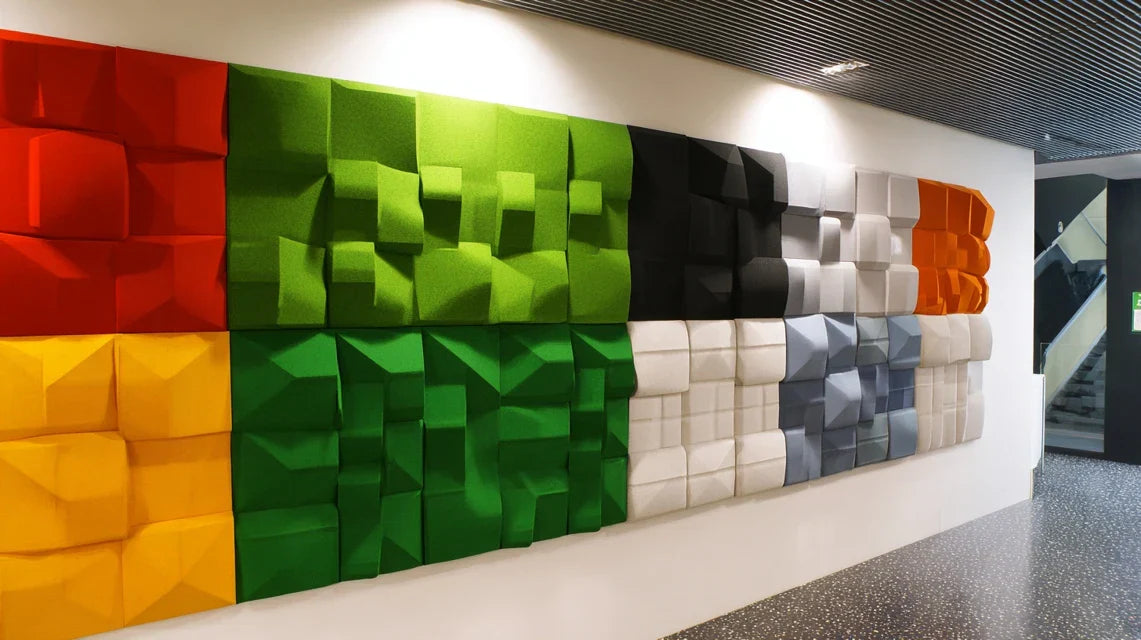
Soften the sound of large spaces with anti-reverberation wall art
By Alexandre MARY
⏱️ Reading time: 8 minutes
You’ve just moved into this magnificent loft with impressive volumes, this contemporary house with cathedral ceilings, or that open space office you'd always dreamed of setting up.
But from the first days, a frustrating reality sets in: every conversation echoes like in an empty cathedral, footsteps clang on the floor, and even the simple clinking of a spoon in a cup creates an unpleasant echo that transforms your haven into a resonating chamber.
You’ve probably already tried installing some rugs, adding thick curtains, or even placing green plants in the hope of absorbing these overpowering reverberations. Unfortunately, these traditional solutions are not enough in large volumes.
It's not your fault, nor a defect of your space. The reality is that large spaces require specific acoustic solutions that classic decoration cannot provide alone.
By the end of this article, you will know exactly how to transform your noisy large space into a harmonious and soothing place thanks to anti-reverberation wall art, without sacrificing the aesthetics or elegance of your decor.
Why the acoustics of your large space deserve immediate attention?
Letting an acoustic problem linger in a large volume is like ignoring a water leak: the longer you wait, the more damage accumulates. Your daily stress increases, your sleep degrades due to amplified noises, and your guests immediately notice the sound discomfort. The analogy with poor thermal insulation is striking: you get used to the problem until you forget how much more pleasant life could be.
🏠 Customer testimonial: Marie, an interior architect, recently confided in us: "In my new 200m² showroom, every client presentation turned into a nightmare. The echoes covered my voice, clients seemed tense, and I lost three contracts before realizing that the problem wasn't my work, but the acoustics of the space."
💬 Conversation with a decor expert
"But I can't possibly stick cork all over my walls! It will completely ruin the aesthetics of my interior..."
I perfectly understand this reluctance! The era of unsightly acoustic solutions is over. Today, acoustic art allows you to combine sound performance and visual refinement. Imagine a work of art that absorbs unwanted sounds while enhancing your decor.
"I've always been told that you have to choose between acoustics and decoration. That real effective solutions are necessarily ugly..."
This belief dates back to the 1980s! Today, high-end anti-reverberation wall art rivals the most beautiful contemporary artworks. Some of our clients don't even realize they are investing in an acoustic solution because the result is so elegant.
The golden rule of decorative acoustics: The earlier you intervene with the right solutions, the more you save on stress and energy. A large space well equipped acoustically immediately transforms the atmosphere, and you feel the difference from day one.
Understanding what's really happening in your space
Do you recognize yourself in these situations: your professional phone calls become difficult due to echoes, your children speak louder and louder to be heard, or your evenings with friends lose their conviviality because everyone unconsciously raises their voice?
What's really happening is that your space suffers from an excess of reflective surfaces. Sound waves bounce off the walls, ceiling, and floor, creating a reverberation phenomenon that transforms every sound into a prolonged echo. The problem isn’t you, but the lack of suitable absorbent materials.
It's like being in an indoor swimming pool: even a whisper becomes deafening because hard surfaces endlessly reflect sounds.
The first hidden cause: the illusion of traditional decoration
Contrary to what many think, multiplying cushions, curtains, and rugs is not enough in a large volume. These elements only absorb high frequencies, letting through low sounds that create this feeling of oppressive sound.
It's exactly like trying to mop up a lake with a towel: the intention is good, but the tool isn’t suited to the scale of the challenge.
This discovery changes everything in your approach: instead of suffering from the acoustics of your space, you can now master it with elegance thanks to solutions specifically designed for large volumes.
🧪 Instant test: Clap your hands in the center of your room. If you hear an echo that lasts more than a second, your space needs a professional acoustic solution.
The second hidden cause: the myth of the size of solutions
Many believe that it takes to cover square meters of walls to get an acoustic result. In reality, effectiveness depends on the quality of the material and its strategic positioning, not the quantity.
It's like lighting: a single well-chosen and well-placed luminaire can transform the atmosphere of an entire room, while ten poorly positioned lamps will create poor lighting.
This understanding frees you from the anxiety of "turning your living room into a recording studio" and opens the way to targeted and elegant solutions.
The third hidden cause: the psychological effect of reverberation
What almost no one consciously notices is that excessive reverberation fatigues the brain. Your auditory system is constantly working to filter out parasitic echoes, creating an unconscious tension.
Observe your energy level at the end of the day in your large space: do you feel more exhausted than in smaller rooms, even without any particular activity?
This auditory fatigue manifests as a decrease in concentration, increased irritability, and a general feeling of discomfort that you may wrongly attribute to stress or fatigue.
The 3 acoustic warning signs:
Progressive volume increase: You naturally speak louder at home than elsewhere, a sign that your ear is compensating for reverberation
Unexplained fatigue: You feel exhausted after spending time in your large space, even when resting
Involuntary avoidance: You instinctively prefer to use smaller spaces to work or relax
The trigger element: ceiling height
The factor that amplifies all these problems is ceiling height combined with floor surface. The greater these two dimensions, the more intense the resonance box effect becomes, creating a real acoustic domino effect. Identify this phenomenon by observing where noises resonate most: generally in the central area, where the volume is maximal.
The universal rule of large spaces: Beyond 40m² with a height greater than 3 meters, natural acoustics are no longer sufficient. Test by mentally counting after clapping your fingers: more than 2 seconds of echo = intervention needed.
❌ Common belief
✅ Acoustic reality
💡 Explanation
🎯 Practical benefit
It takes a lot of material to absorb
Efficiency is more important than quantity
High-performance materials act like selective sponges
Discreet and elegant solution
Acoustics sacrifice aesthetics
Acoustic art enhances decoration
Modern technologies integrate performance and beauty
Double decor and comfort function
Only musicians need acoustics
Every large space benefits from treatment
Auditory comfort improves daily quality of life
Immediate and lasting well-being
Solutions cost a fortune
The investment is quickly amortized
A few strategic pieces are enough for a big impact
Noticeable transformation from the first installation
Rest assured, transforming the acoustics of your large space doesn't require either extensive work or a disproportionate budget. This method is akin to gardening: you first plant the structural elements, then refine the overall harmony. Imagine yourself in six months, savoring the tranquility of your transformed space, where every conversation is clear and every moment of relaxation truly soothing.
🗺️ Overview of the transformation: Three logical steps will lead you from diagnosis to perfect acoustic control. First identify critical areas (immediate satisfaction), then strategically install (noticeable comfort), finally personalize optimization (total harmony).
Step 1: Identify and target resonance zones
Starting with this step is laying the right foundations for your acoustic project. Just as an architect studies the terrain before building, you will map the sonic "hotspots" of your space. This first victory will give you immediate satisfaction: finally understanding why certain places seem particularly noisy!
What you need for analysis
Your smartphone: Use the built-in voice recorder to capture echoes. Download a sound level meter app (free) to measure decibels. The difference with a professional sound level meter? Less precision, but more than enough to identify problematic areas in your home.
A plan of your space: Even a rough sketch will do. The goal is to visualize the sound flows like invisible rivers. Identify reflective surfaces (bare walls, bay windows) that act as acoustic mirrors and amplify reverberations.
A notebook: To record your observations hour by hour. Nuisances vary depending on the time of day: external traffic in the morning, family activities in the afternoon, household appliances in the evening. This temporal mapping will reveal surprising patterns.
Let's move on to exploring your space concretely now
Acoustic diagnostic procedure
Strategic clapping test: Stand in the center of each area and clap your hands once, energetically. Listen carefully to the echo that follows: its duration indicates the level of reverberation, its tone reveals which frequencies are problematic. Metallic echoes signal an excess of hard surfaces.
⏱️ Time: 15 minutes | ✅ Successful when: You identify 2-3 areas where the echo exceeds 2 seconds | ⚠️ Attention: Don't test near walls (false positives) but in the center of volumes
Sound flow mapping: Ask someone to speak normally from different points while you move around. Note where the voice becomes confused, where words overlap. These areas of "acoustic blur" reveal the paths that sound waves take in your space.
⏱️ Time: 20 minutes | ✅ Successful when: Your plan clearly indicates areas of clarity and confusion | ⚠️ Attention: Vary positions - standing, sitting, near windows
Frequency testing through simulation: Play different types of sounds from your phone: deep male voice, high female voice, classical music, dishwashing noises. Each frequency reveals a different aspect of the acoustic behavior. Bass frequencies expose deep resonances, highs reveal excessive "brightness".
⏱️ Time: 10 minutes per area | ✅ Successful when: You can distinguish which frequencies cause the most problems | ⚠️ Attention: Moderate volume to avoid saturating your perception
🎯 Validation of step: Your diagnosis is complete when you can explain to a friend where voices resonate in your space and why. If some areas remain mysterious, repeat the analysis at different times of the day. This understanding will be your compass for what follows!
OUR RECOMMENDED PRODUCTS
Step 2: Choosing and positioning your first acoustic panels
Now that you know your space, you are moving to the next level: concrete action. This step is particularly rewarding because the results are immediate. As soon as you install your first anti-reverberation panel, you will literally hear the difference. The snowball effect begins: a calmed area positively influences adjacent areas.
Characteristics of high-performance acoustic panels
High-density absorbent core: Look for open-cell materials (professional acoustic foam or natural fibers) at least 3cm thick. These materials act as labyrinths that trap sound waves. Avoid thin decorative foams which offer only a placebo effect for acoustics.
Acoustically transparent textile coating: The fabric must allow sounds to pass through while protecting the absorbent core. Check for the "acoustically transparent" mention - a fabric too tight blocks important frequencies. The beauty of the fabric should never compromise acoustic performance.
Optimal dimensions for large spaces: Favor formats of 60x80cm minimum. In acoustics, size matters: a panel that is too small in a large volume is like a bandage on an open wound. The visual and acoustic impact grows exponentially with the surface area.
Optimized strategic installation
Positioning in primary reflection zones: Install your artworks facing the main sound sources (conversation area, television, workspace). The goal is to intercept the waves before they bounce back. Imagine sounds as tennis balls: you place your "acoustic nets" on their natural trajectory.
⏱️ Time: 45 minutes per artwork | ✅ Success when: The clapping test reveals a noticeable echo reduction | ⚠️ Attention: Avoid perfect centering - offset slightly to avoid perfect symmetries
Acoustically efficient hanging height: Position the center of the artwork at 1.50m from the floor, not too high (loss of effectiveness on voices), nor too low (interference with furniture). This height corresponds to the average level of human sound sources and optimizes the absorption of conversational frequencies.
⏱️ Time: 20 minutes per artwork | ✅ Success when: The artwork visually "dialogues" with your furniture | ⚠️ Attention: Check horizontality with a level - a tilted artwork attracts the eye negatively
🔍 Efficiency check: Repeat your initial test in the equipped area. The improvement should be immediately audible: clearer voices, attenuated echoes, a feeling of space more "muted". If the effect remains imperceptible, check the orientation and adjust the location. Patience: the ear quickly gets used to comfort!
Step 3: Harmonize the whole and optimize details
You are now reaching the level of mastery that makes the difference between basic acoustic correction and true expertise in art acoustics. At this stage, you no longer suffer from the acoustics of your space: you direct it with finesse. The final result? A large space where a perfect sound balance reigns, worthy of the most beautiful luxury hotels or prestigious cultural spaces.
Advanced harmonization elements
Complementary format artworks: Integrate different sizes to create a visual rhythm while optimizing absorption. Small formats (40x50cm) treat acoustic details, large formats (80x120cm) manage volumes. This diversity avoids the "repetitive" effect while enriching overall performance.
Calculated asymmetrical positions: Controlled asymmetry avoids parasitic resonances. Two perfectly symmetrical artworks can create unpleasant acoustic "beats". Slightly offset heights and locations for a more natural and homogeneous sound diffusion.
Acoustic diffusion elements: Integrate some objects with irregular surfaces (sculptures, open bookcases) that disperse residual waves. These "irregularity breakers" complement the action of absorbers by preventing the formation of standing waves.
Precision acoustic optimization
Natural conversation test: Organize a normal discussion with several people in your equipped space. Observe if the voices remain distinct even when multiple people speak simultaneously. The goal: no listening effort, even in complex situations. Successful acoustics is noticeable by what you no longer hear: parasitic echoes.
⏱️ Time: 30-minute test | ✅ Successful when: Fluid conversation without raising your voice | ⚠️ Attention: Test at different times to validate consistency
Calibration of activity zones: Fine-tune according to the use of each zone. A workspace requires more absorption than a reading corner. Slightly move your paintings or add occasional items to personalize the acoustics of each function. Every square meter should perfectly serve its purpose.
⏱️ Time: Adjustments over several days | ✅ Successful when: Each activity finds its optimal acoustic comfort | ⚠️ Attention: Gradual changes to appreciate each improvement
🏆 Mastery validation: Your space is acoustically successful when your guests spontaneously comment on the "calm" and "serenity" that emanate from it, without consciously identifying the cause. Acoustic excellence is felt intuitively: immediate well-being, natural conversations, reduced fatigue at the end of the day.
Gradual progression rule: Evolve in stages - install, let your ear get used to it (minimum 48 hours), then evaluate before adding. The goal is never to completely eliminate reverberation but to bring it to a natural and comfortable level. Too much absorption would kill the "life" of your space.
Congratulations! You now master the subtleties of decorative acoustics. This expertise gives you a considerable advantage: you can create custom sound atmospheres, adapt the acoustics to the seasons (more muffled in winter, more lively in summer), and even advise your friends on these delicate issues.
🎓 Little-known expert tip: Slightly vary the inclination of your paintings (2-3° downwards) to optimize sound dispersion. This technique, used in concert halls, enriches the spatialization of sound and avoids direct reflections. The effect is subtle but remarkable for sensitive ears.
💭 Frequent question from our readers
"I'm still hesitating... What if the result doesn't suit me? I'm afraid of ending up with 'dead' walls that kill the atmosphere of my space..."
This concern is perfectly legitimate! Acoustics are like perfect lighting: you only notice it when it's not right. A successful installation preserves the "sonic personality" of your space while eliminating discomforts. Start with a single artwork in the most problematic area: you will immediately see that the improvement does not sacrifice atmosphere, but reveals it! The real transformation is rediscovering the pleasure of living in your space.
🧪 Risk-free test: Temporarily install a painting with removable adhesive. Live with it for a week, then remove it one evening. The contrast will be striking: you'll rediscover how much the echo disturbed your daily comfort.
Pitfalls to avoid at all costs
Before you start, allow me to warn you about some common mistakes that could compromise your results. These pitfalls are normal and predictable, but perfectly avoidable when you know them in advance.
⚠️ The "all at once" impatience: It's tempting to want to equip the entire space simultaneously for a spectacular result. Consequence: over-absorption that turns your space into an uncomfortable "soundproof room". Proceed zone by zone, let your ear validate each step. This is the most common mistake among enthusiastic beginners.
🎯 The trap of perfect symmetry: Arranging paintings in a perfectly symmetrical way seems logical and aesthetic. In reality, this regularity creates "acoustic corridors" that amplify certain frequencies. Slightly offset heights and positions - the eye accepts it, your ear will thank you.
💰 Saving on absorption quality: Choosing "decorative" paintings with symbolic absorption for budget reasons. Result: total disappointment and a final doubled budget to buy the right solutions. It's better to have one true acoustic painting than three decorative imitations.
📐 The installation height error: Hanging too high (to "free up" space) or too low (for ease of installation). Sound waves travel at human height - respect this natural logic for optimal effectiveness.
🔄 Forgetting seasonal evolution: Failing to remember that acoustics change with furniture, winter textiles, opening windows. Allow for minor adjustments according to the seasons - your acoustic comfort must adapt to your evolving lifestyle.
🛡️ Anti-error verification system: Before each installation, test the location with a thick cushion held temporarily. Perform your clap test to preview the effect. Validate the visual harmony with the rest of the decor. Check that access for maintenance remains possible. These four points will avoid 90% of regrets.
Because you took the time to inform yourself, enjoy 10% discount on your first order :
ART10
⏰ Valid 72h after reading • Applicable on all our products
🙋♀️ Your practical questions about anti-reverberation wall art
🕐 How long does it take to feel a real acoustic difference, and what budget should you consider to get started?
The improvement is immediate with the first well-positioned wall art! For a 40m² living room, count on 3-4 wall arts (budget €800-€1200) for a noticeable transformation. Optimize by starting with the main area (sofa/TV) with 2 wall arts: guaranteed effect for €400-€600. The investment is felt from the first evening in listening comfort.
🔧 Does installation require specific skills or specialized tools?
Absolutely not! If you know how to hang a classic picture, you already master the technique. The only difference is to check that your fixings support the weight (usually 3-5kg). Use fixings suitable for your wall type. Allow 20 minutes per wall art, level and pencil are sufficient. The trickiest part is choosing the location, not hanging it.
🎨 How to visually harmonize several acoustic wall arts without creating an "overloaded" effect?
The key lies in color consistency rather than perfect uniformity. Choose a palette of 2-3 colors maximum, vary the formats (large/medium/small) and slightly offset the heights. The eye perceives overall harmony without monotony. Inspiration: look at contemporary art galleries - controlled diversity and visual breathing space.
🏠 Can good results be achieved in a space with a very high ceiling (4-5 meters)?
Yes, but the strategy differs slightly. Favor larger wall arts (minimum 80x120cm) and increase their number. In very high volumes, add diffusion elements at the intermediate level (shelves, textile suspensions). The goal: create multiple "acoustic horizons" to avoid a cathedral effect. Spectacular result guaranteed with the right approach!
🔄 Does acoustic efficiency decrease over time? What maintenance is required?
Quality materials retain their acoustic properties for decades. Maintenance is limited to occasional dusting (vacuum cleaner on low power or dry cloth). Avoid wet products that could alter the absorbent core. Durability is a major advantage: one-time investment for lasting comfort, unlike temporary solutions.
Your acoustic transformation: from echo to well-being
Imagine yourself in three months, enjoying the newfound calm of your spacious home. Your conversations flow naturally without strained listening, your moments of relaxation are truly restful, and your guests immediately notice the serene atmosphere that reigns in your home. This transformation goes beyond acoustics: it's a new relationship with your living space, more harmonious and restorative.
Beyond the immediate sound comfort, you have developed an acoustic sensitivity that will serve you in all your future interior design projects. This fine understanding of sonic atmospheres enriches your decorative culture and positions you as a knowledgeable connoisseur among your peers. Your expertise becomes a valuable asset for creating truly livable spaces.
Now that you understand the mechanisms and master the method, all that remains is to take action. Start by identifying your priority area and visualize the first artwork that will transform your daily life. Each day of waiting is a day less of comfort - and your well-being is priceless.
🚀 Your new acoustic chapter begins now: You have all the tools to succeed in this transformation. Perfect acoustics are no longer an inaccessible luxury, but a reality within reach. Treat yourself to the pleasure of rediscovering your space in a new light!
📚 To deepen your acoustic knowledge
Explore our other guides on decorative acoustics, solutions by type of space, and the latest innovations in sound art. Become a true expert in acoustic design!